Note: The response time and overall functioning speed of data import are determined by your computer's processor, not by Swipe or Tally software.
Step 1: Go to Settings
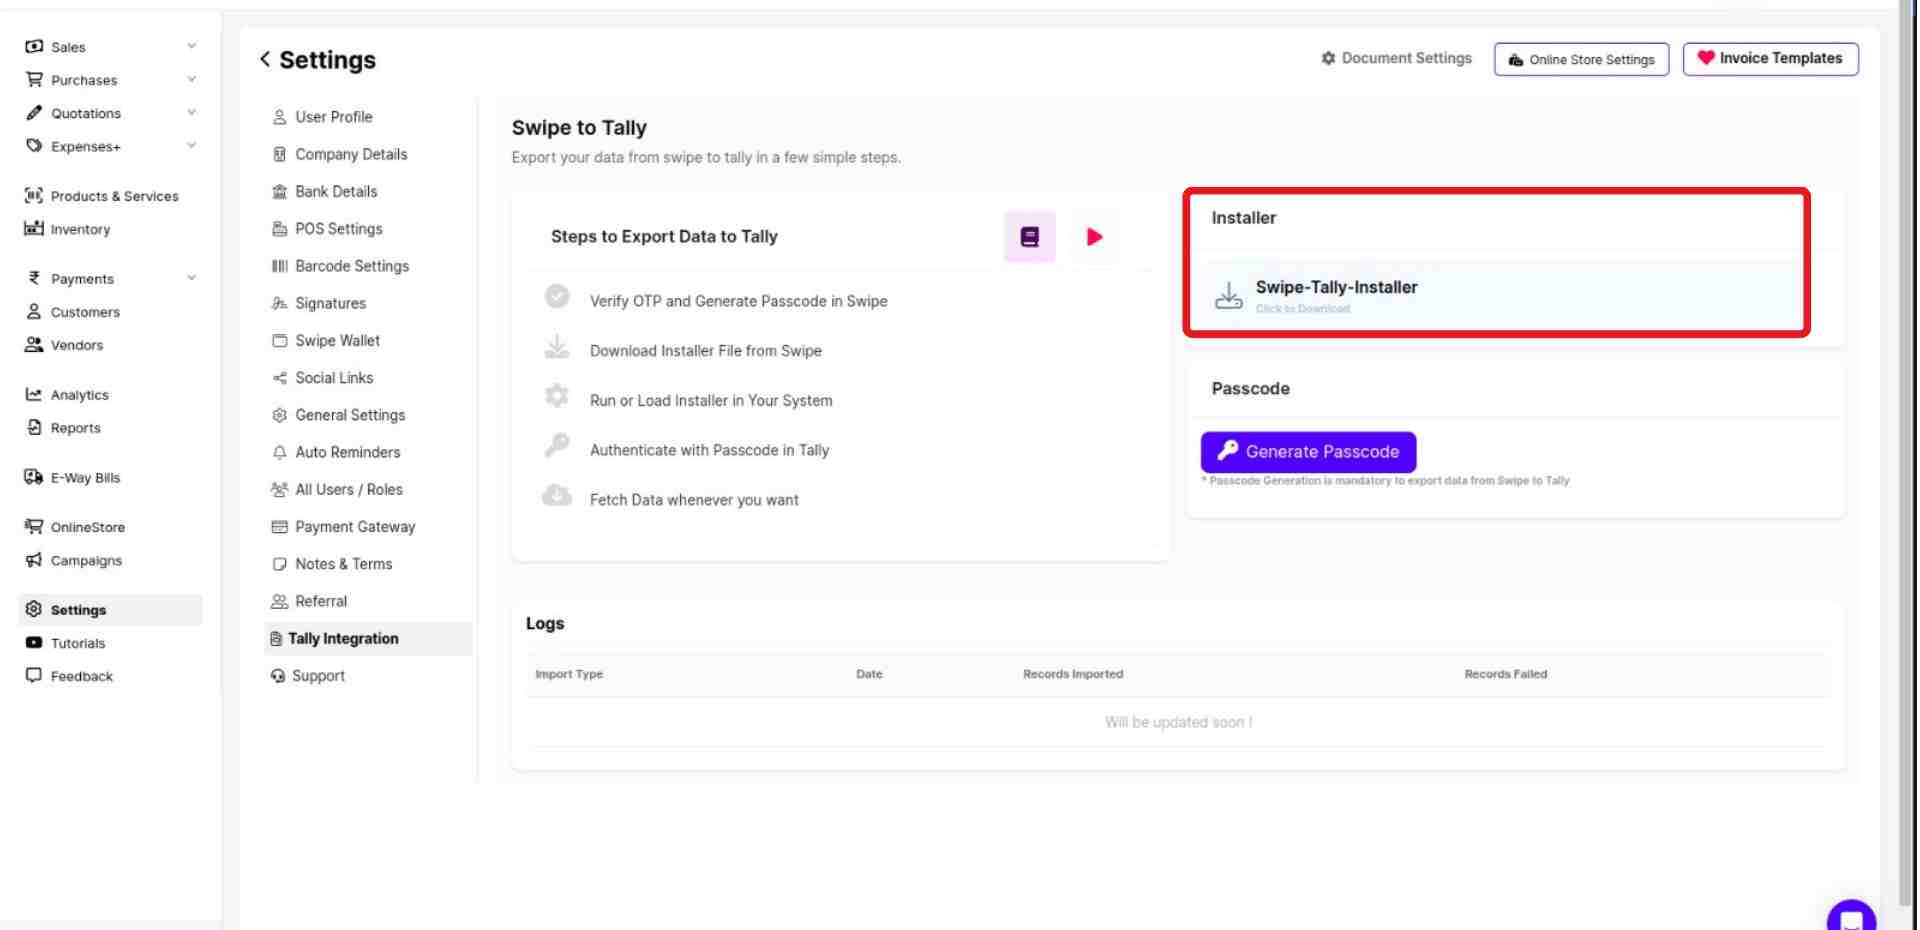
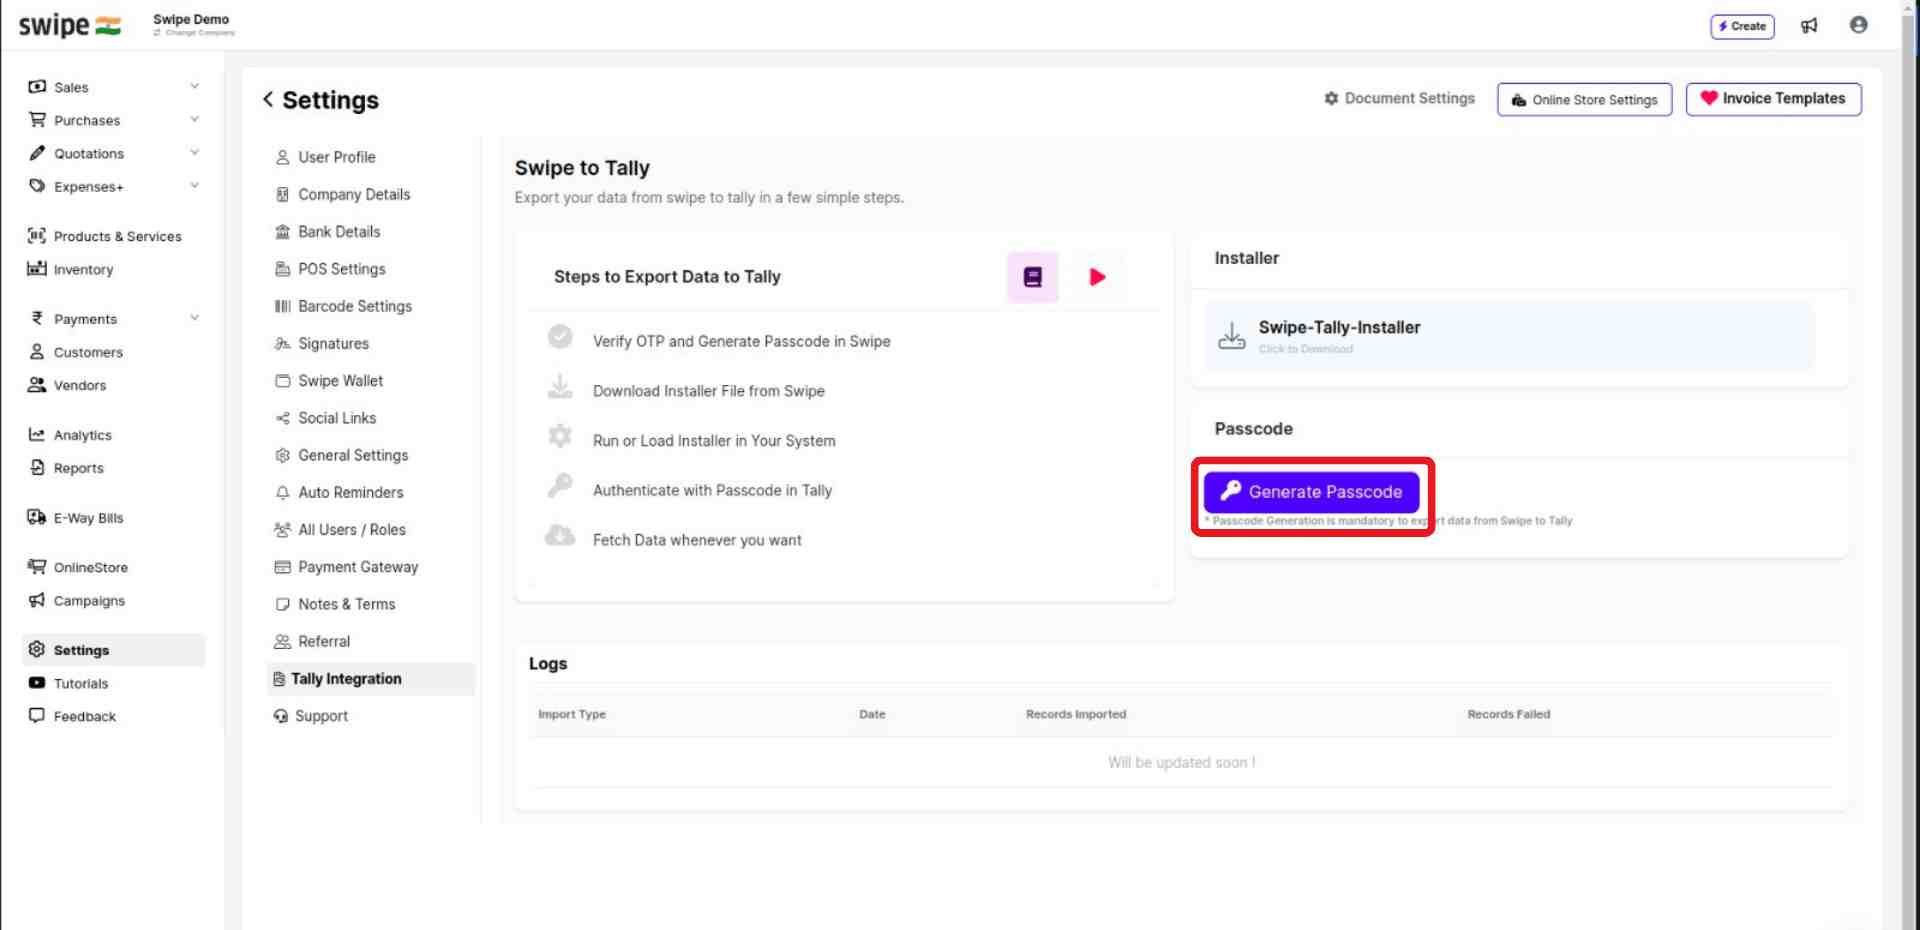
Click on the “Settings” icon on the left dashboard and select the “Tally integration” option from the menu.
Step 2: Get Started
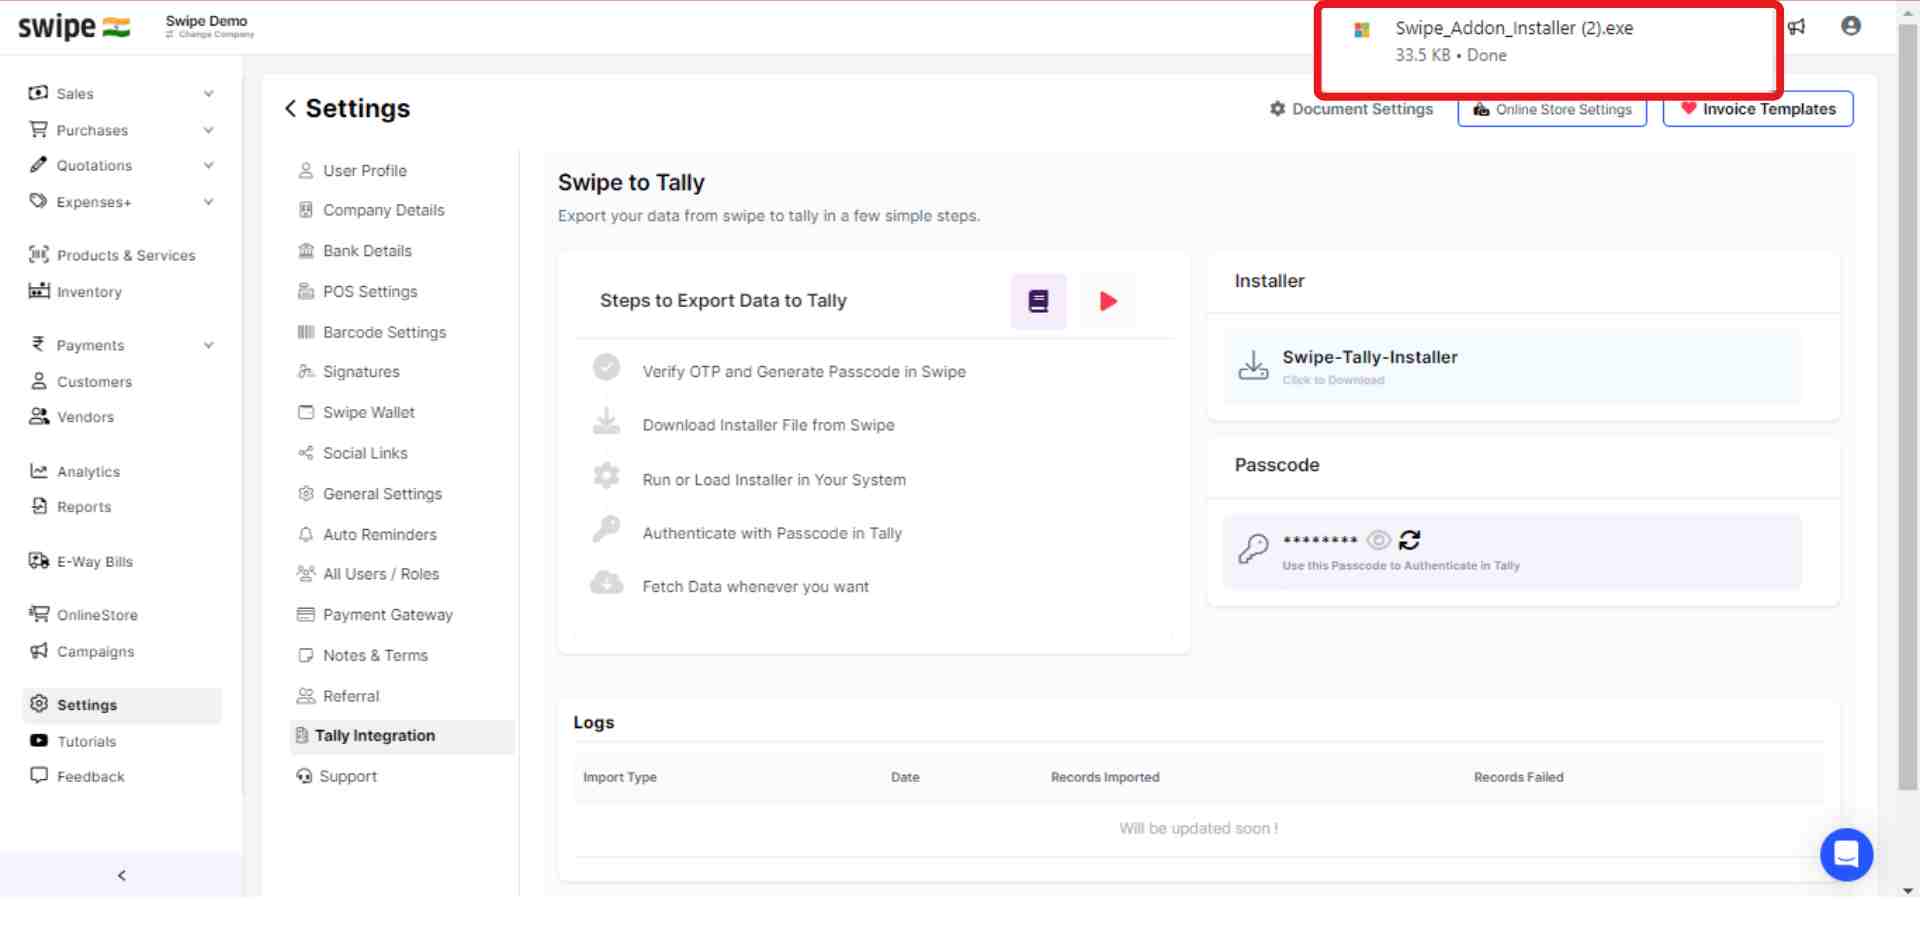
Download the "Swipe-Tally-Installer" present under the Installer section.
Once downloaded, open the file.
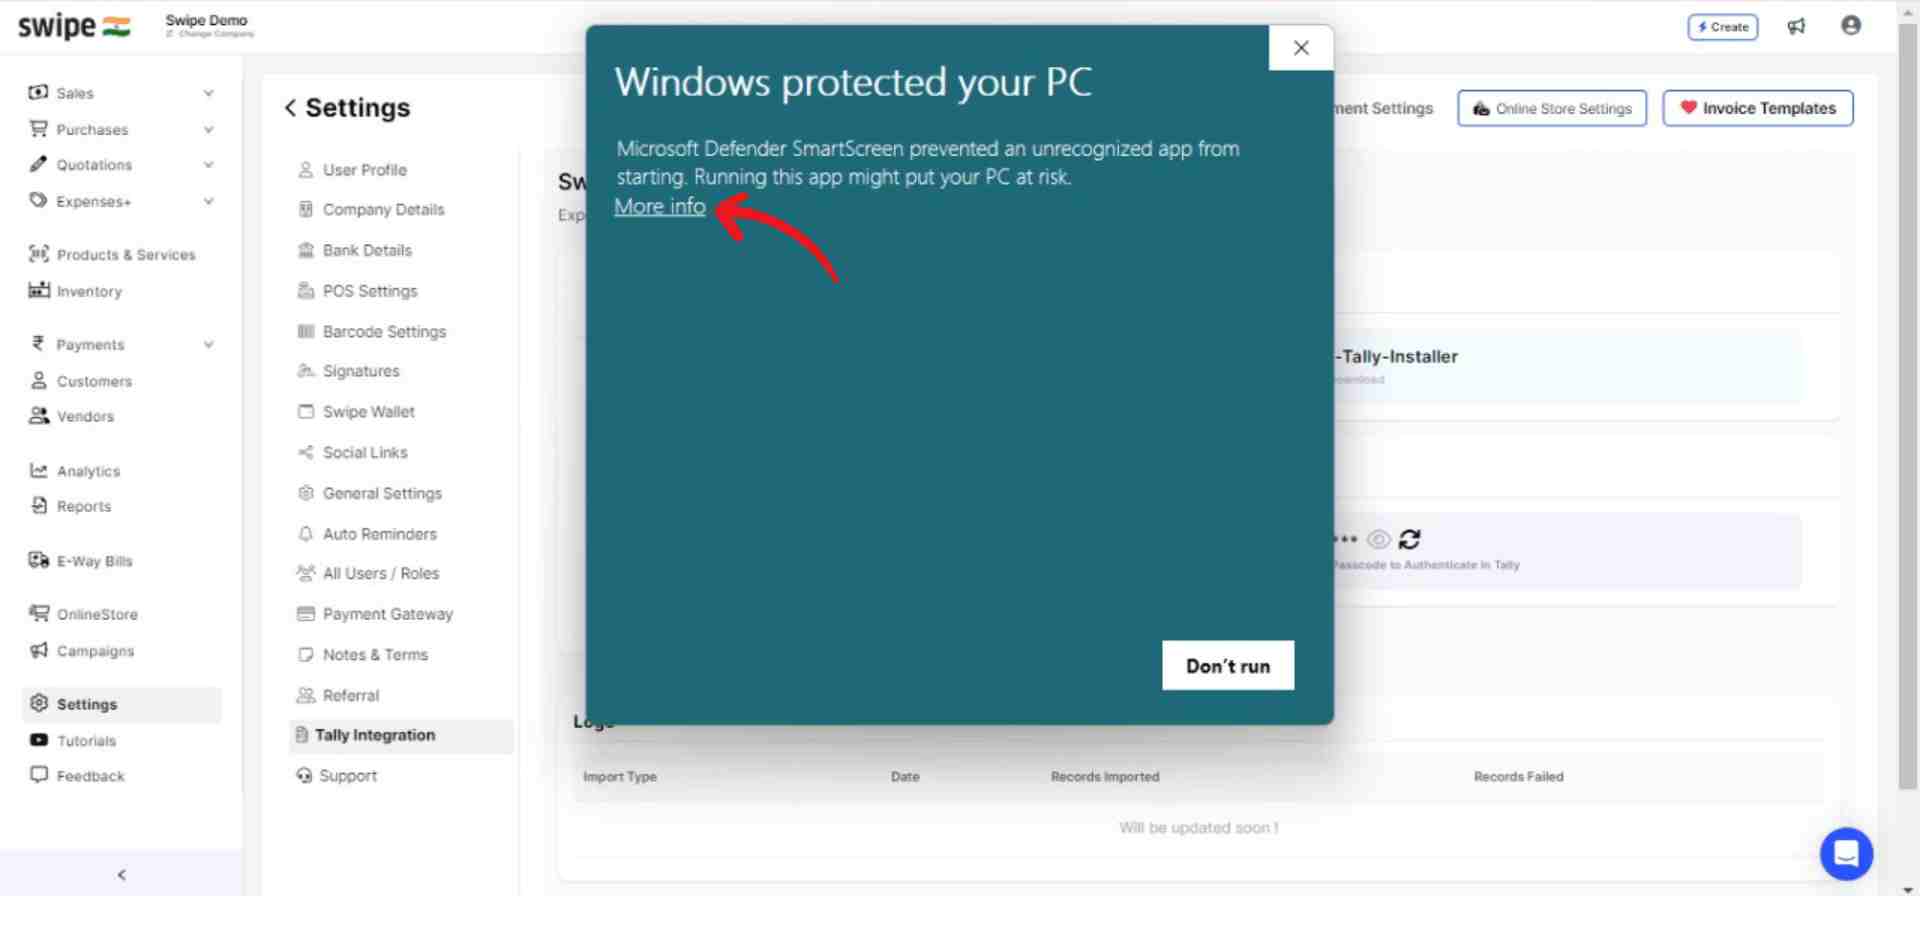
Step 3: Run the Swipe-Tally-Installer
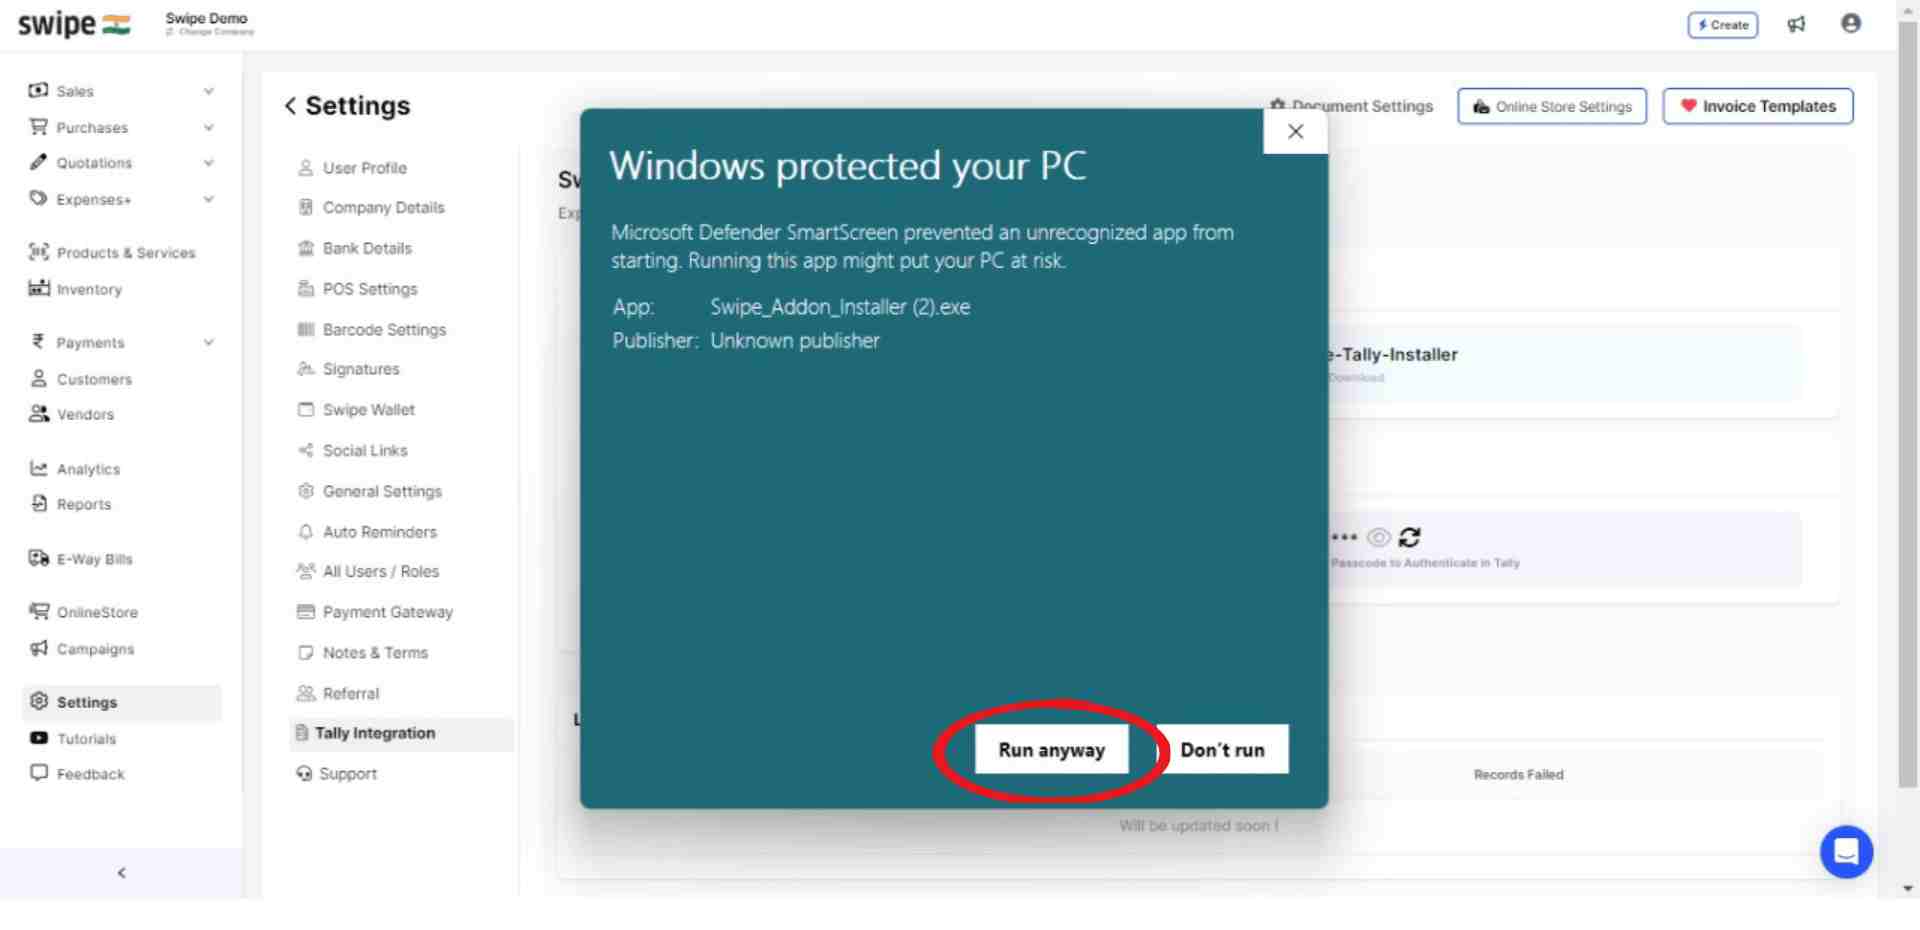
If Microsoft Defender shows up, select "More Info," then choose the "Run anyway" option at the bottom of the pop-up.
Another pop-up will appear. Here, confirm your action by clicking "Yes".
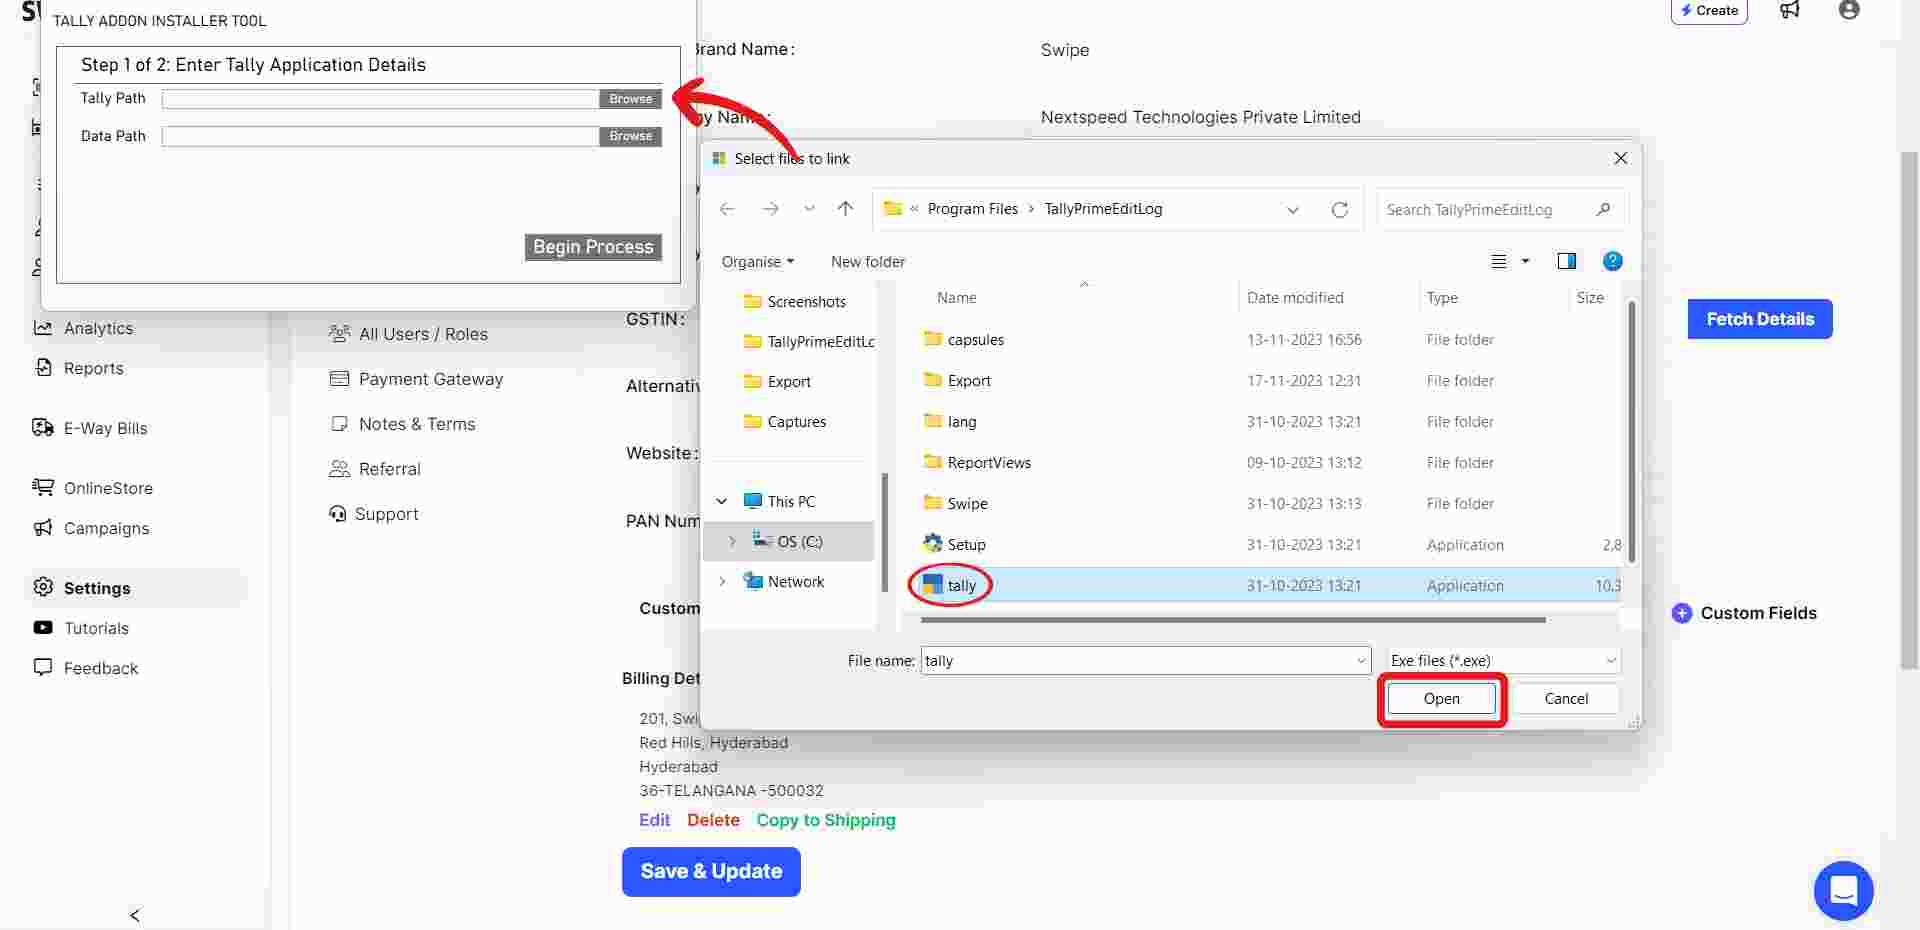
Step 4: Enter tally application details
Click on "Browse" next to Tally Path; your file explorer will open. Here, locate and select the Tally file on your device, then click "Open."
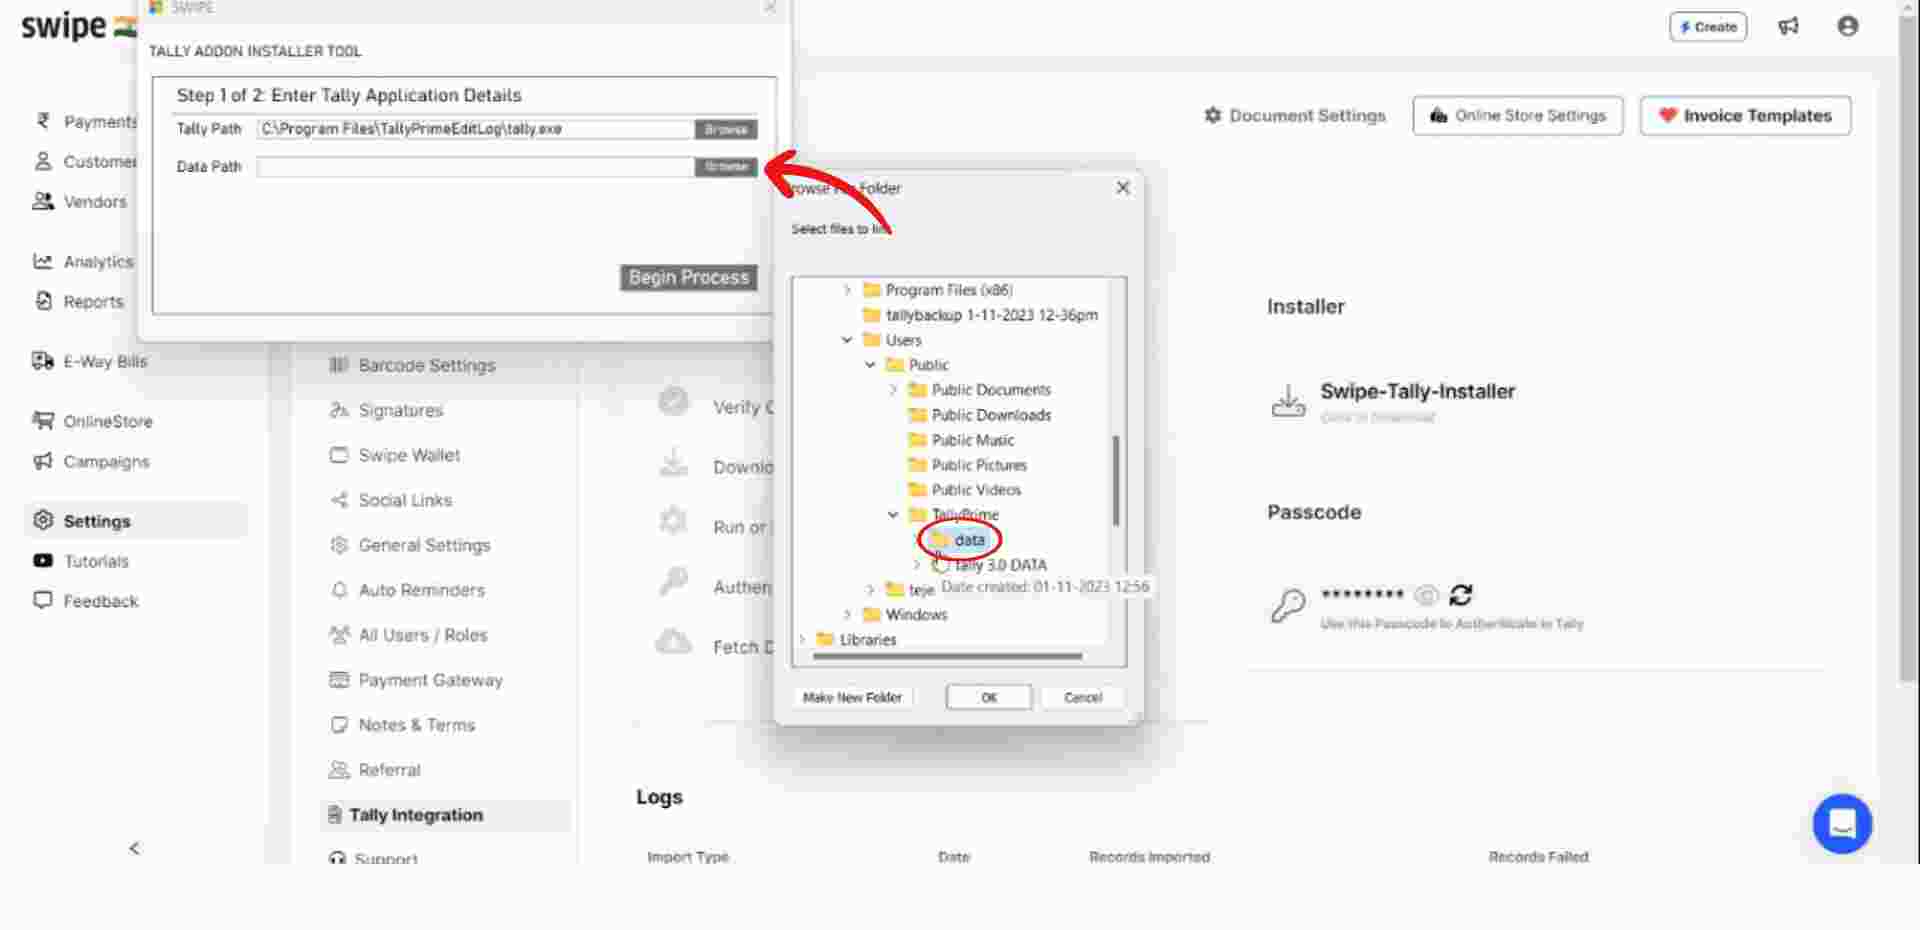
Next, click "Browse" next to Data Path; your file explorer will open again. Select the "Data" file under Tally Prime, click on it,
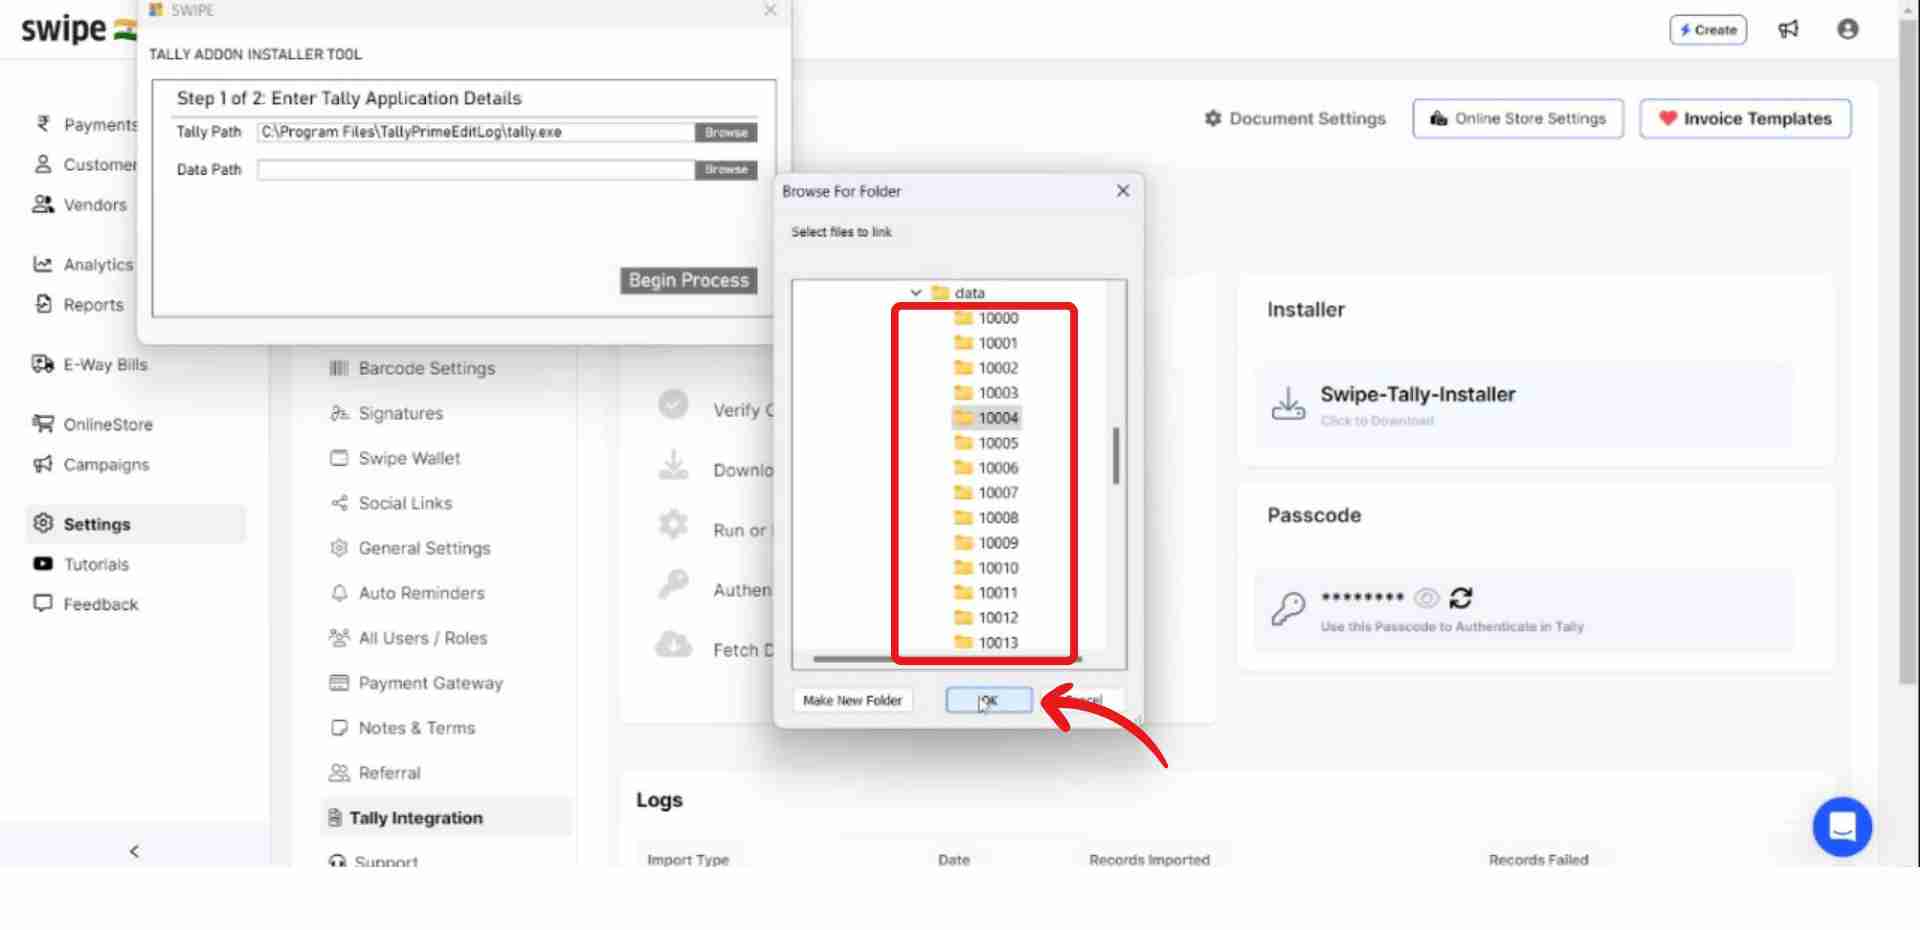
Now, choose the company code with which you want to link Swipe from the list.
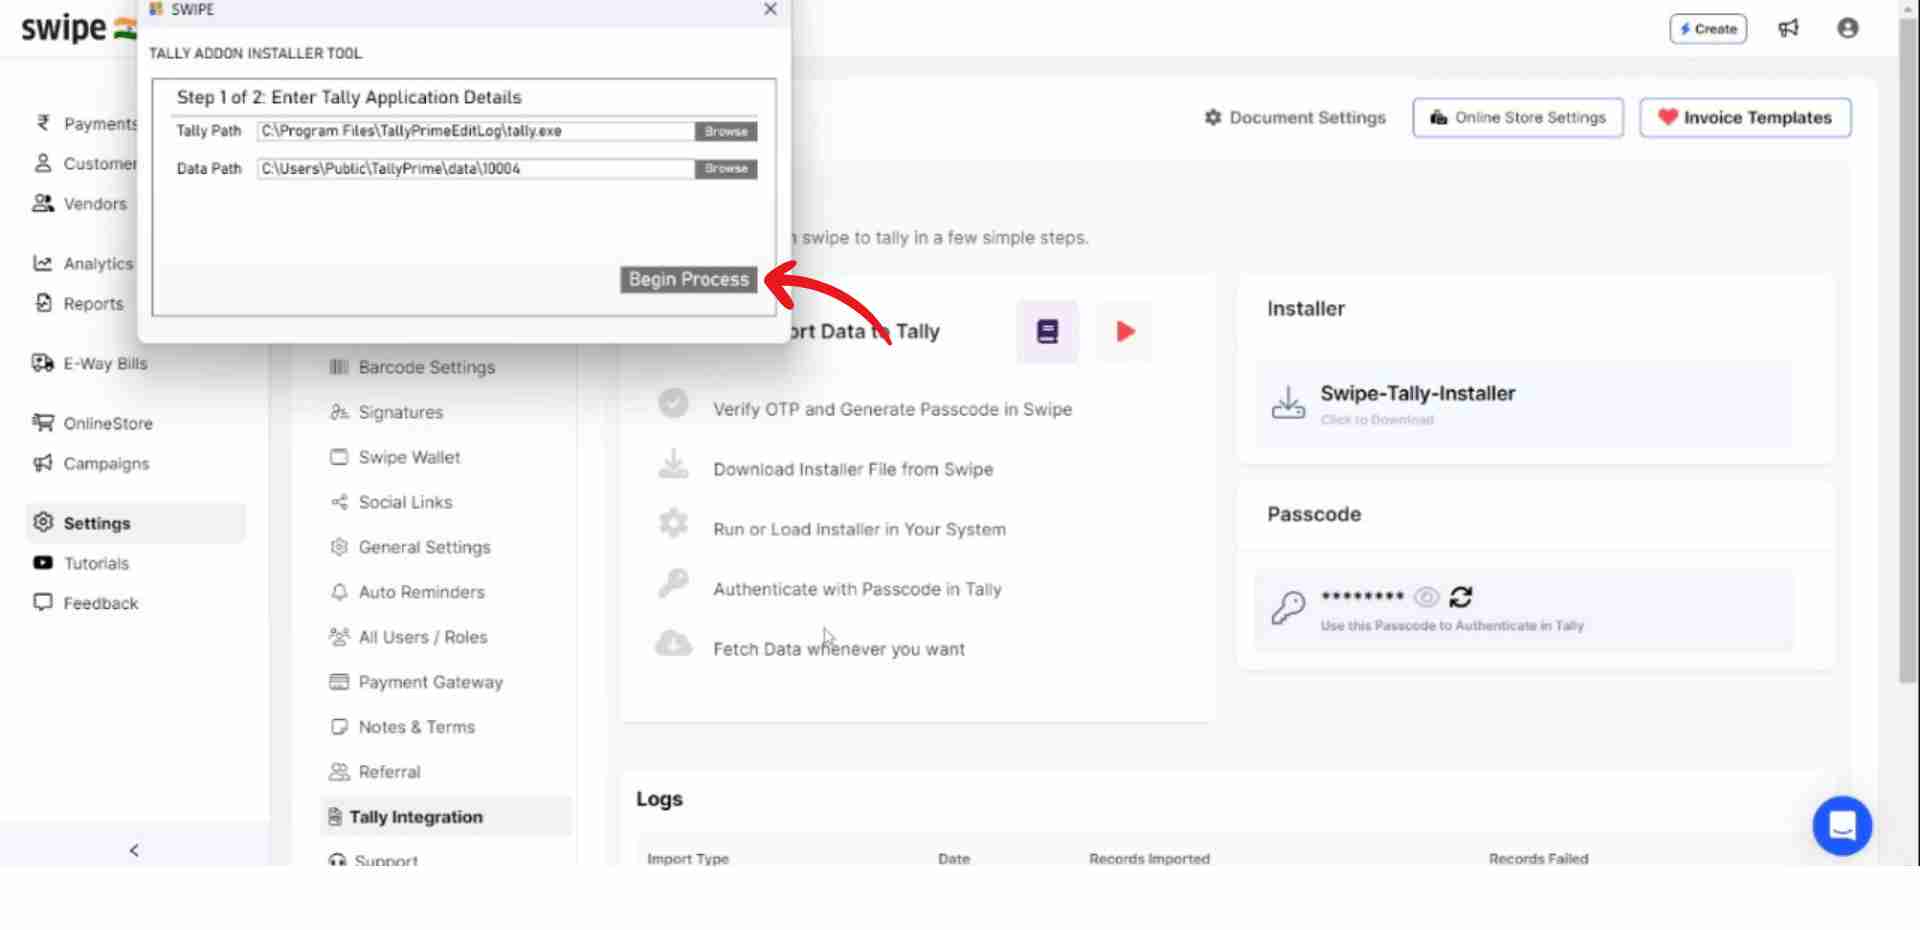
Finally, click "Begin Process" from the initial pop-up to open the tally.
Step 5: Go to Tally
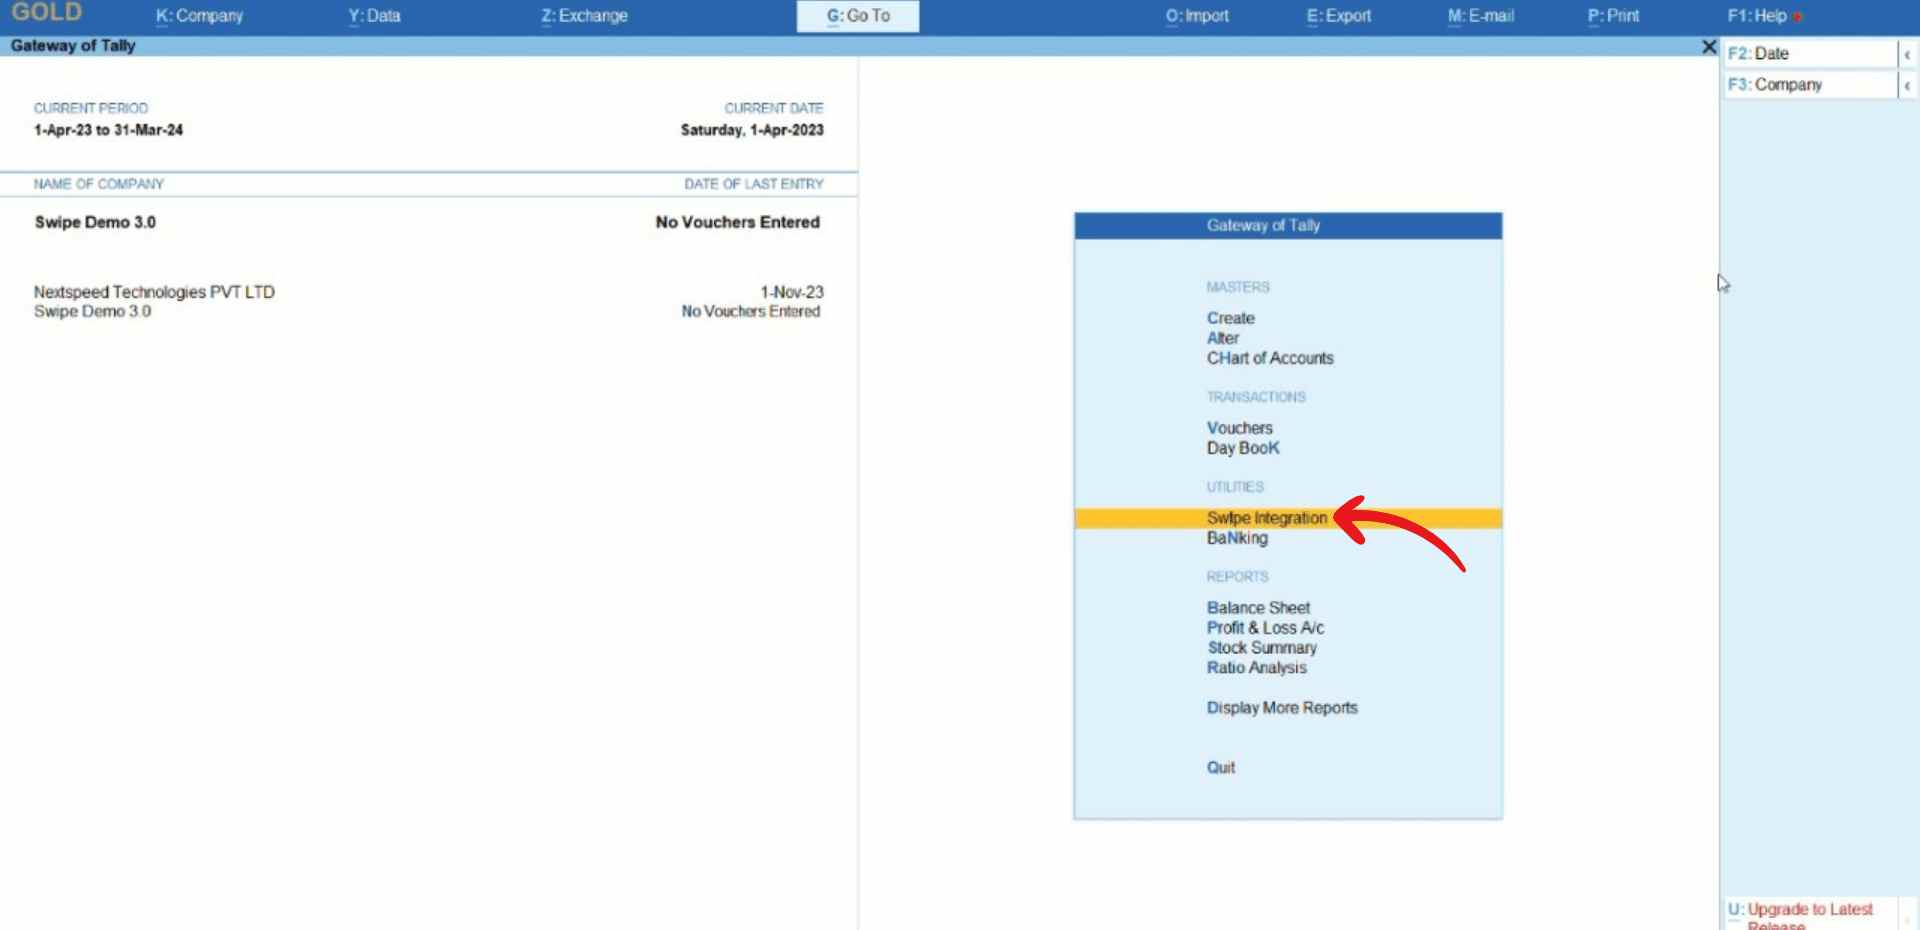
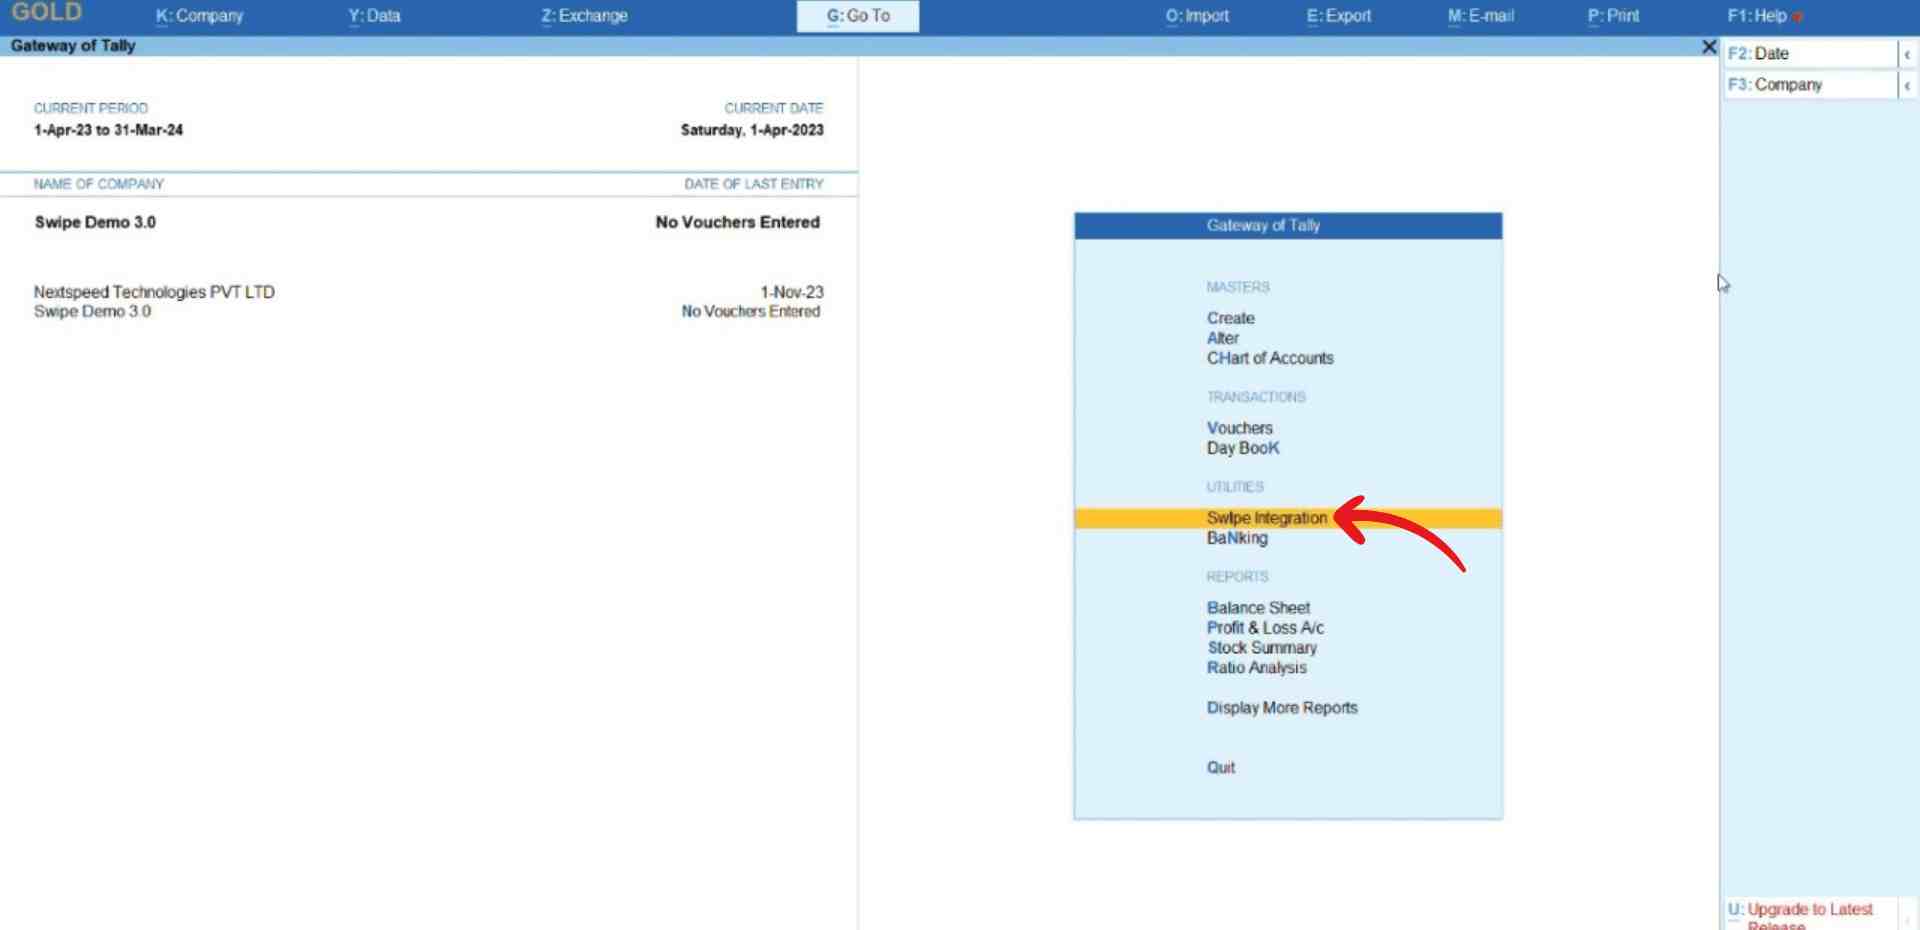
Now, click on "Swipe Integration" which is under the Utilities section of “Gateway of Tally”.
Step 6: Connect with Swipe
Now, on swipe, click on generate passcode and copy the generated passcode.
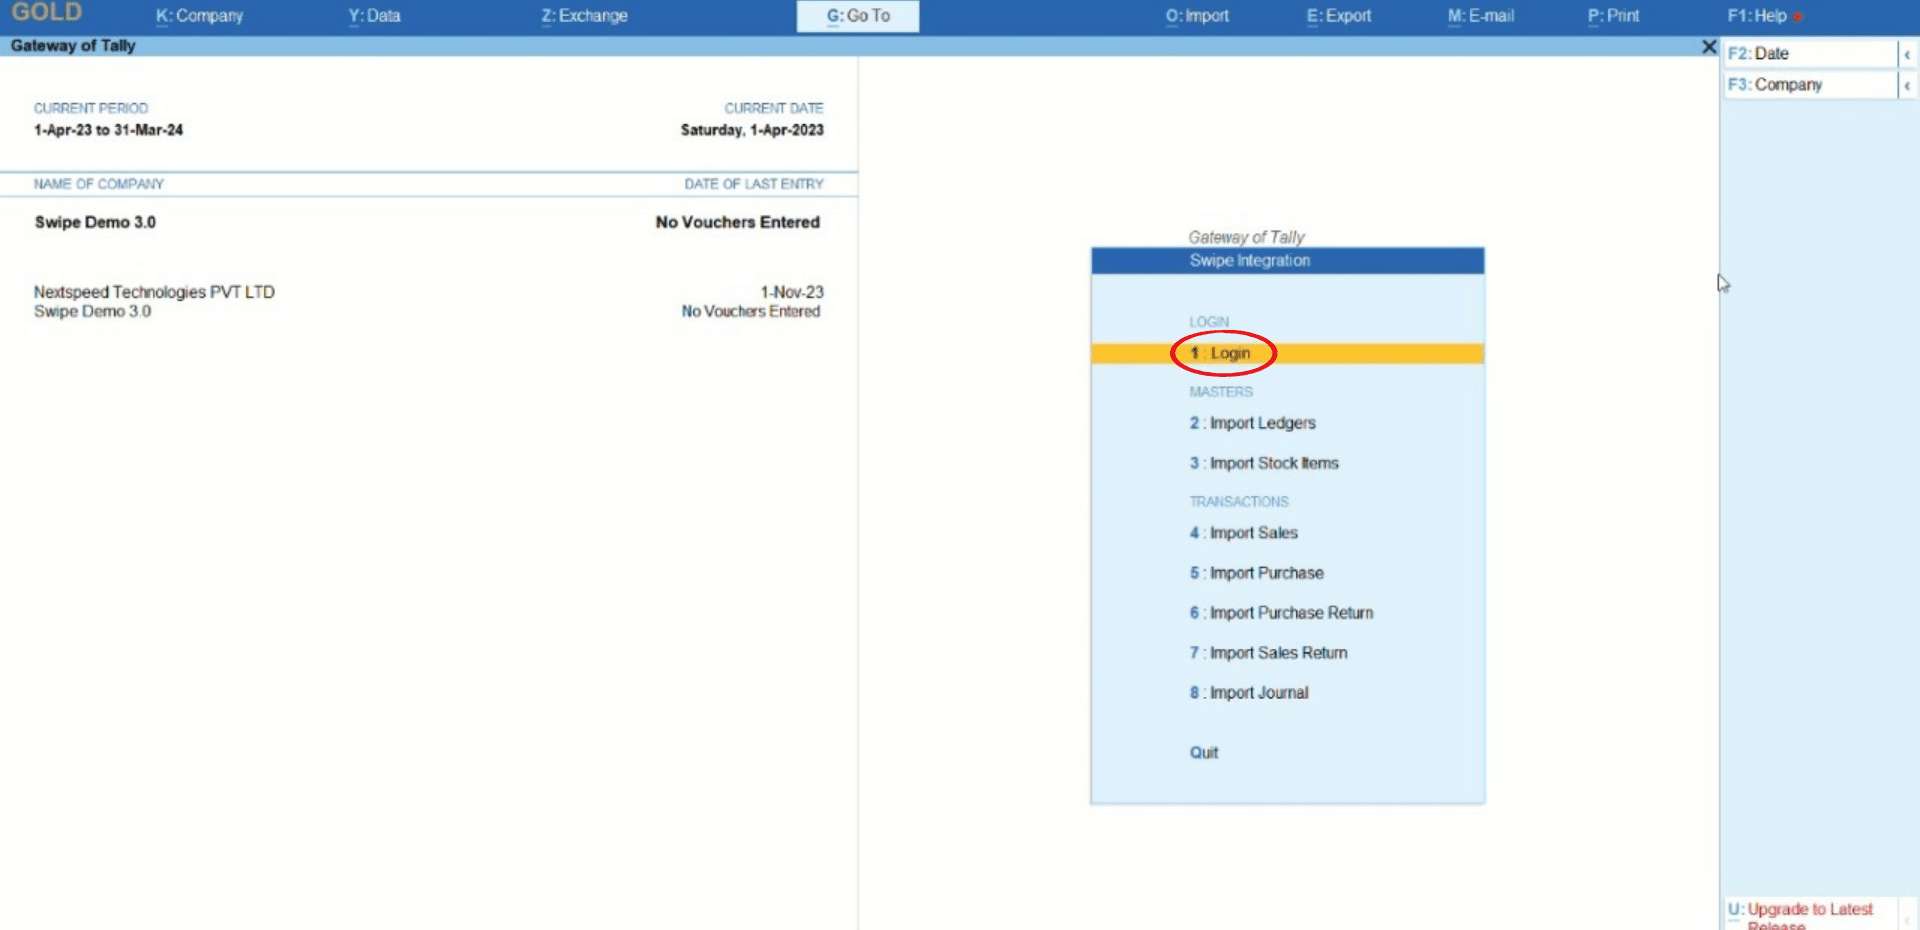
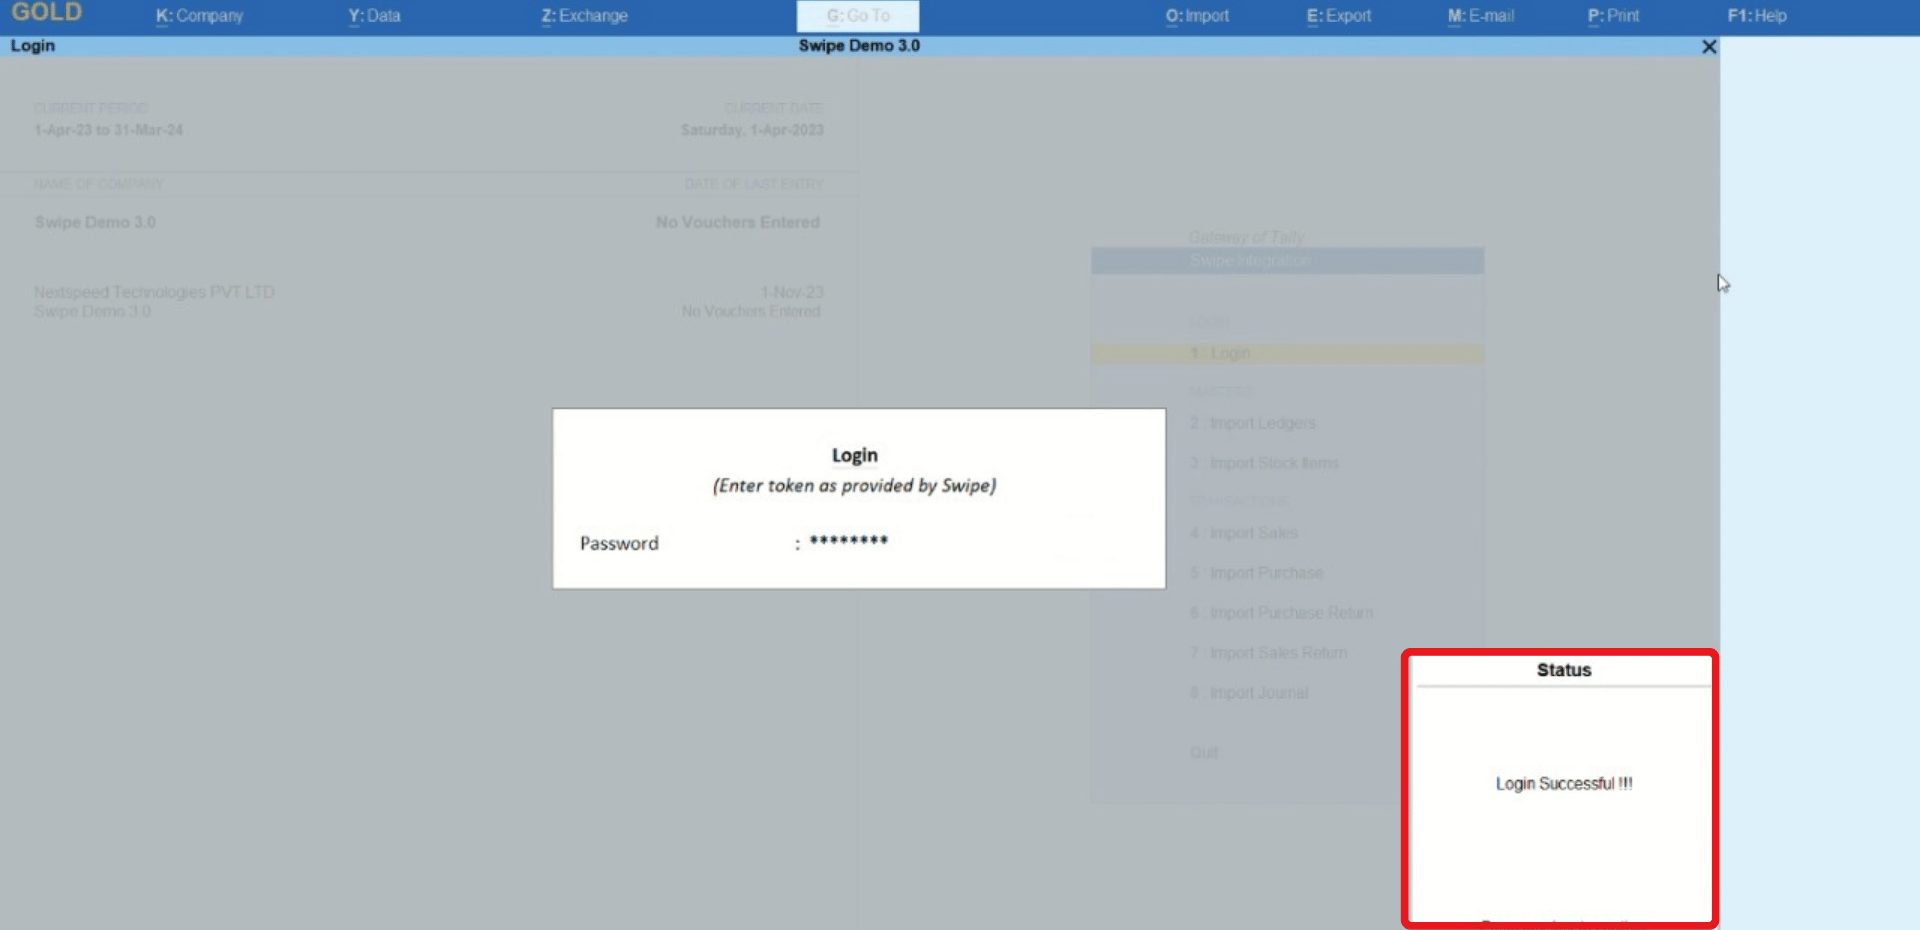
Head back to Tally. Here, a new page will appear. Here, go to the login section and click on it.
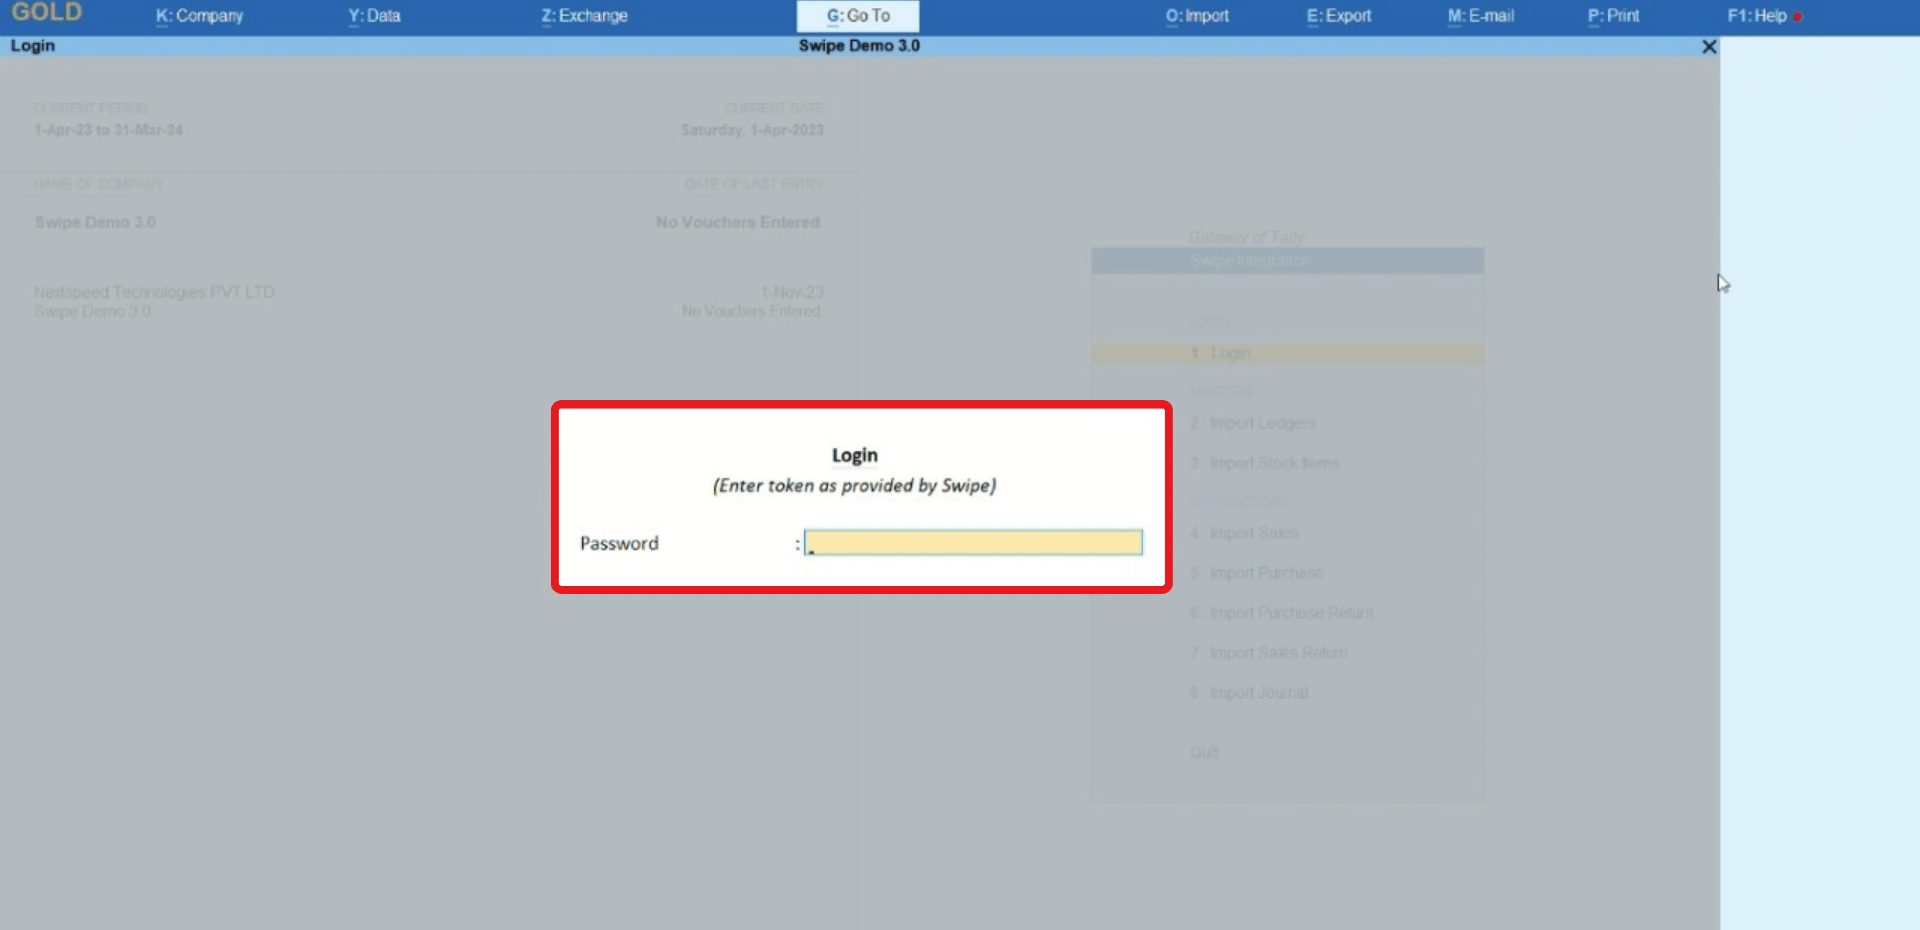
A pop-up appears asking for the credentials. Now enter the passcode generated from Swipe.
Note: The passcode expires in 2 hours if not used to log in. In that case, please go back to Swipe and generate a new passcode.
Step 7: confirm the login
Confirm the login credentials by selecting yes from the pop-up.
Congratulations, You have successfully linked your Swipe account to your Tally account, a pop-up appears at the bottom of the screen informing the same.
Press any key to go back to the “Gateway of Tally” page.
How to import customer's and vendor’s data to tally from Swipe
Note: The response time and overall functioning speed of data import are determined by your computer's processor, not by Swipe or Tally software. In Tally software, customers and vendors are collectively referred to as “Ledgers”.
Step 1: Go to Swipe Integration.
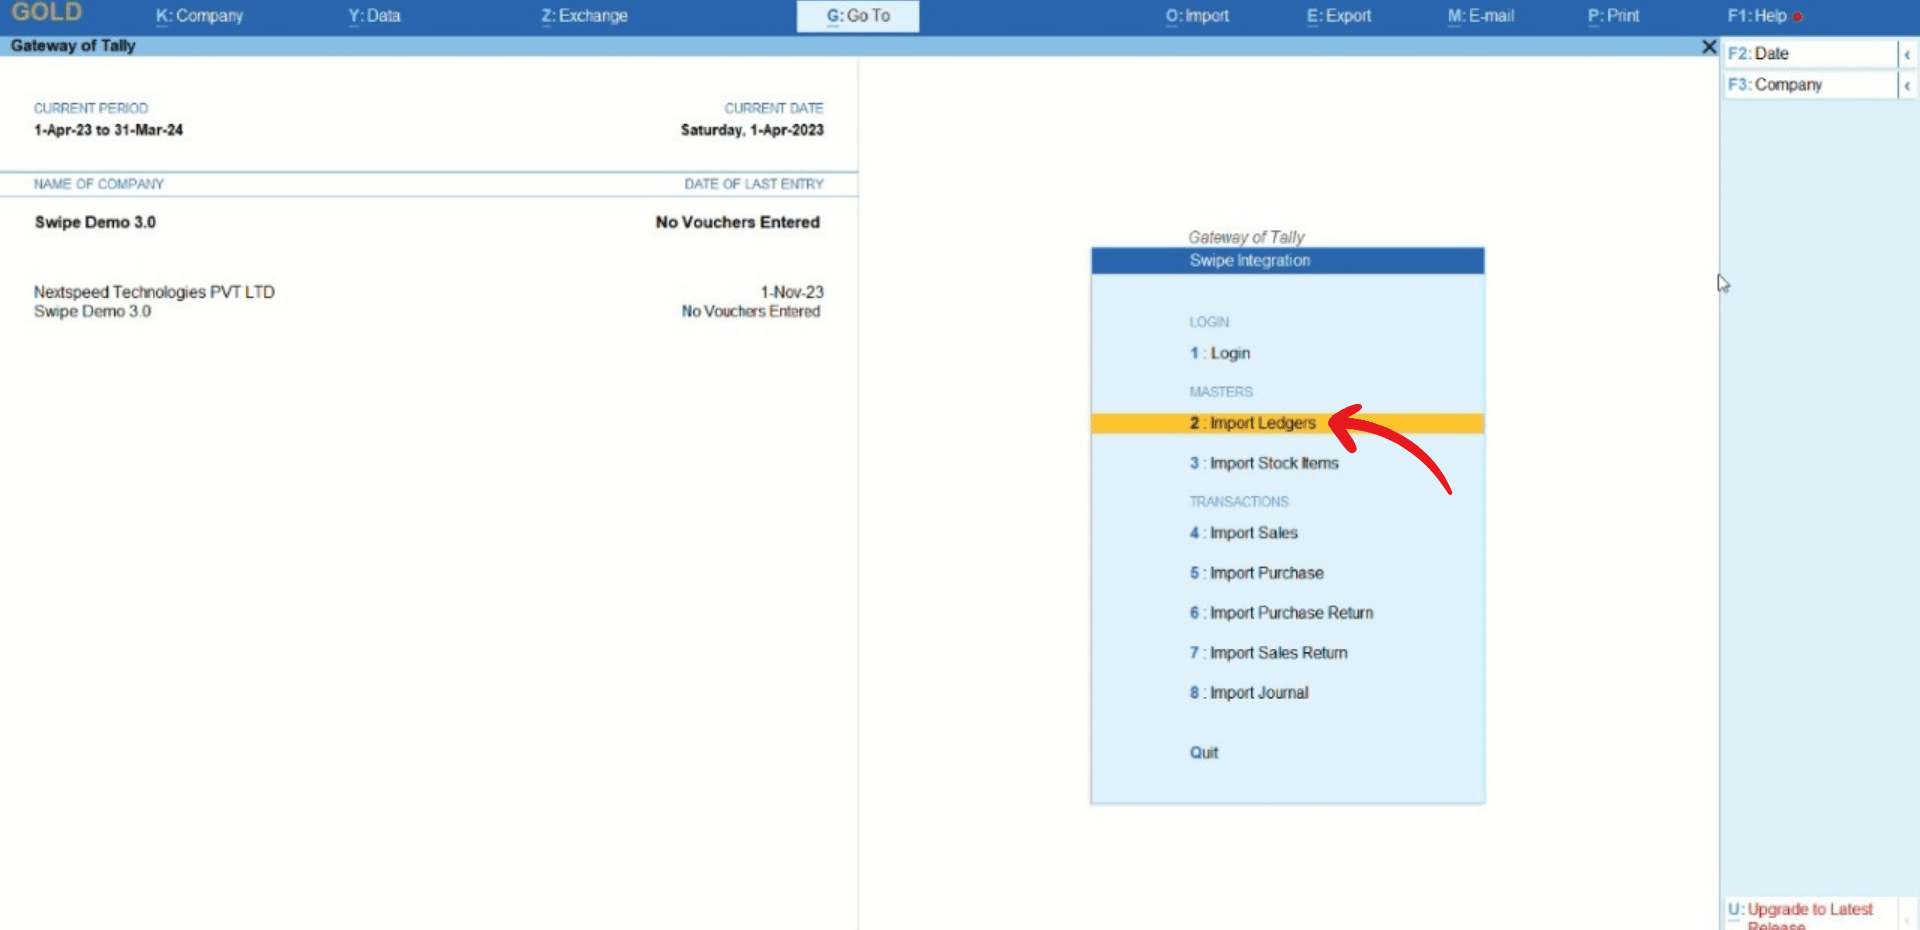
Launch your tally software and click on "Swipe Integration" which is under the Utilities section of “Gateway of Tally”.
Step 2: Import Ledgers.
Now, click on “Import Ledgers” under the Masters section.
Please wait until the data is fetched from Swipe.
Step 3: Check the Error List.
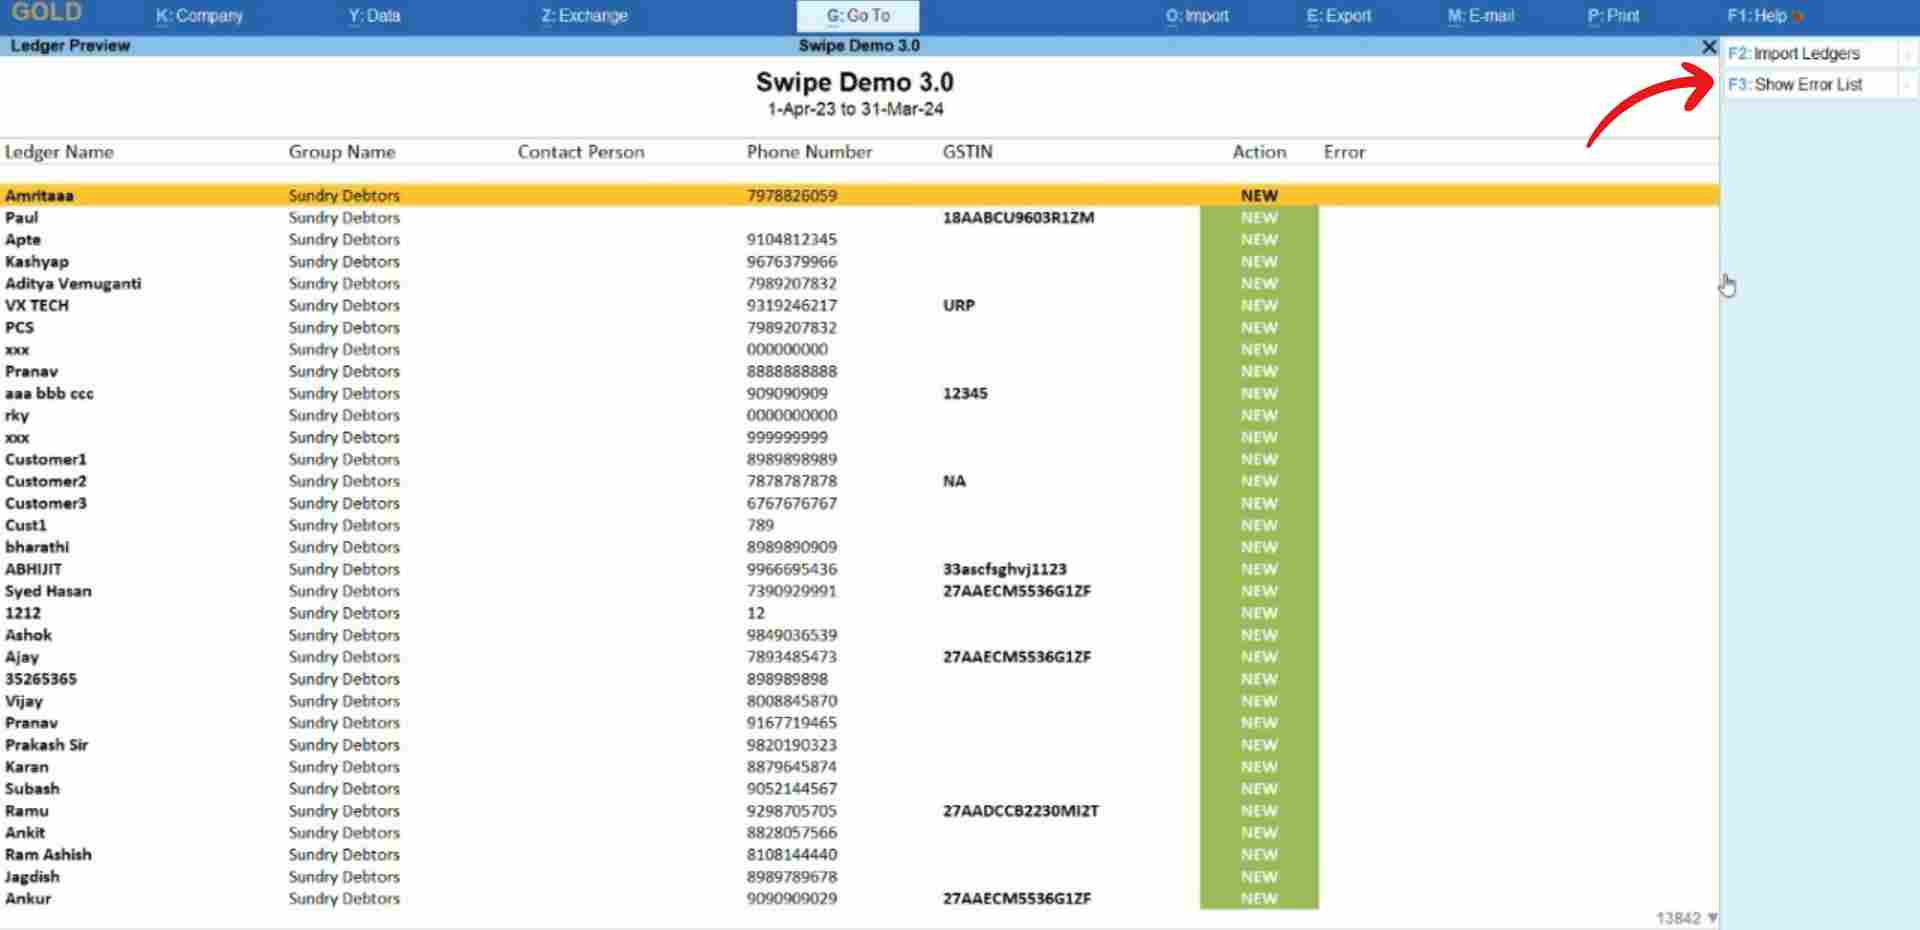
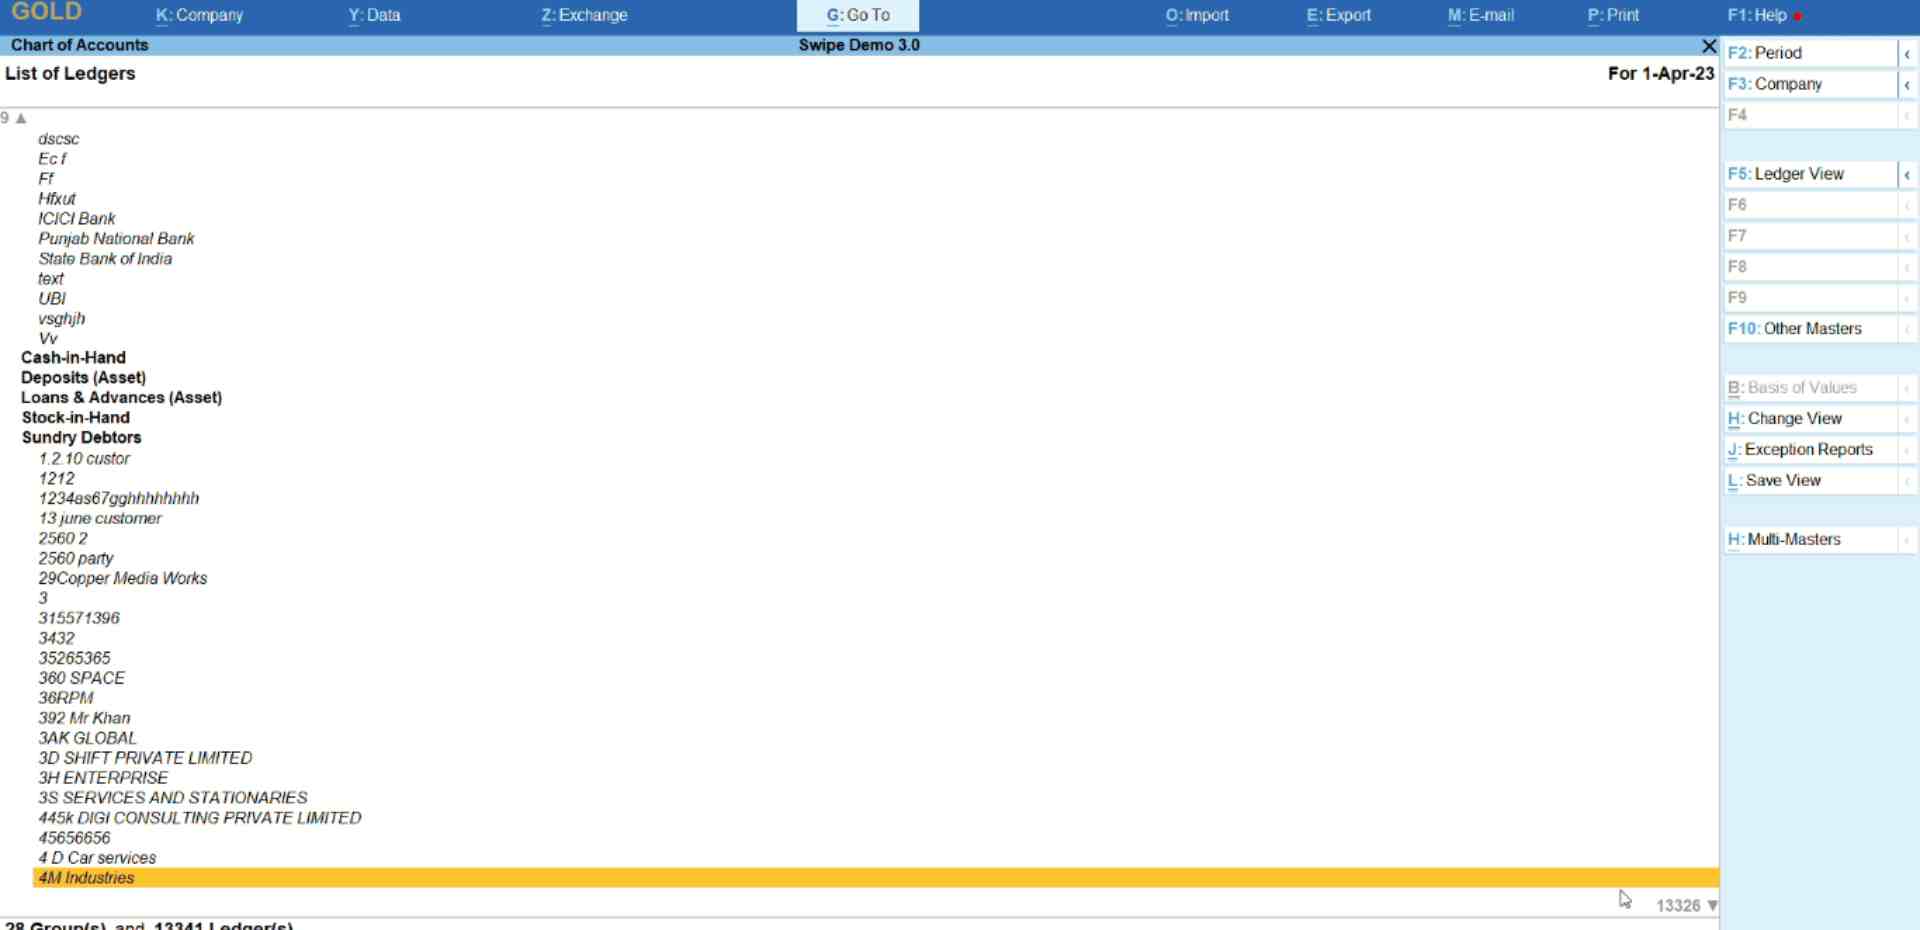
After fetching the data, a preview page appears, displaying the vendor and customer details.
To review any errors, hover over the 'Show Error List' option at the top right corner of the screen or press the F3 key on your keyboard".
Step 4: Import the data.
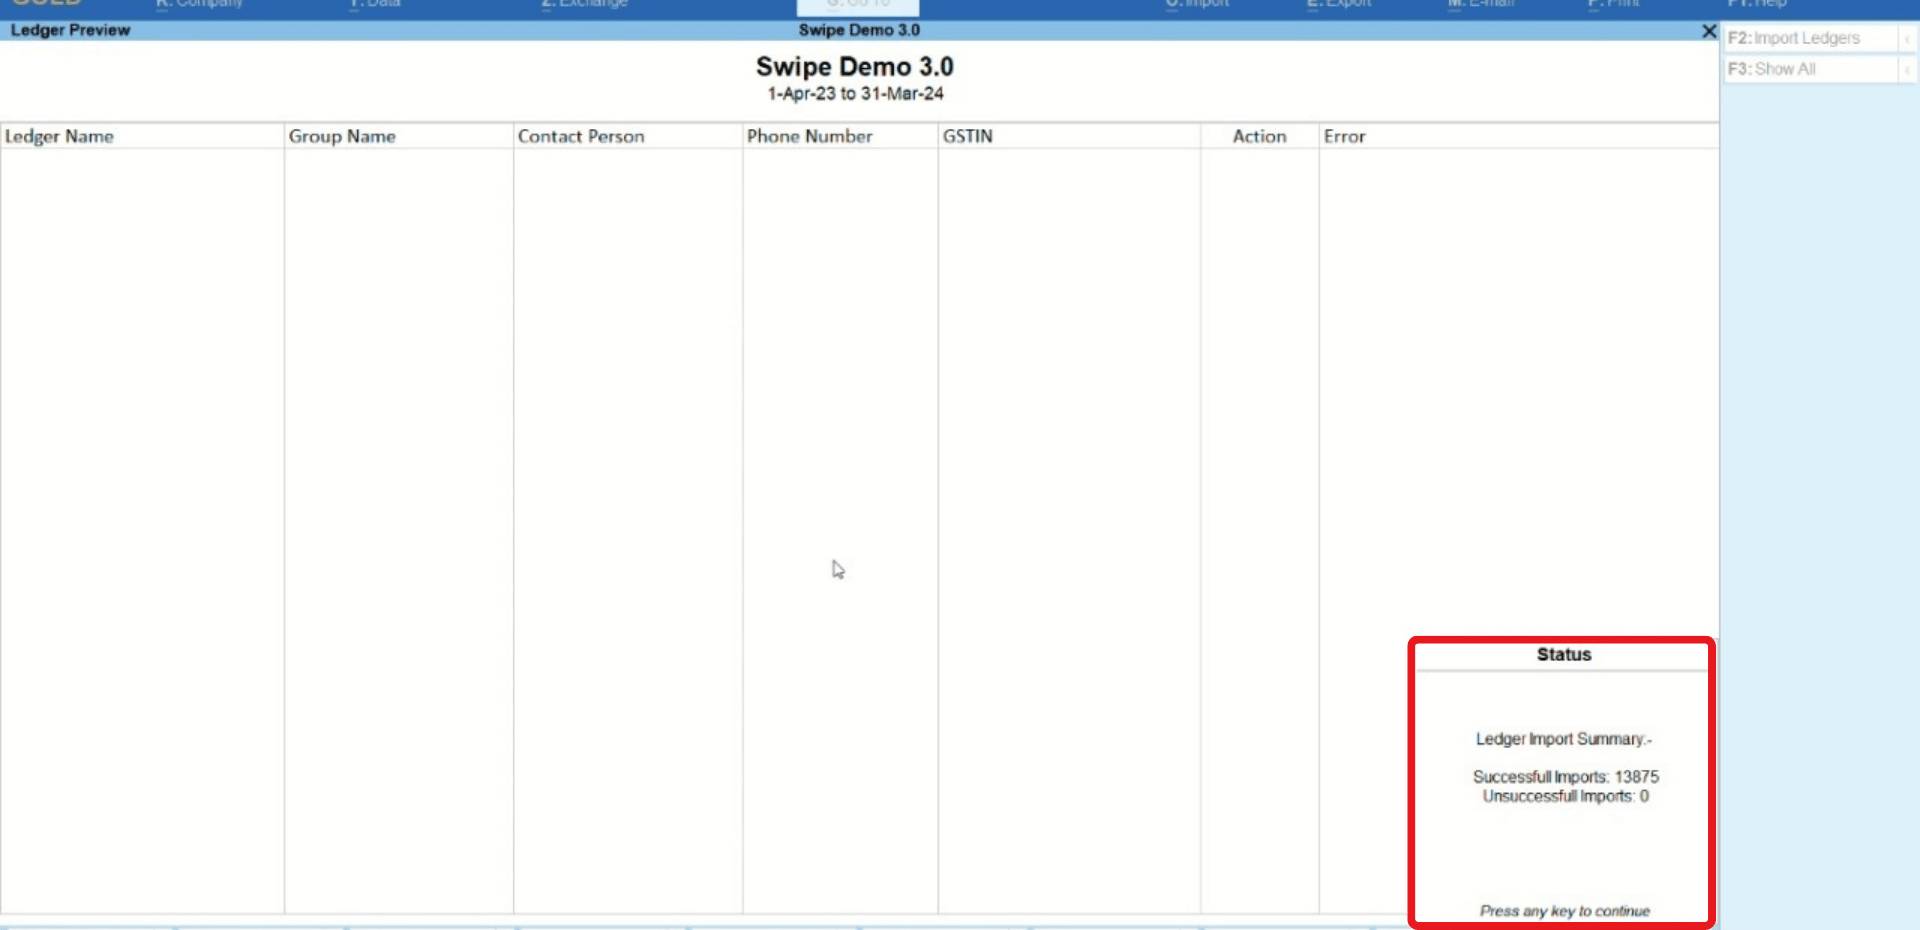
Click on the “Import ledgers” option present at the top right corner of the screen or press the F2 key on your keyboard.
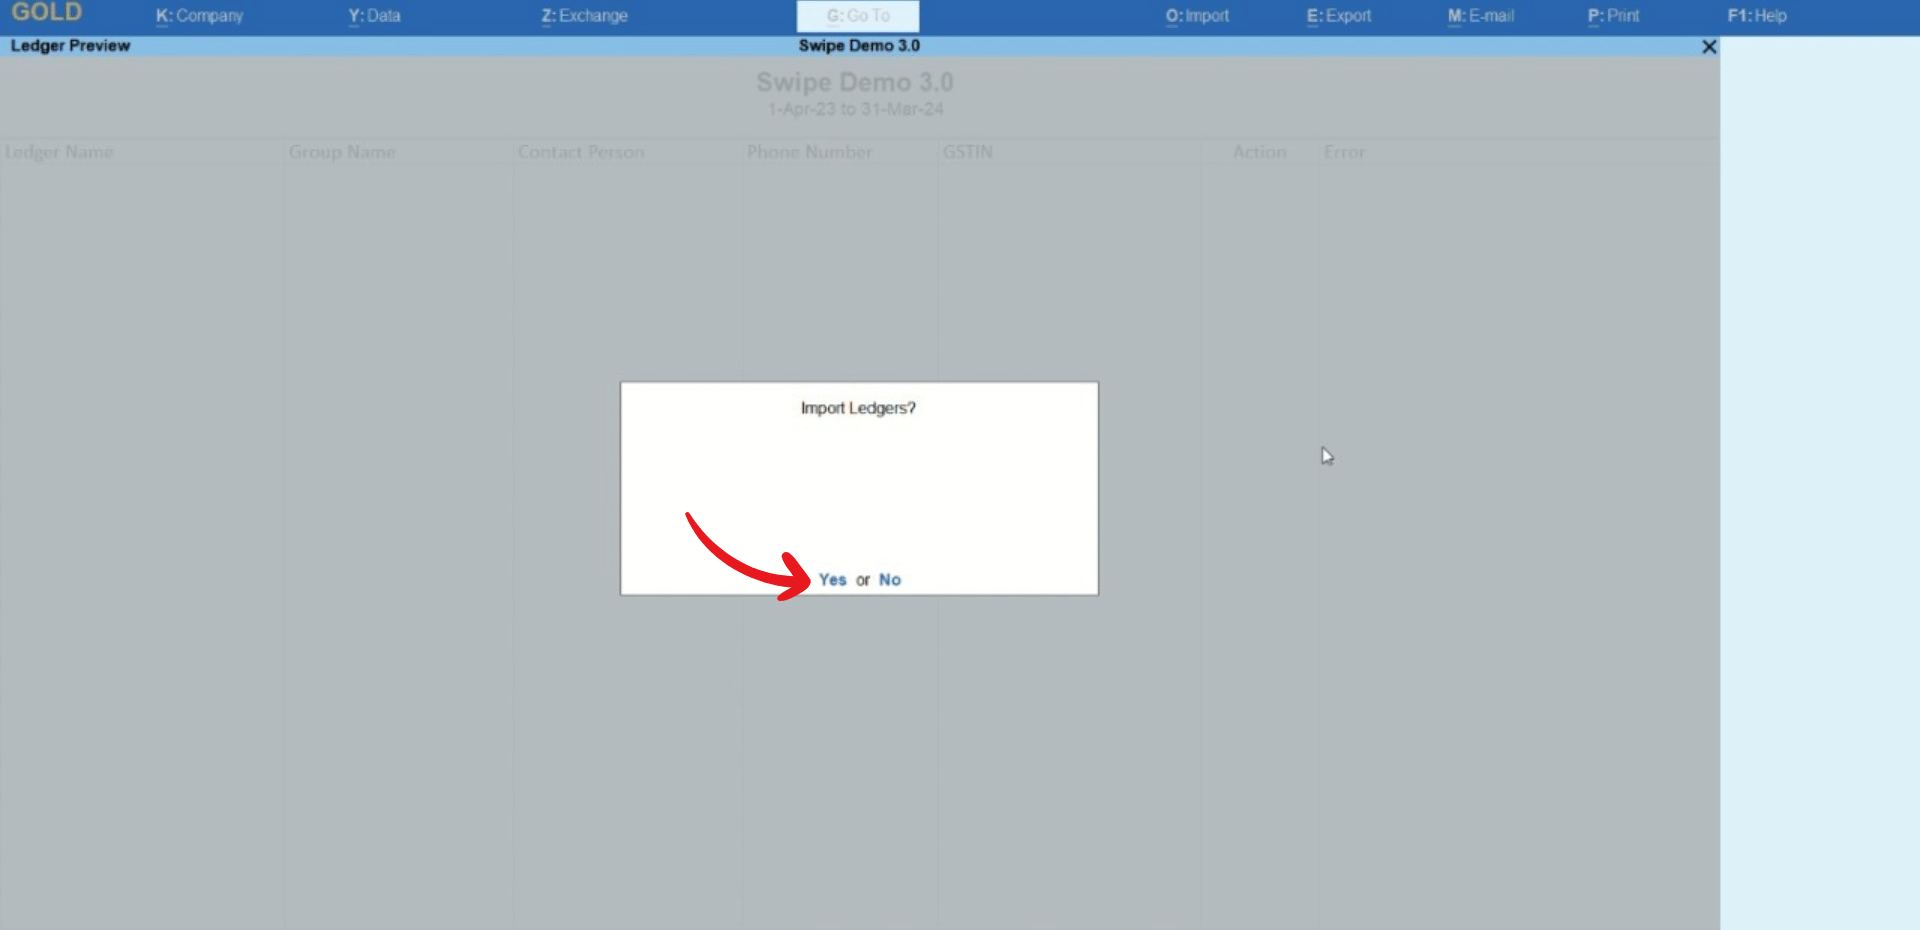
Now, confirm your action by clicking on the “Yes” option from the pop-up.
Congratulations, You have successfully imported customer’s and vendor’s data from your Swipe account to your Tally account and a pop-up appears at the bottom of the screen informing the same.
Press any key to continue.
How to import products data to Tally from Swipe
Note: The response time and overall functioning speed of data import are determined by your computer's processor, not by Swipe or Tally software. In Tally software, products and services are collectively referred to as “Stock items”.
Step 1: Go to Swipe integration.
Launch your tally software and click on "Swipe Integration" which is under the Utilities section of “Gateway of Tally”.
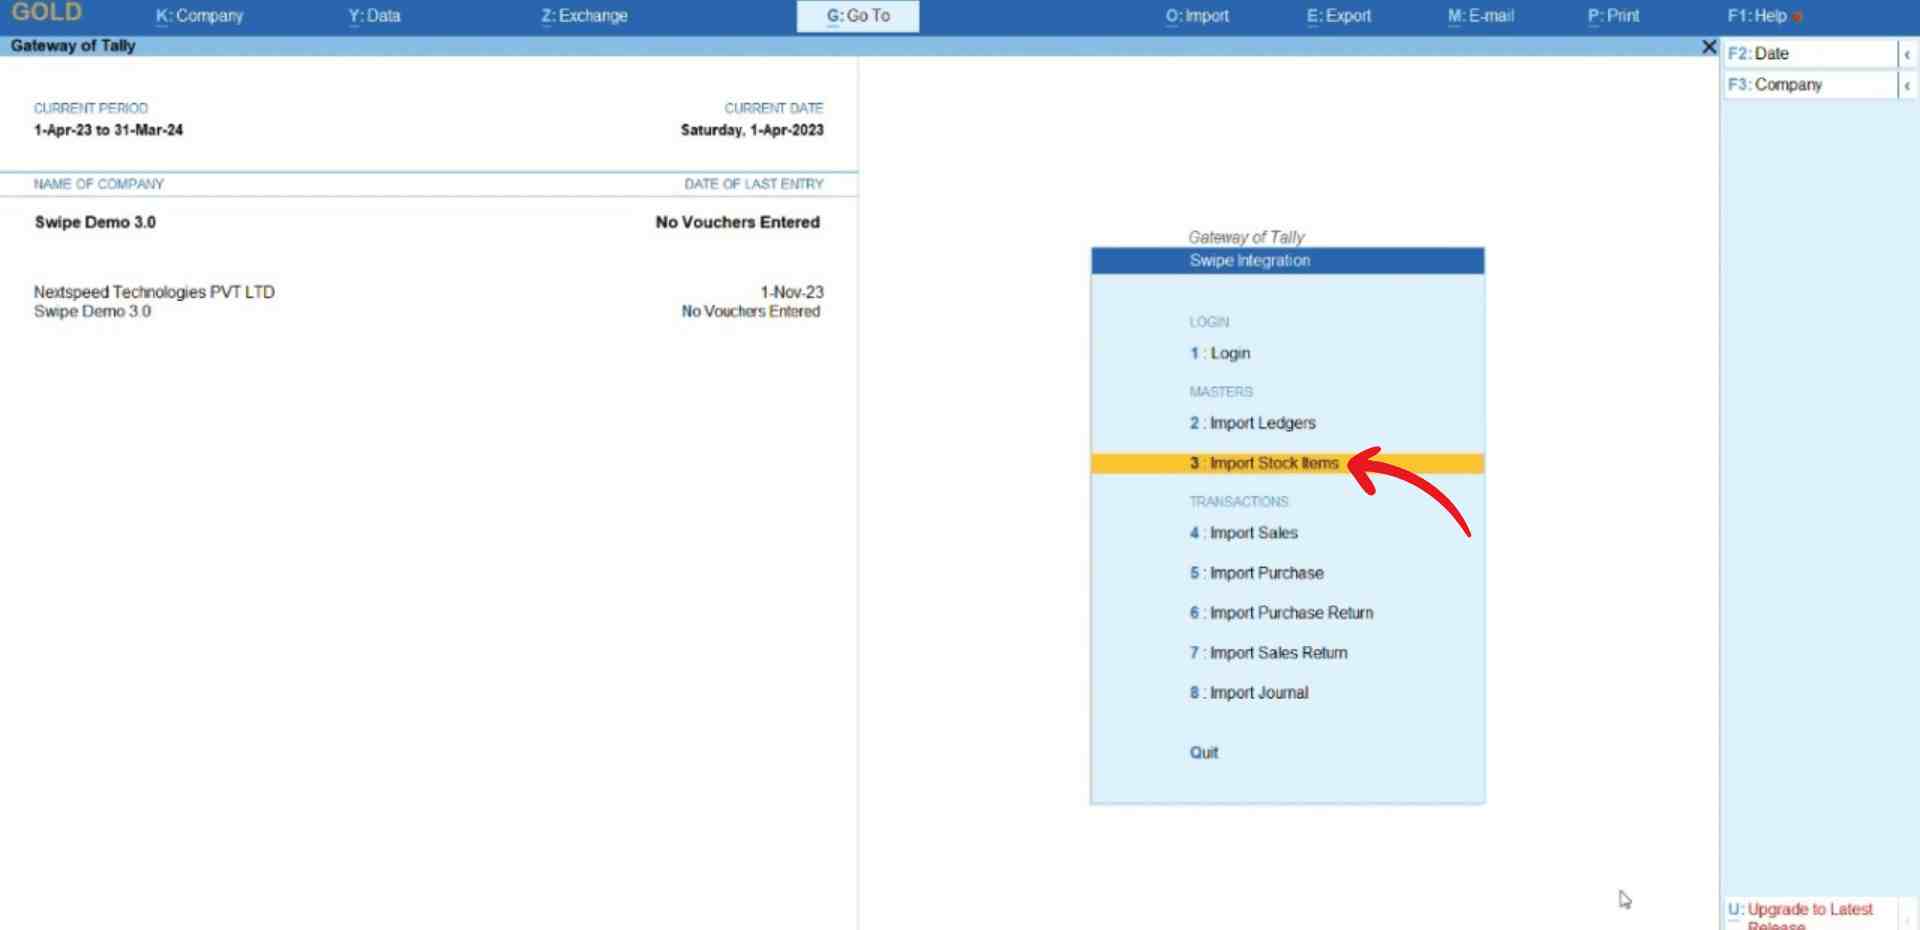
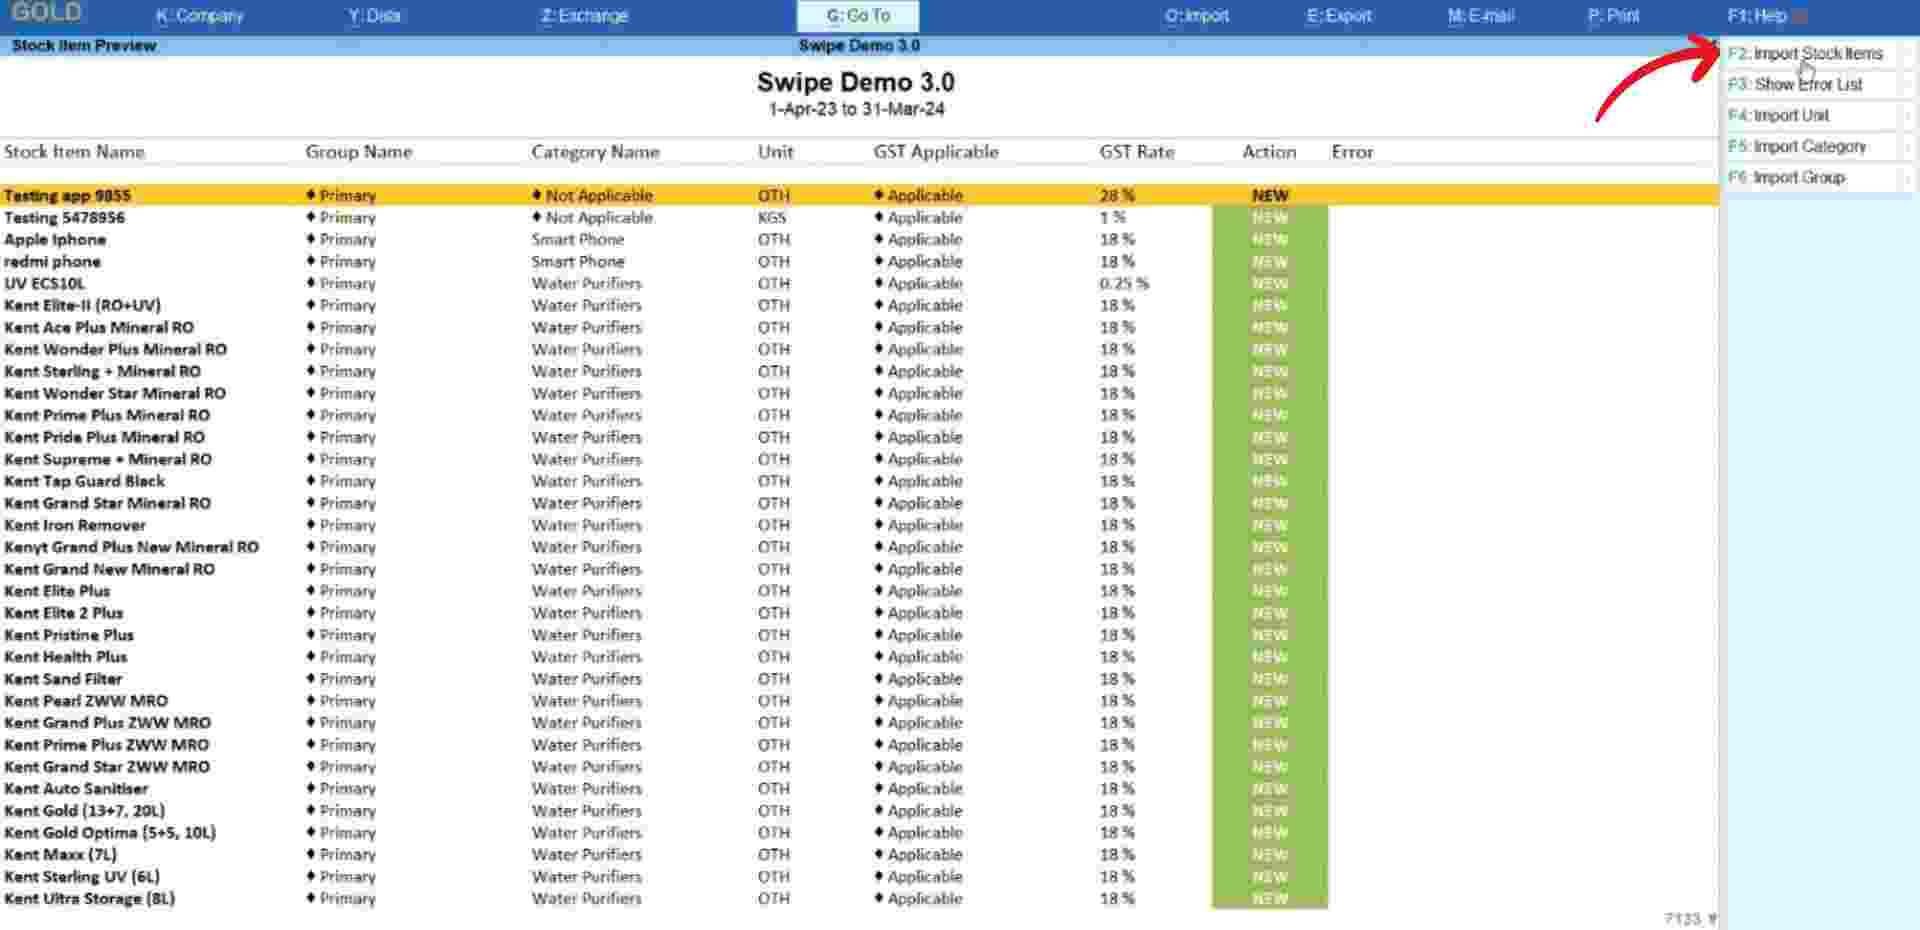
Step 2: Import Stock Items.
Now, click on “Import Stock Items” under the Masters section.
Please wait until the data is fetched from Swipe.
Step 3: Check the Error List.
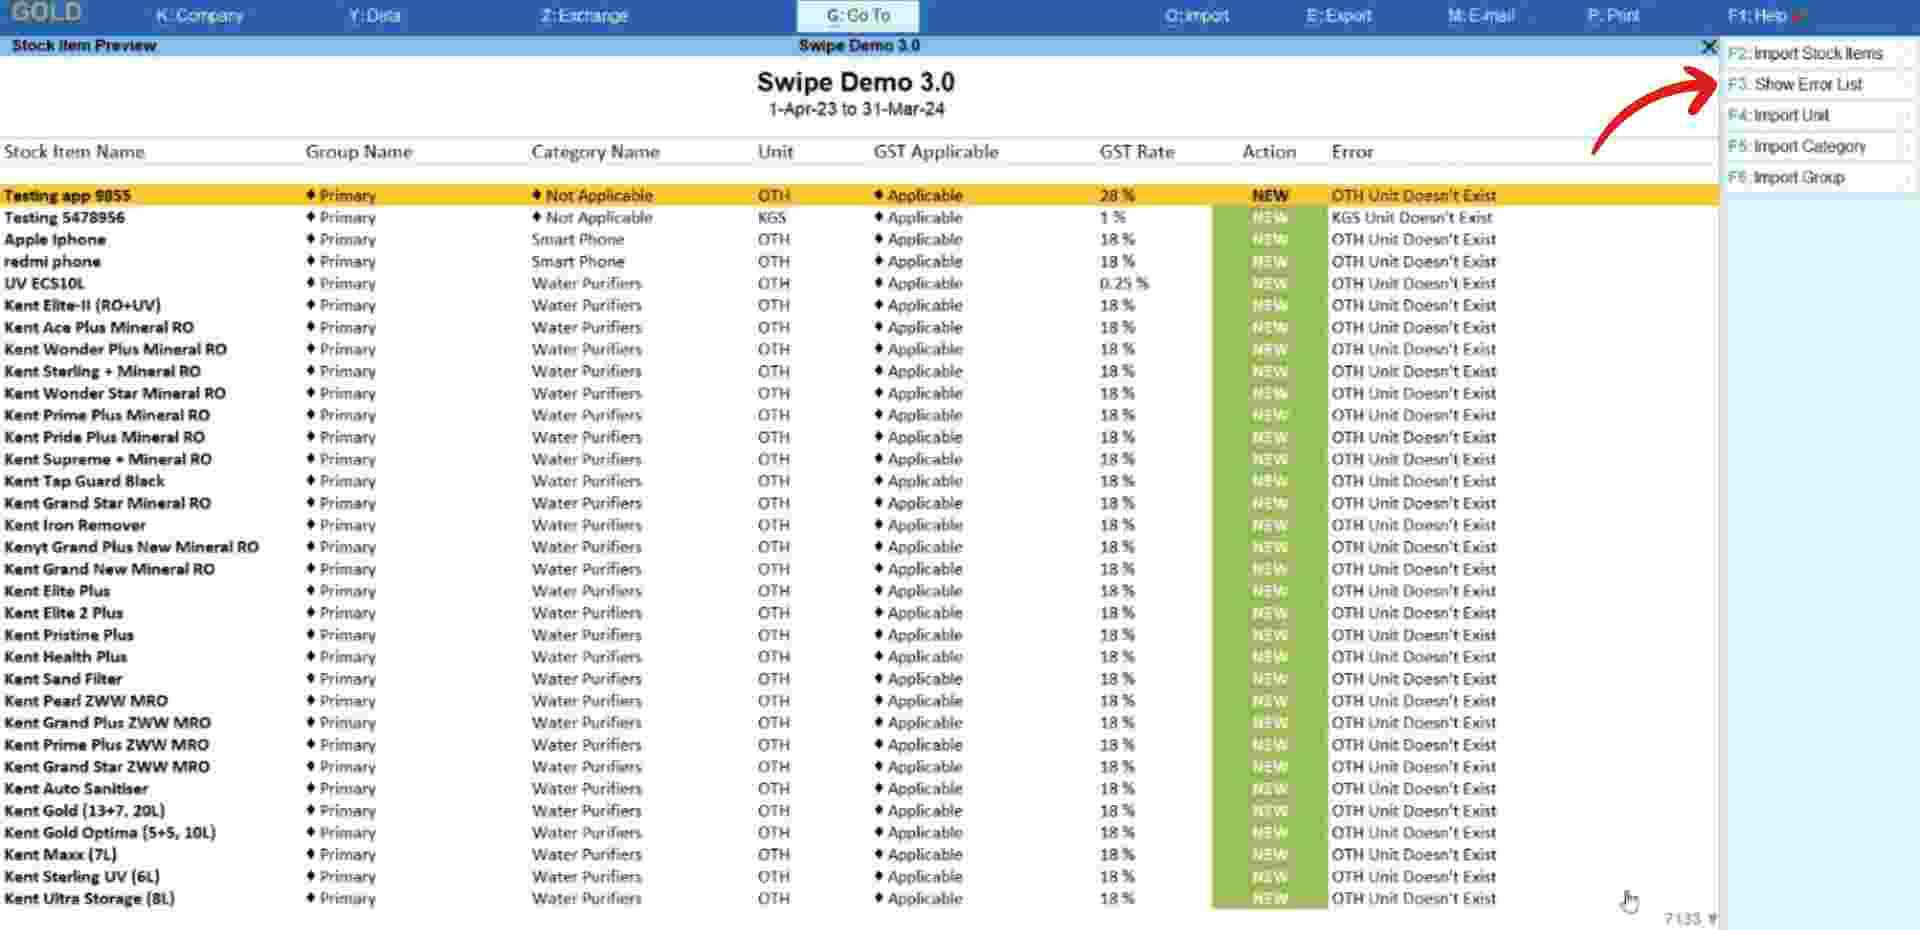
After fetching the data, a preview page appears, displaying the product details.
To review any errors, hover over the 'Show Error List' option at the top right corner of the screen or press the F3 key on your keyboard".
Please follow the steps below to resolve the issue.
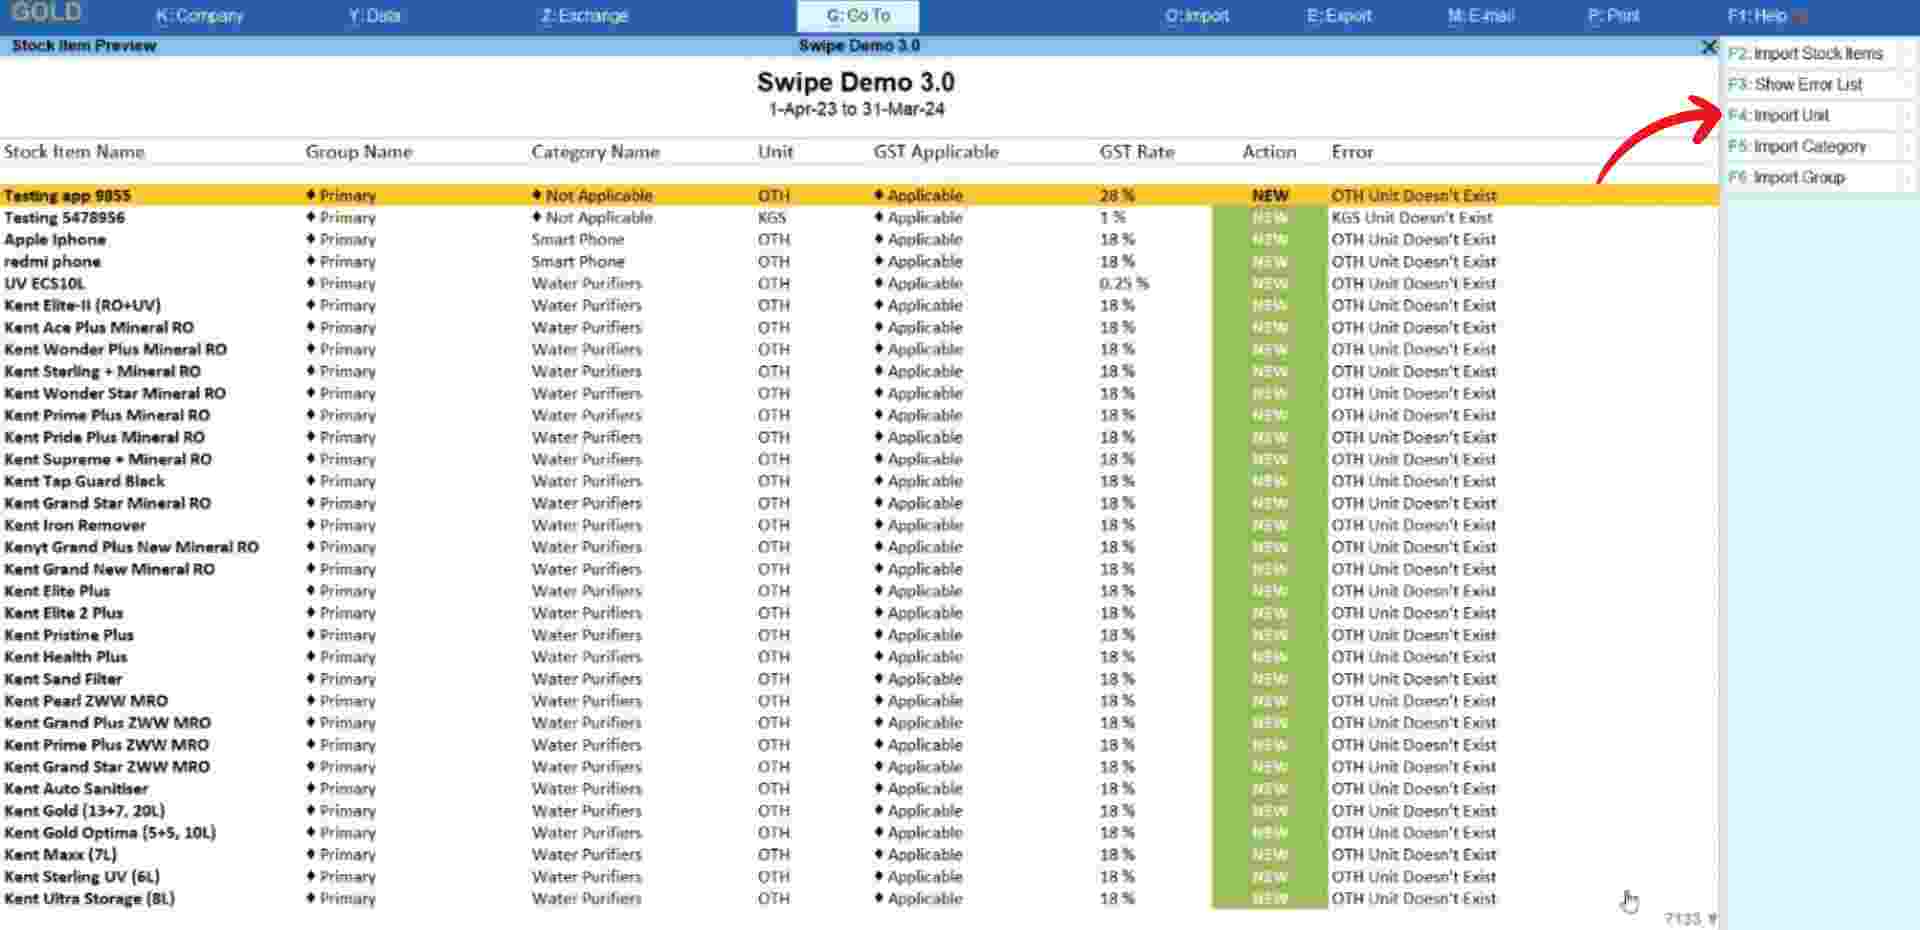
For the error “Unit Doesn’t Exist”: Click on the “Import Unit” option present at the top right corner of the screen or press the F4 key on your keyboard.
Now, click on the “Yes” option from the pop-up to confirm the action.
Congratulations! You have successfully created or altered units and a pop-up appears at the bottom of the screen informing the screen. Press any key to continue.
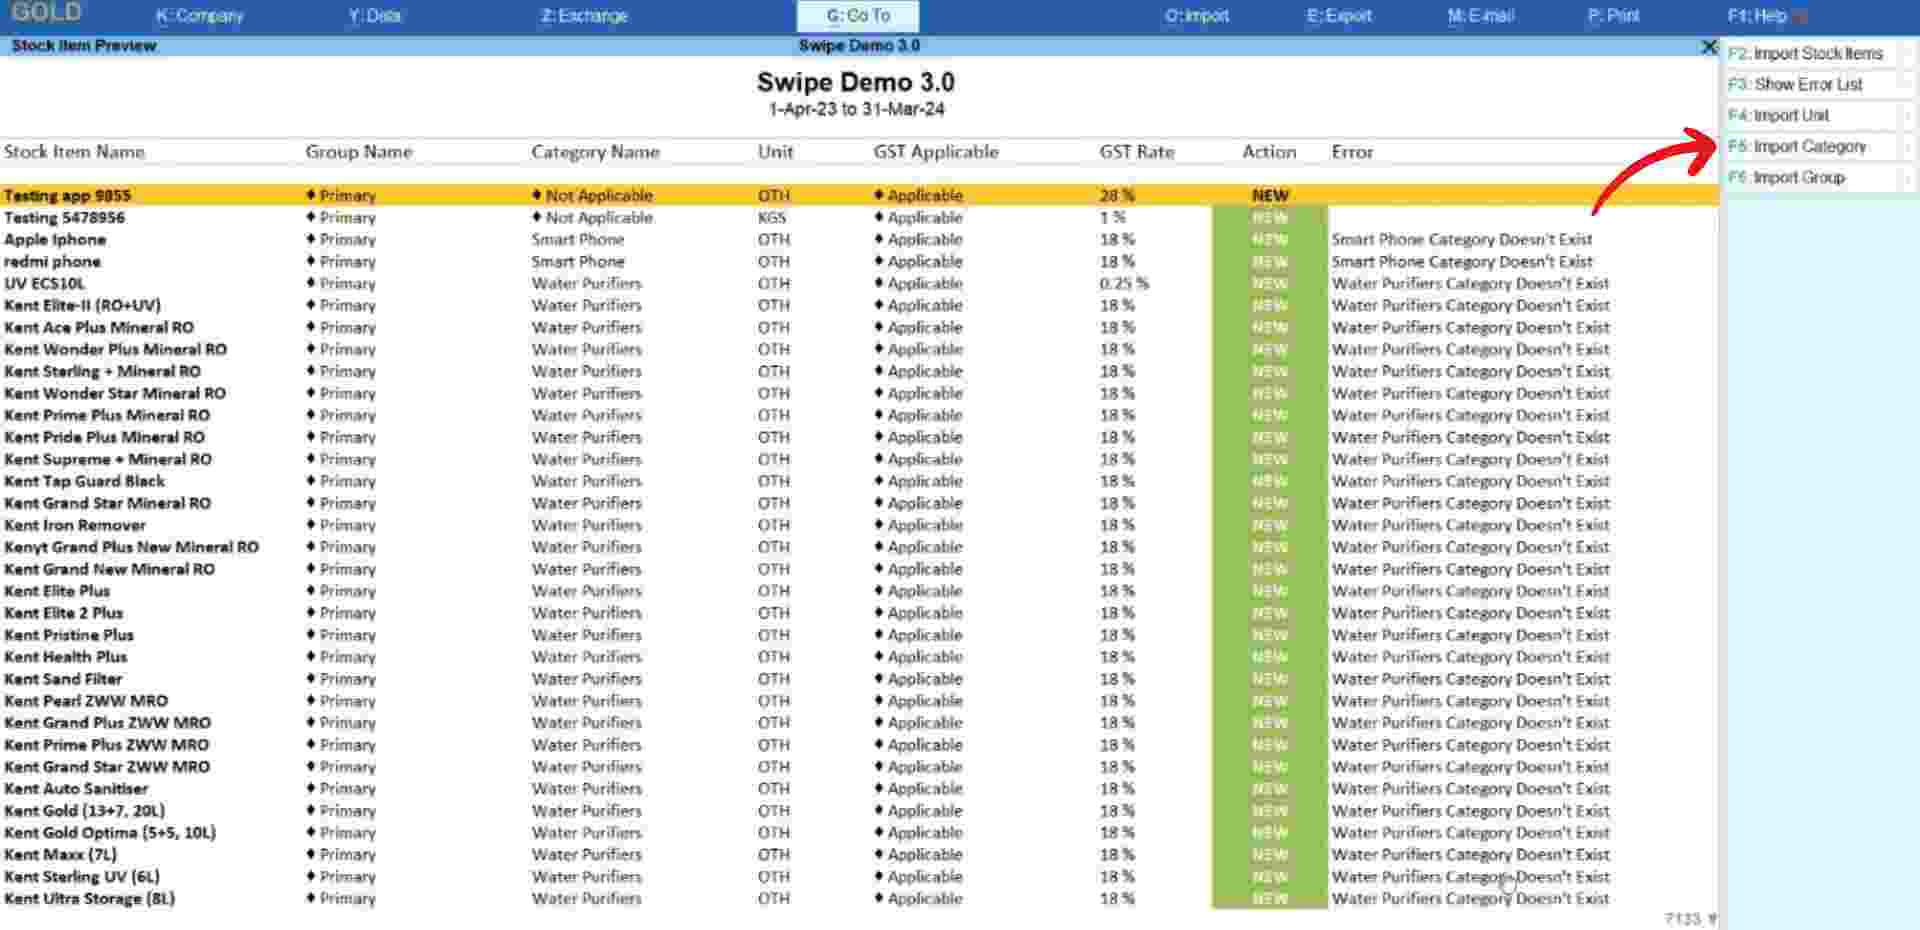
For the error “Category Doesn't Exist": Click on the “Import Category” option present at the top right corner of the screen or press the F5 key on your keyboard.
Now, click on the “Yes” option from the pop-up to confirm the action.
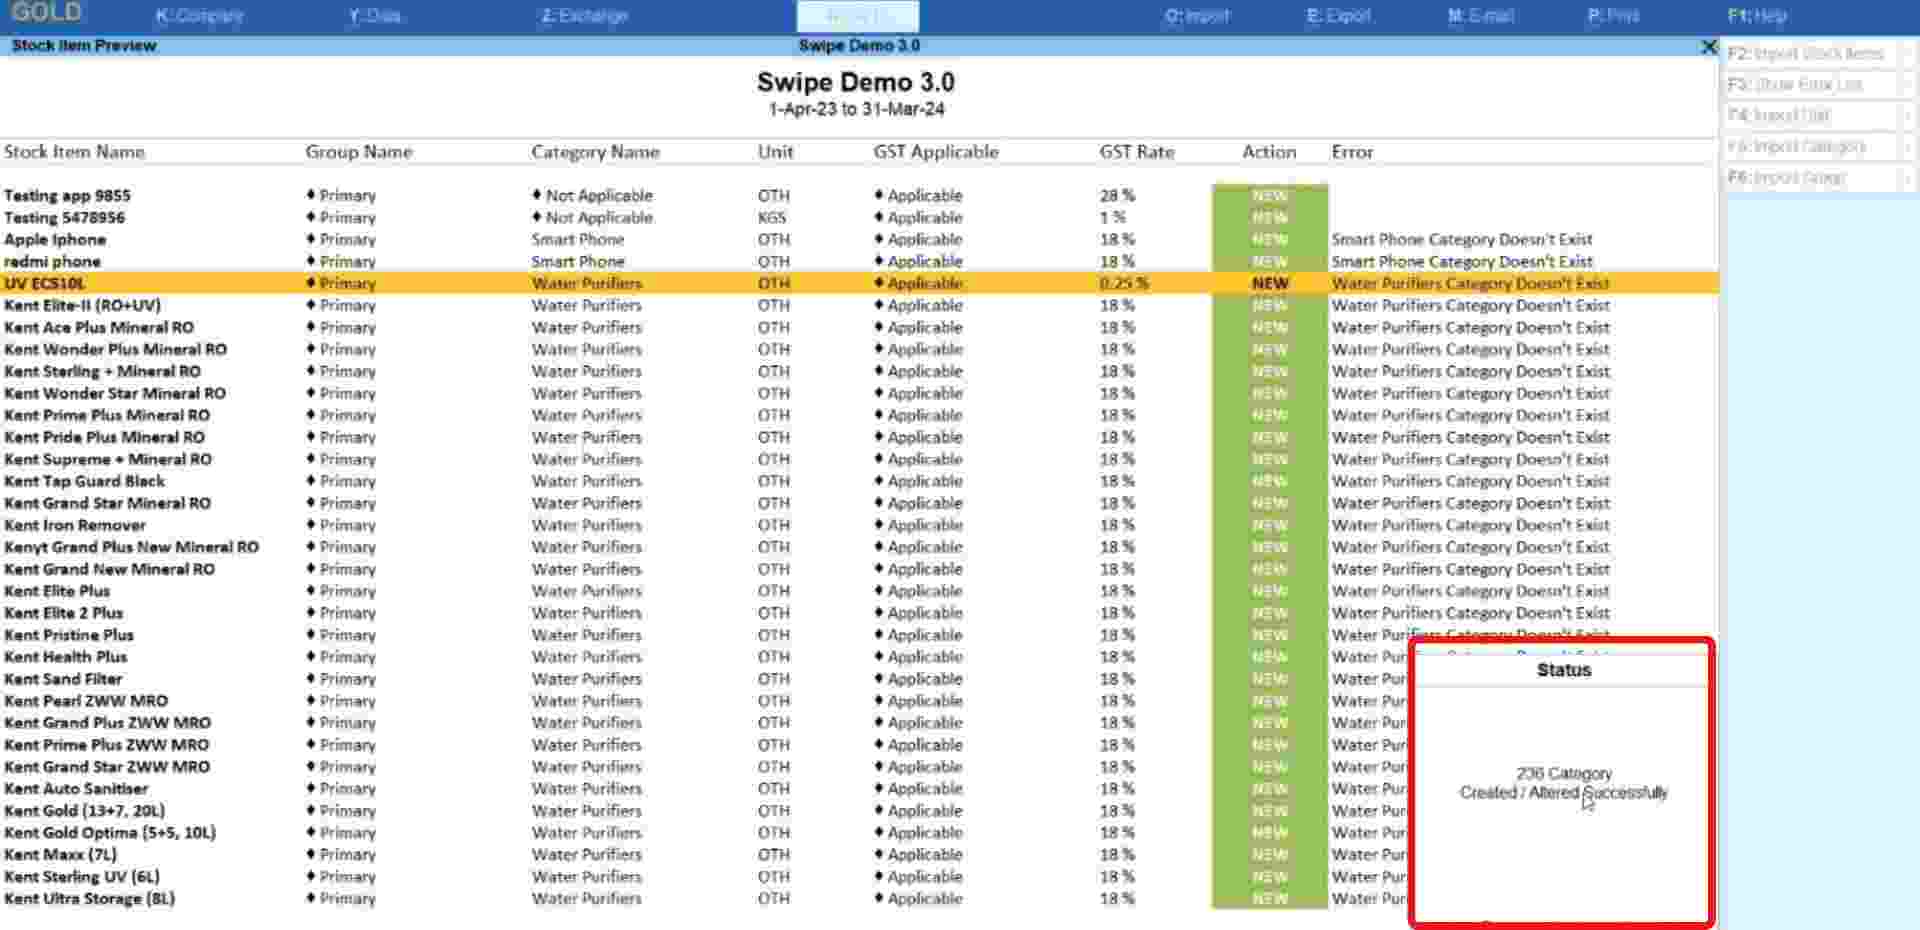
Congratulations! You have successfully created or altered categories and a pop-up appears at the bottom of the screen informing the screen. Press any key to continue.
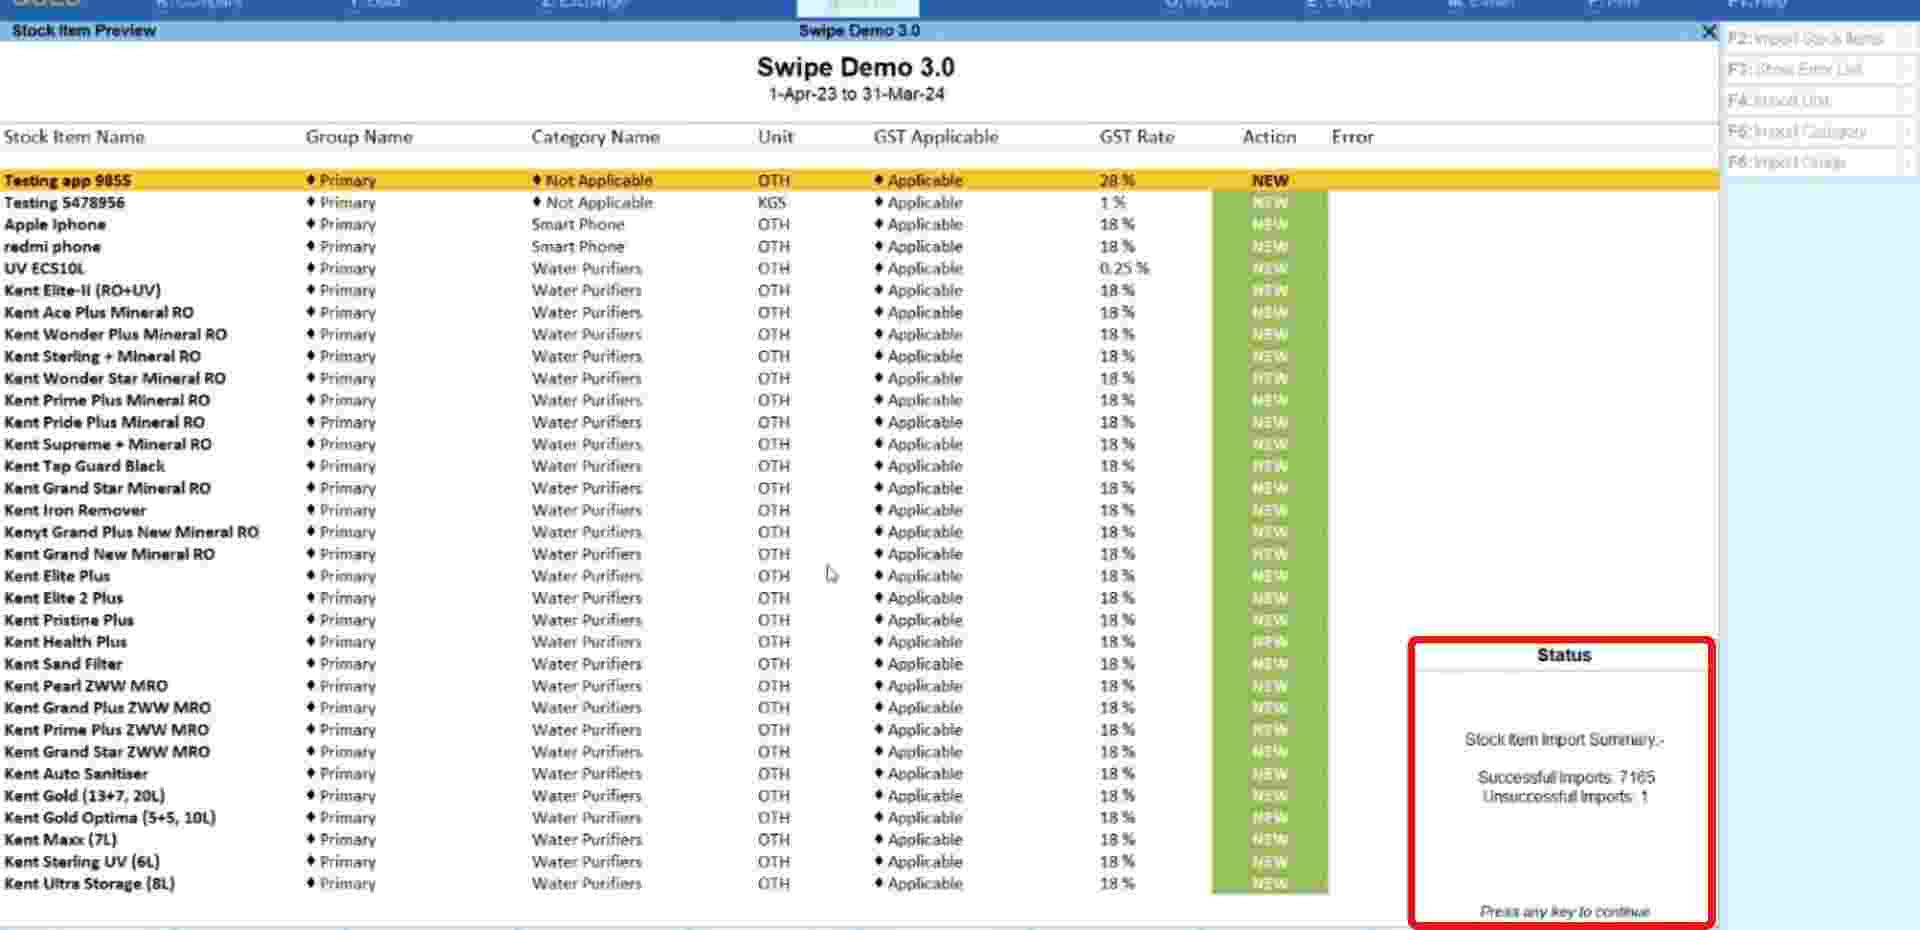
Step 4: Import the data.
Click on the “Import Stock Items” option present at the top right corner of the screen or press the F3 key on your keyboard.
Congratulations, You have successfully imported products data from your Swipe account to your Tally account and a pop-up appears at the bottom of the screen informing the same.
Press any key to continue.
How to import sales invoices from Swipe to Tally
Note: The response time and overall functioning speed of data import are determined by your computer's processor, not by Swipe or Tally software. If you haven't made mandatory changes to your settings to import transactions, please follow the below steps. If you have already made mandatory changes, please skip to step 4.
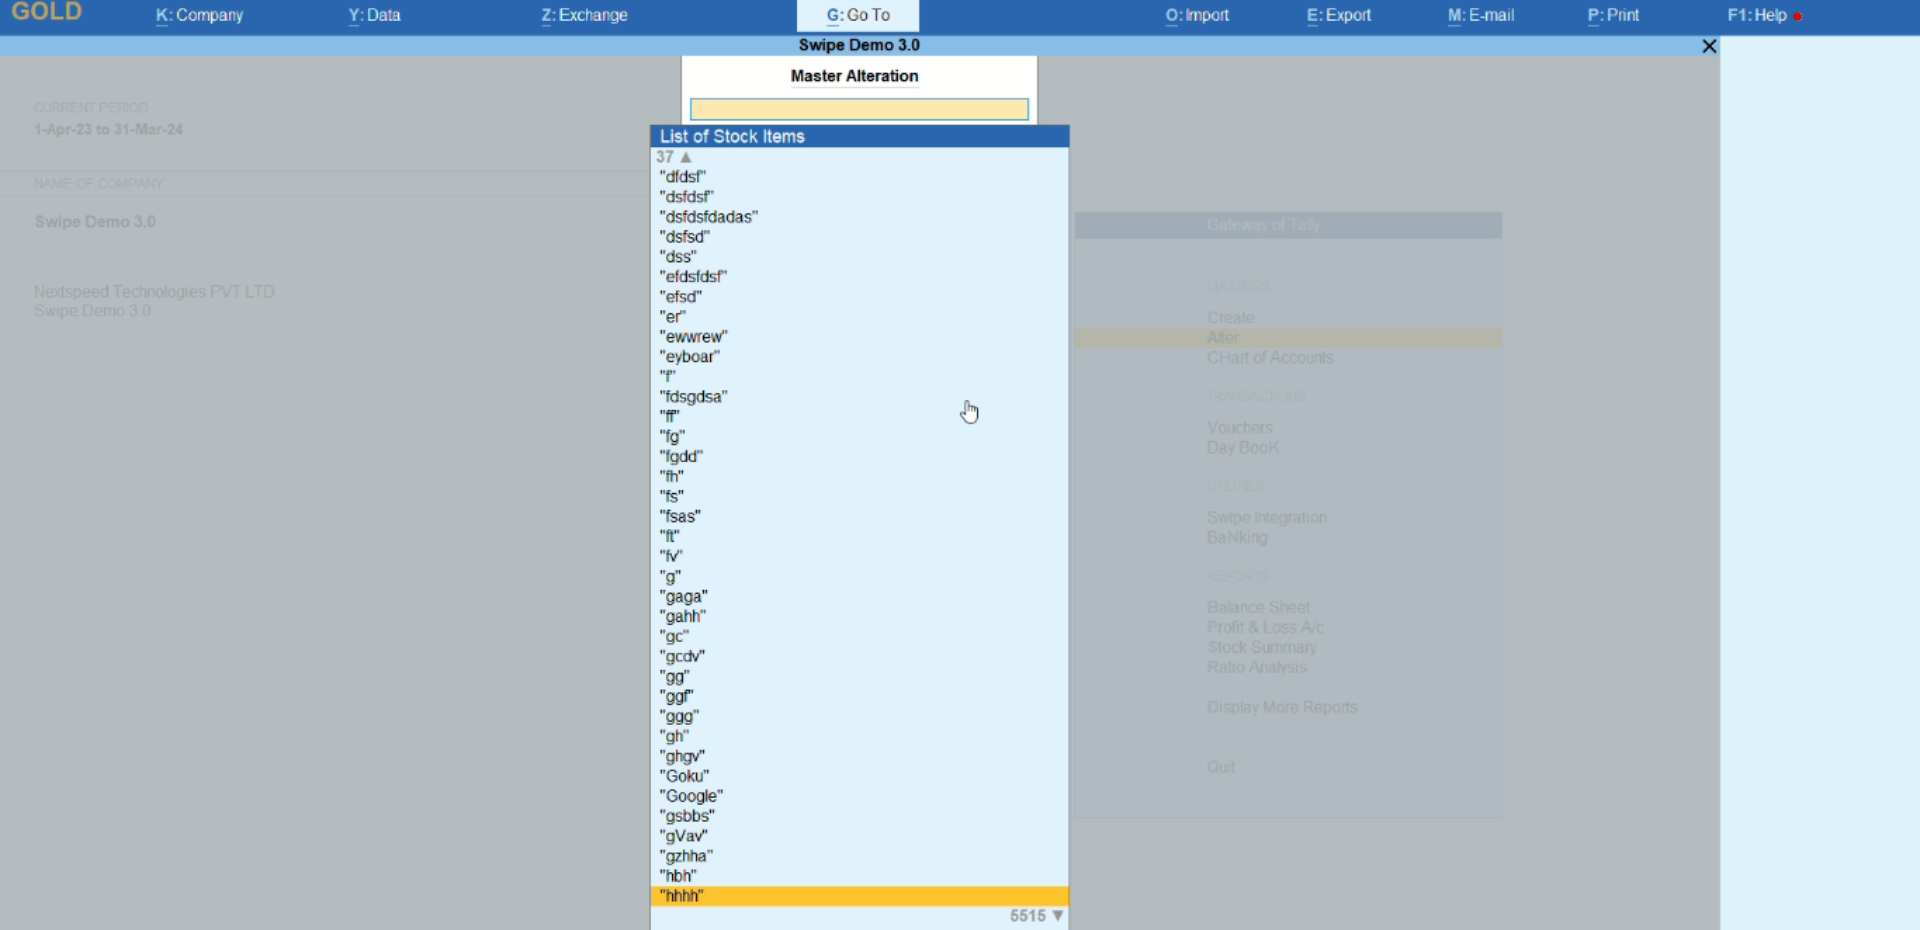
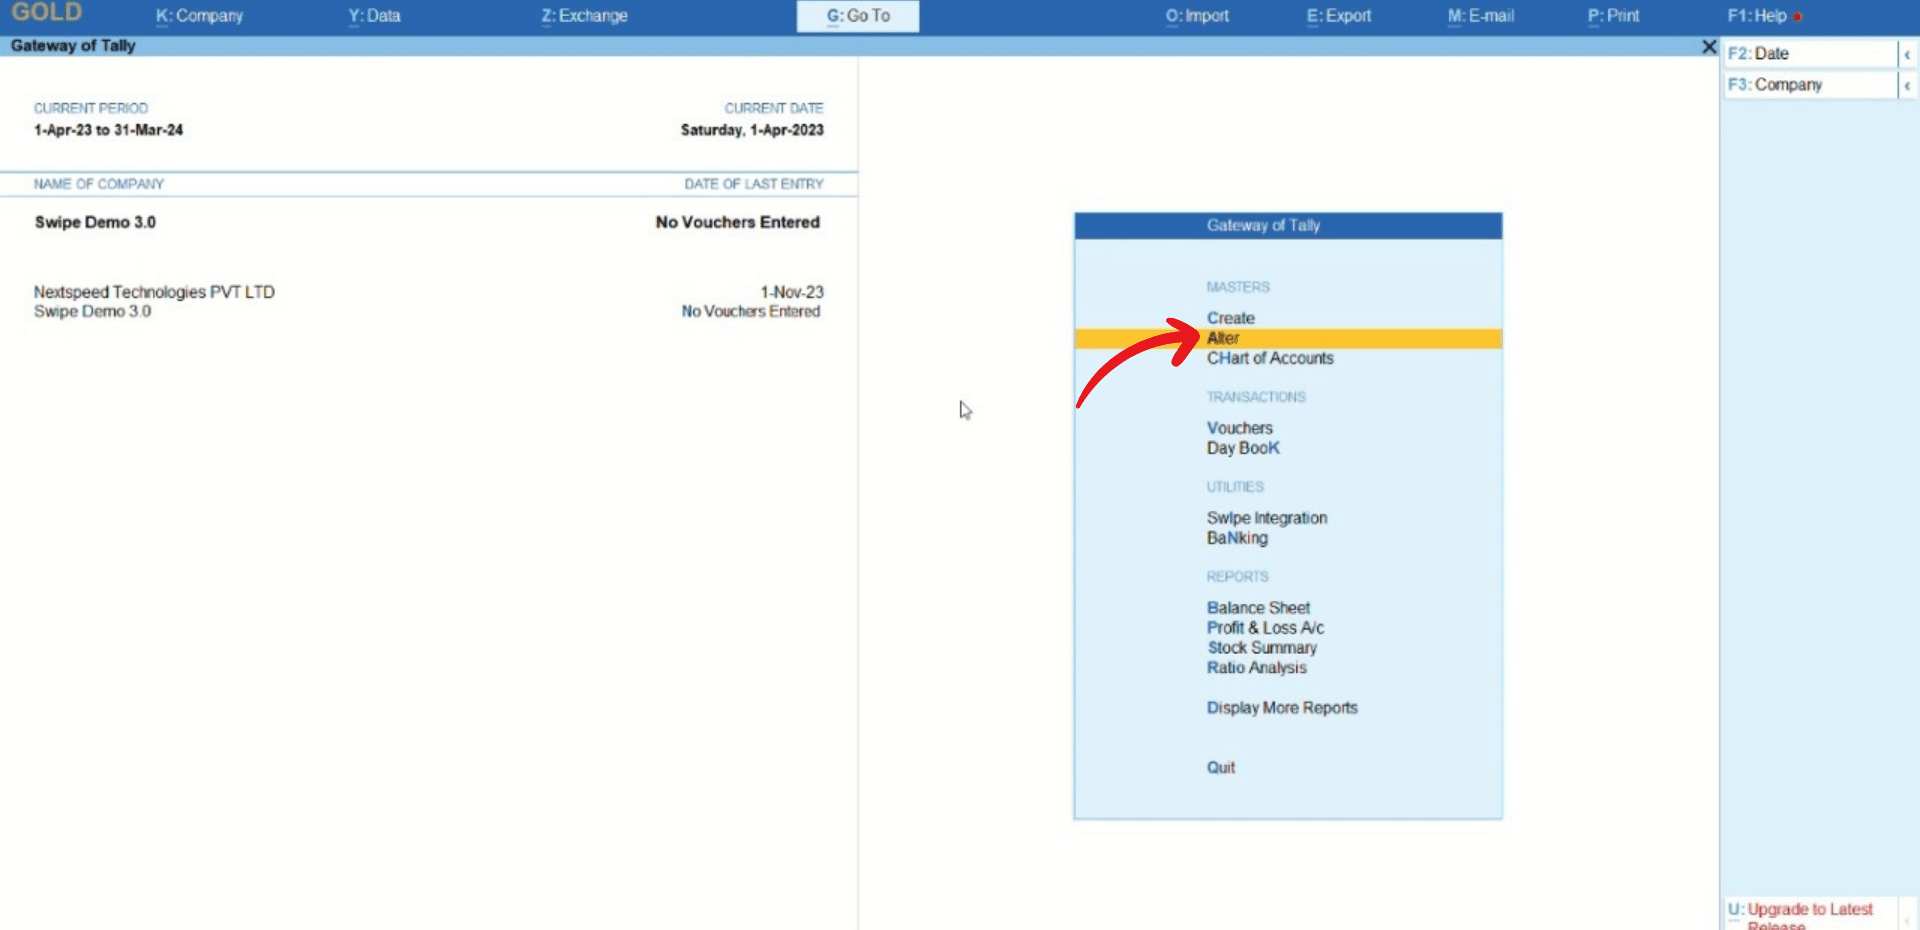
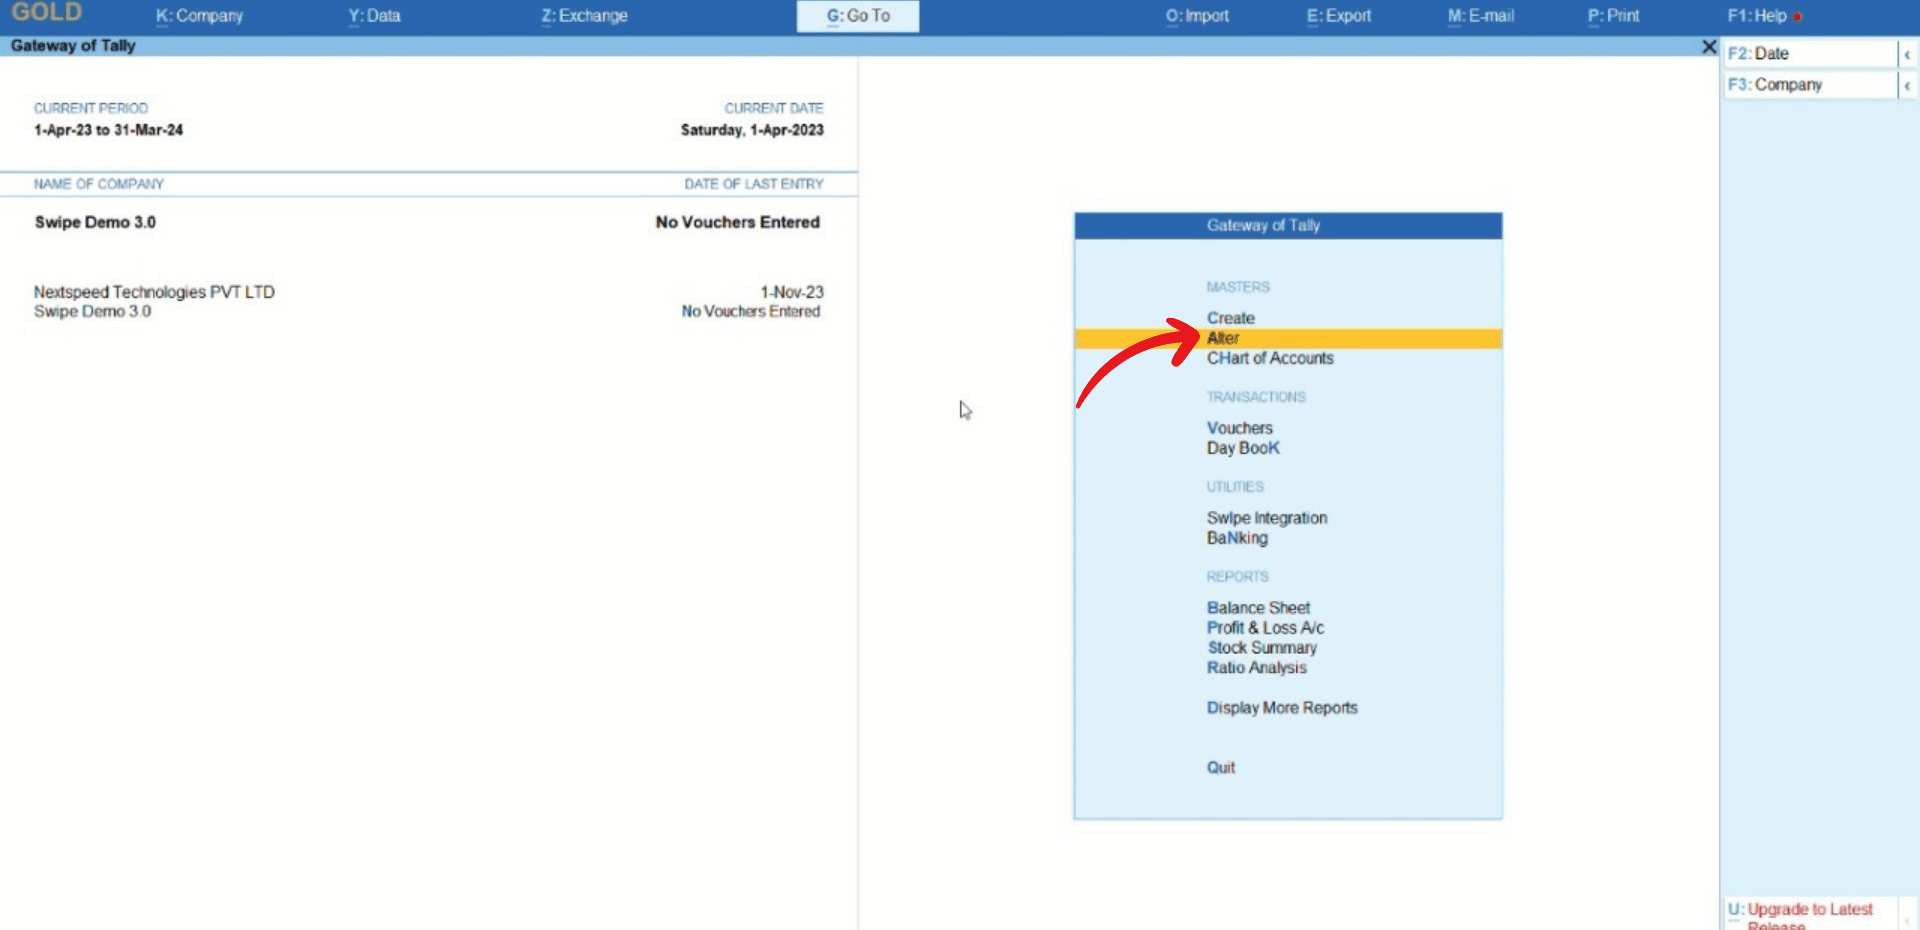
Step 1: Go to the Alter.
Click on "Atler" which is under the Masters section of “Gateway of Tally”.
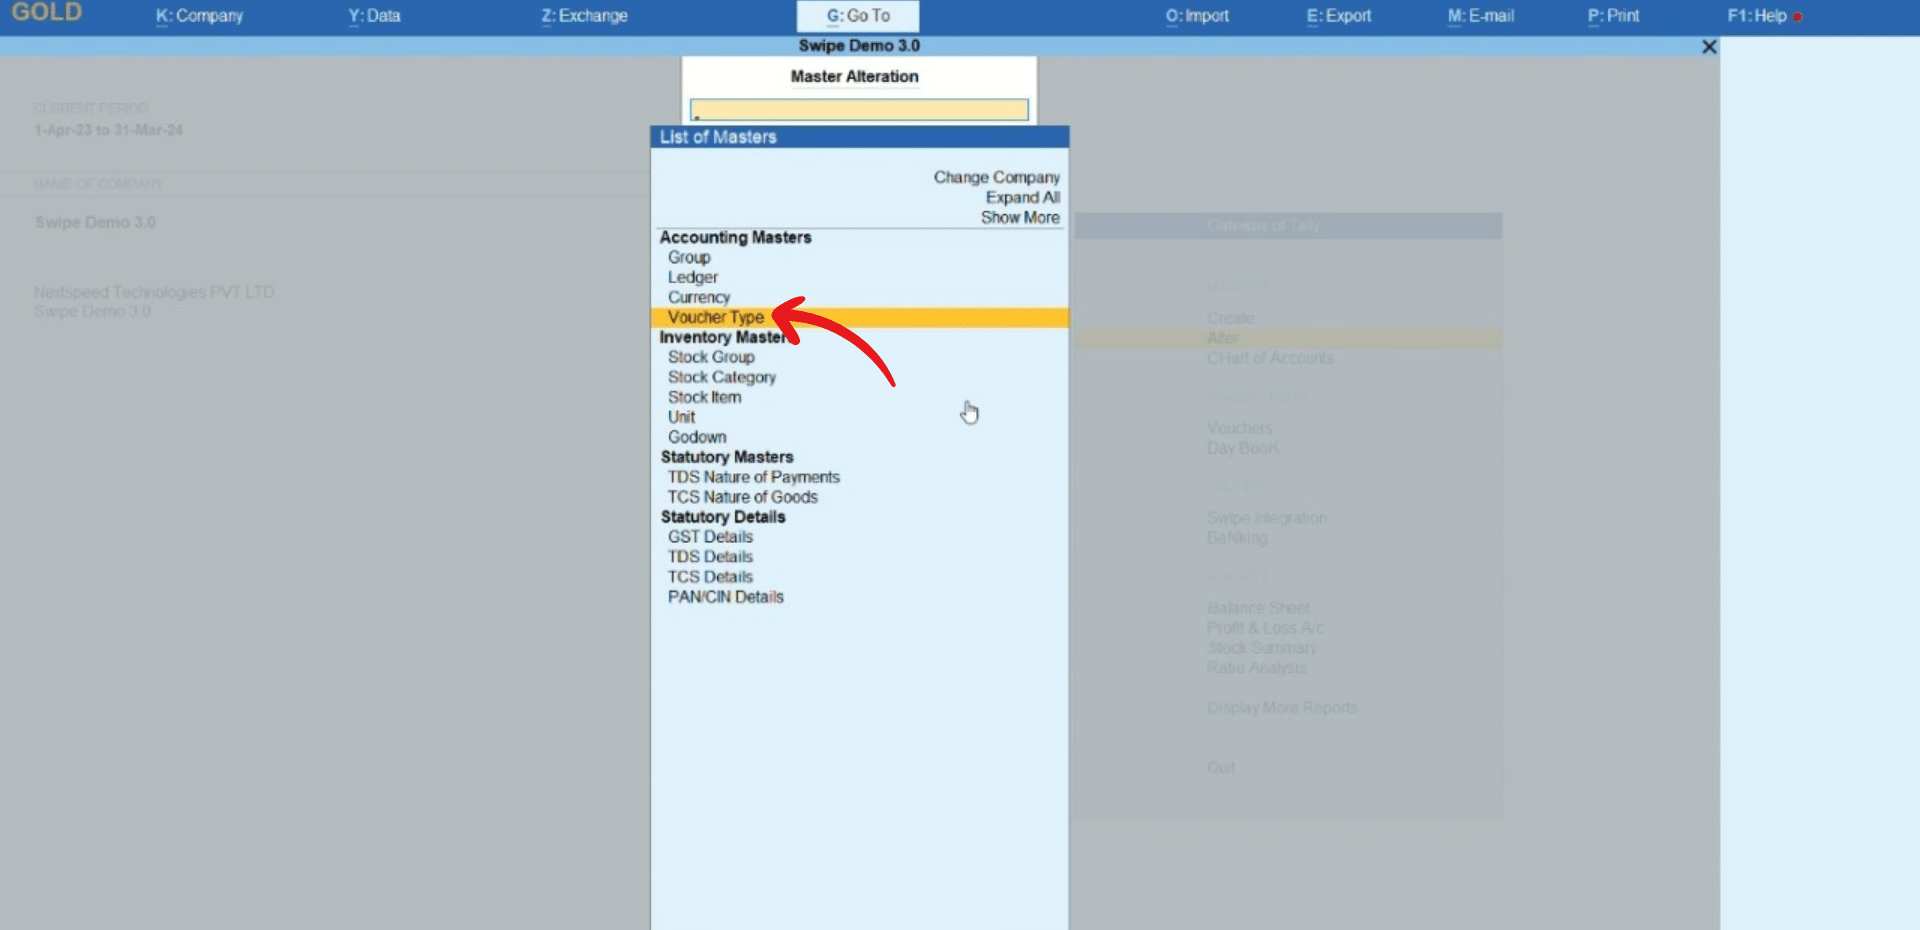
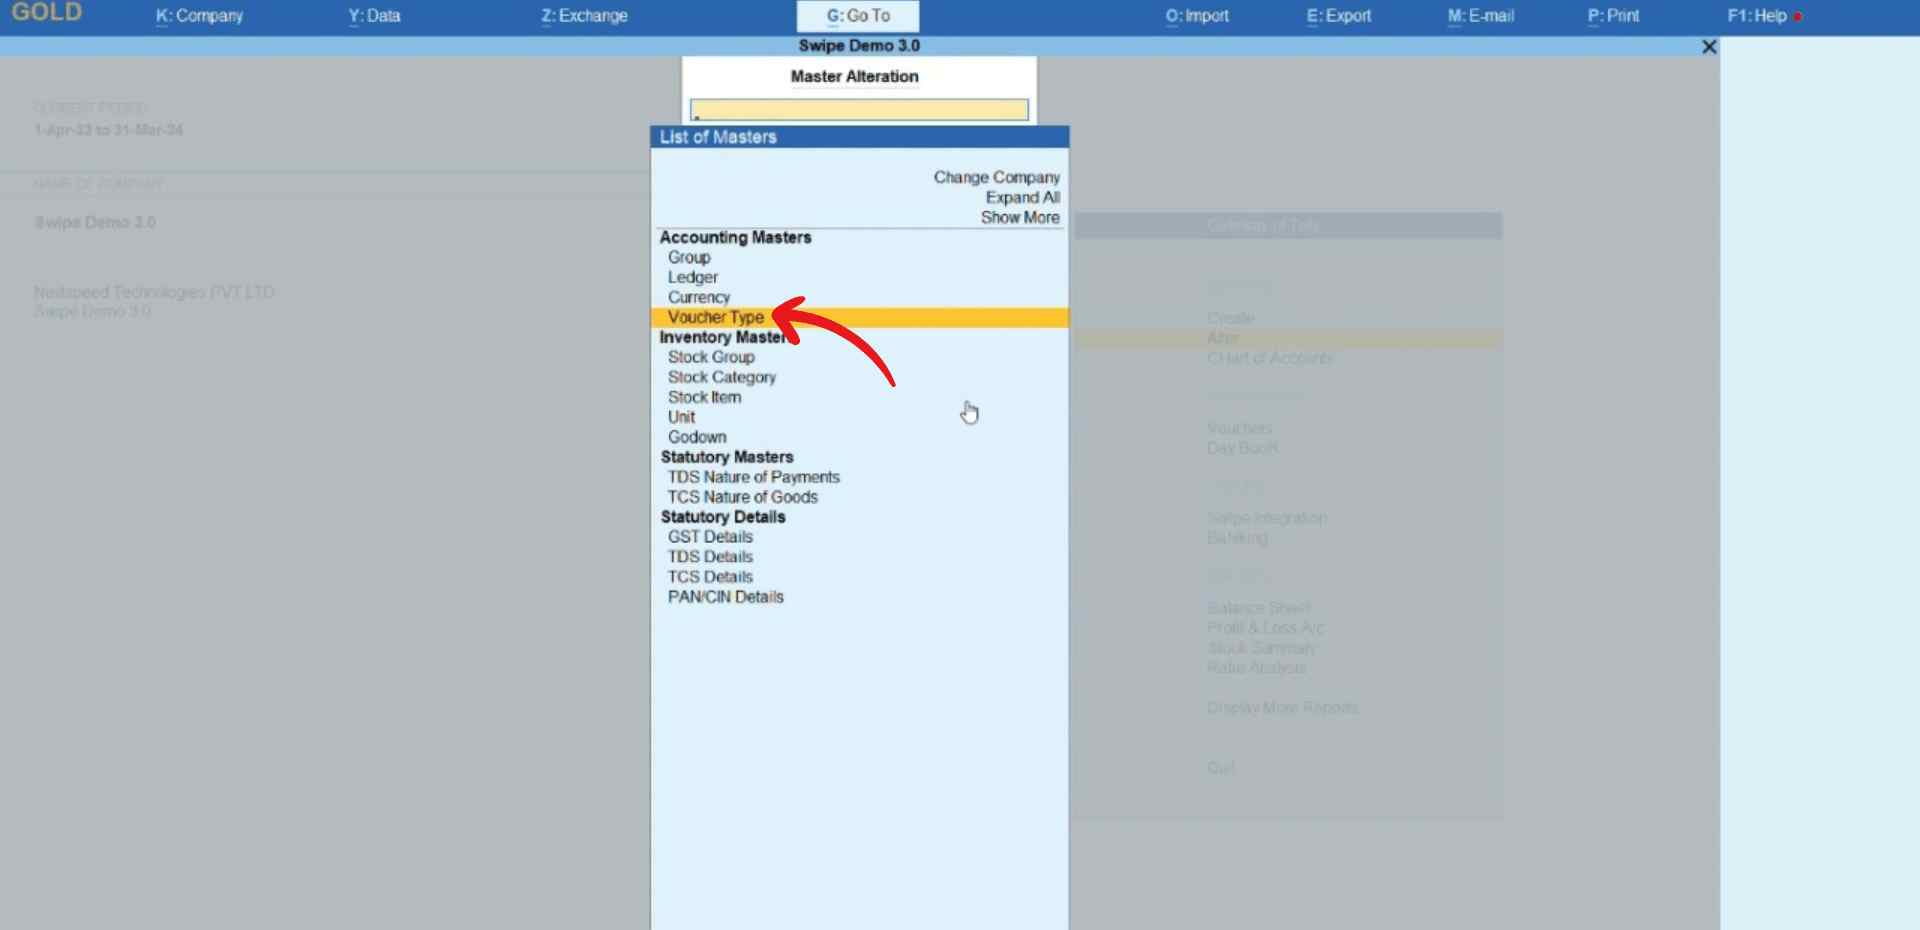
Step 2: Click on the voucher type.
A new page appears. Here, click on “Voucher Type” under the Accounting Masters section.
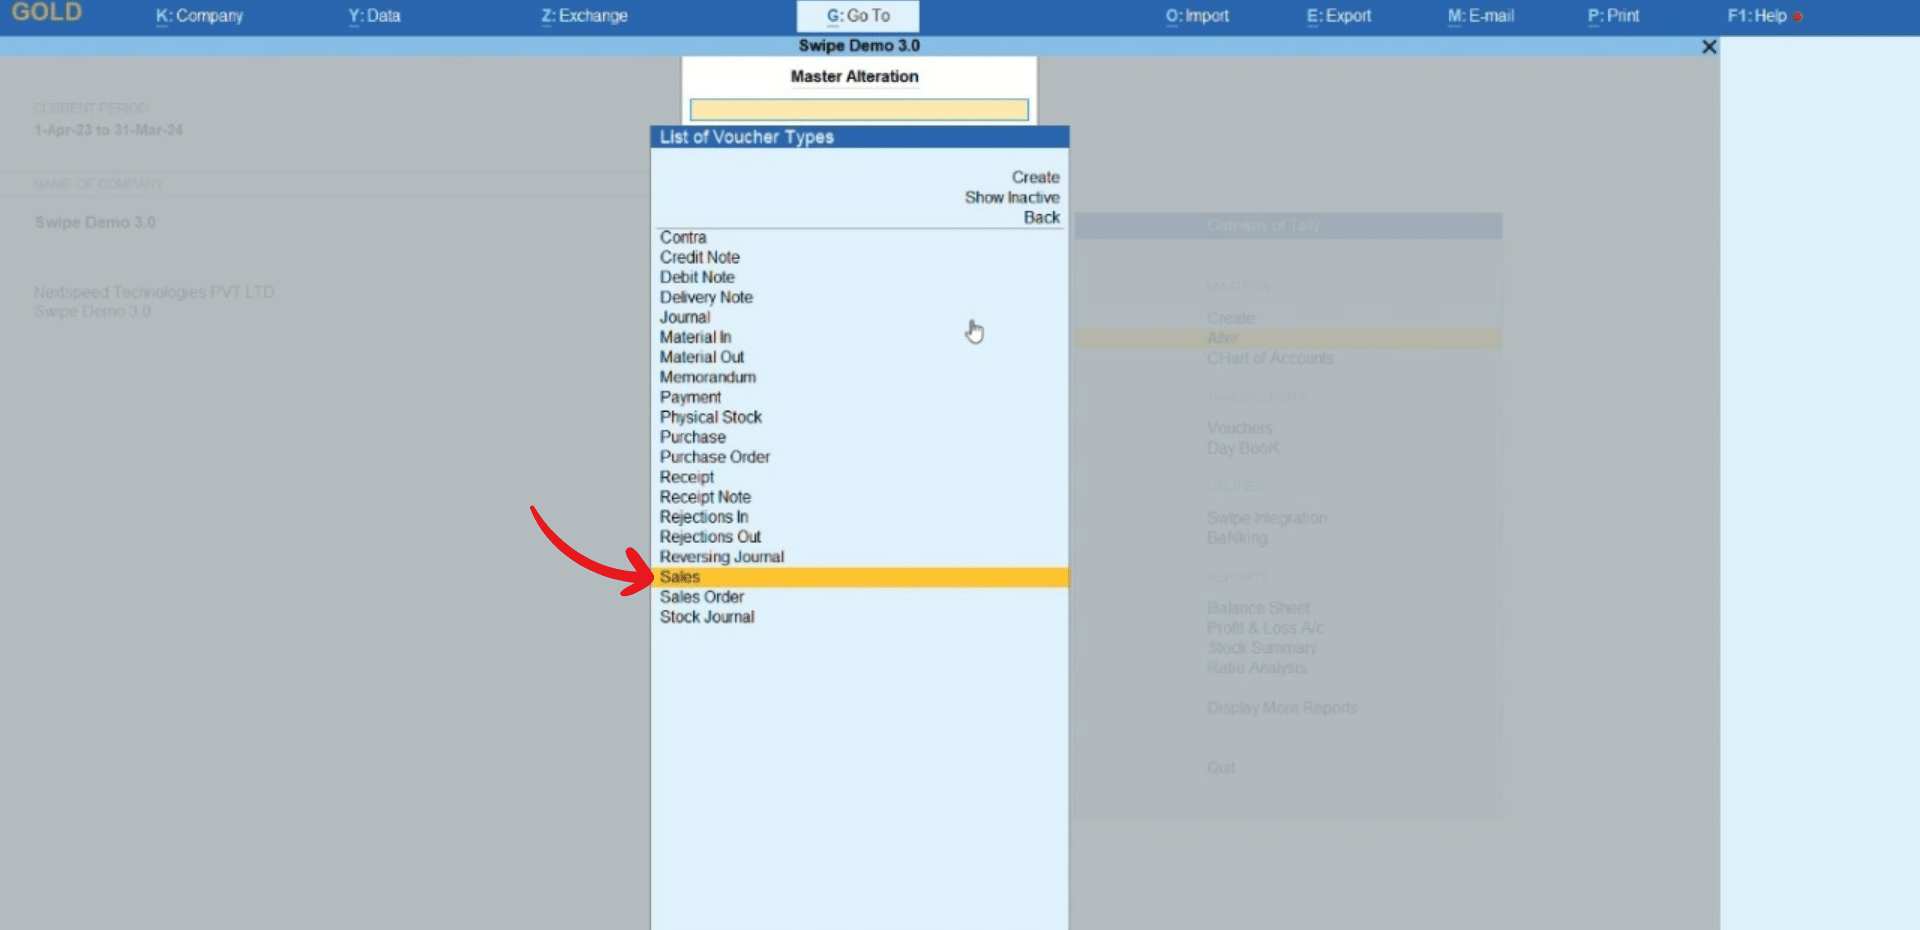
Step 3: Select sales.
Now, select the “Sales” option from the menu.
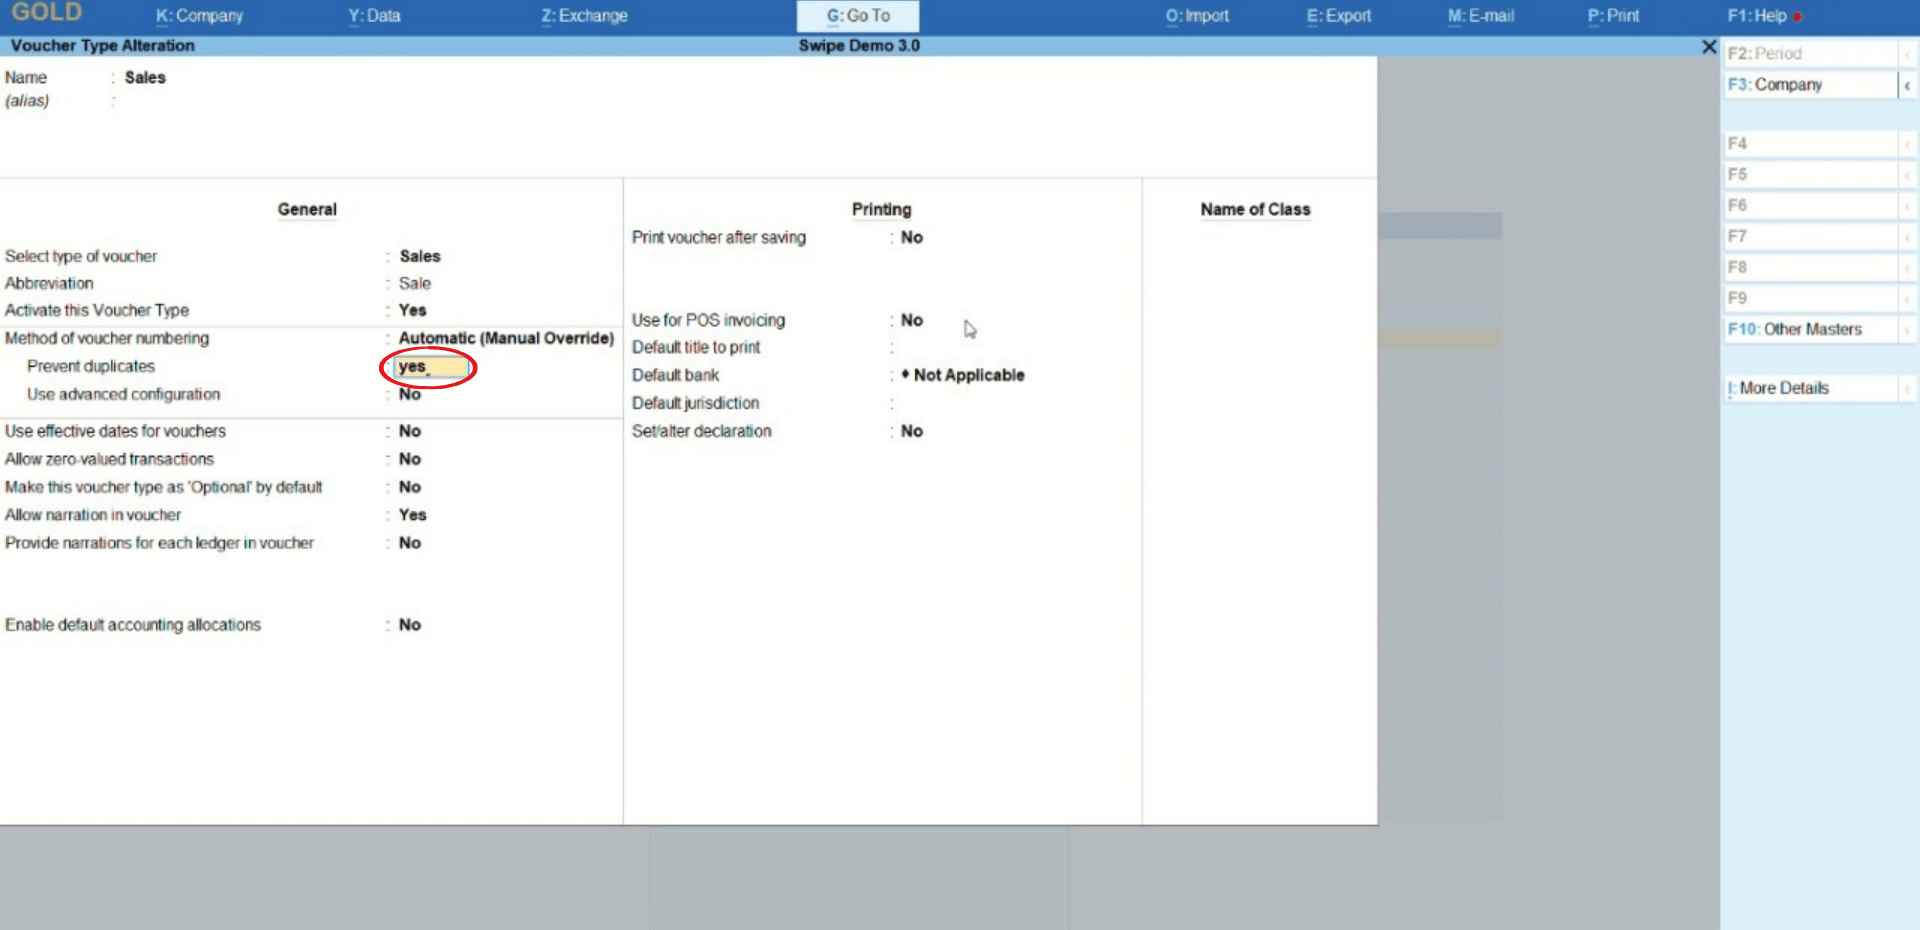
Change “Method of Voucher Numbering” to Automatic (Manual Override).
Type yes in the box next to "prevent duplicates”.
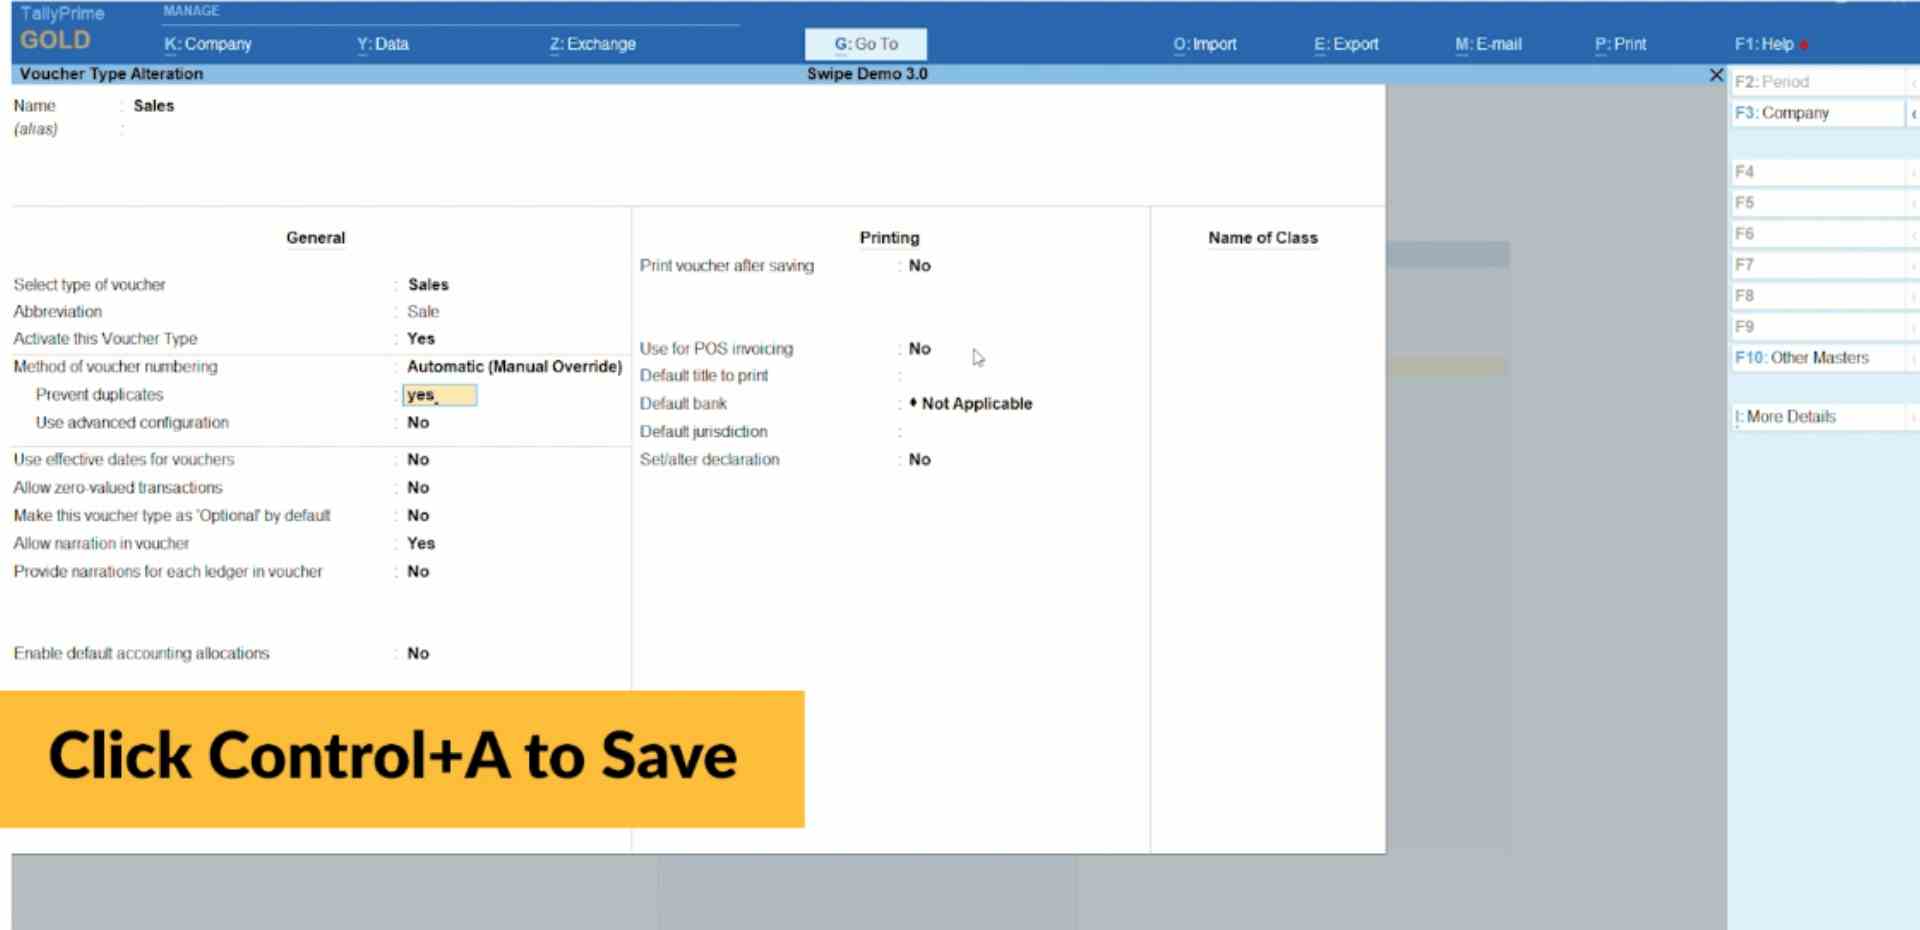
Now, press Control+A on your keyboard to save the settings and press “Esc” to go back to “Gateway of Tally”.
Step 4: Go to Swipe Integration.
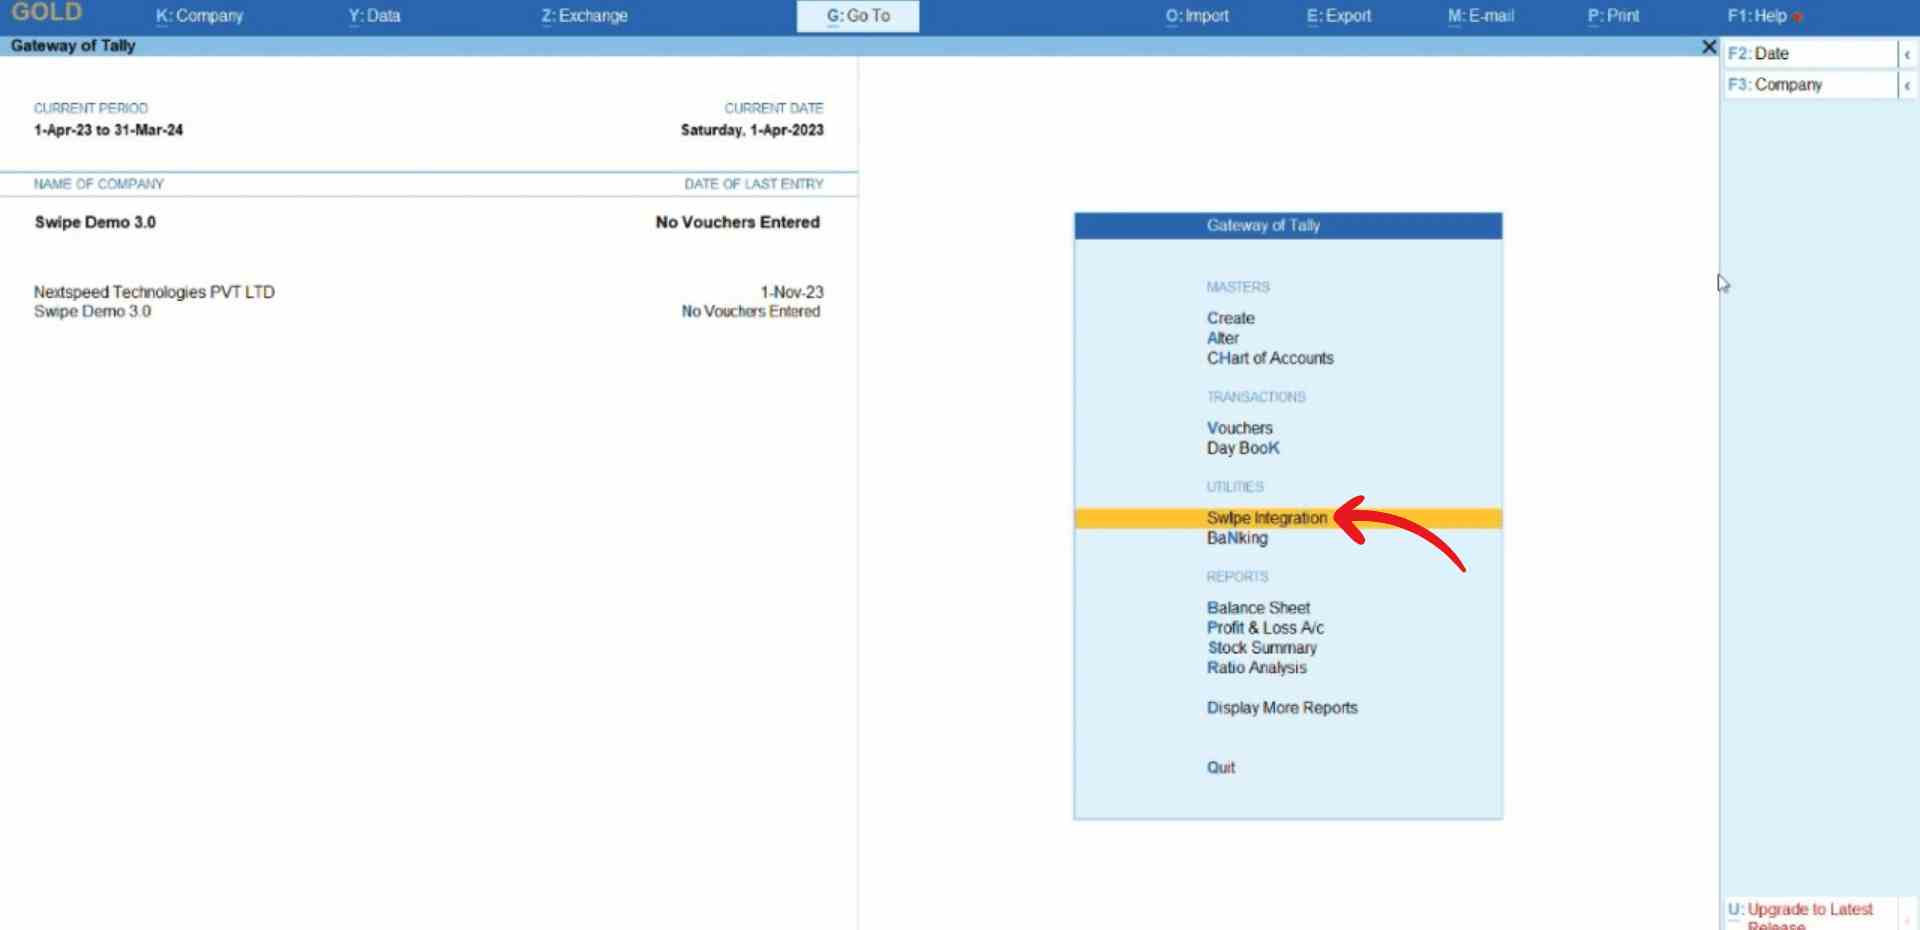
Go to "Swipe Integration" which is under the Utilities section of “Gateway of Tally”.
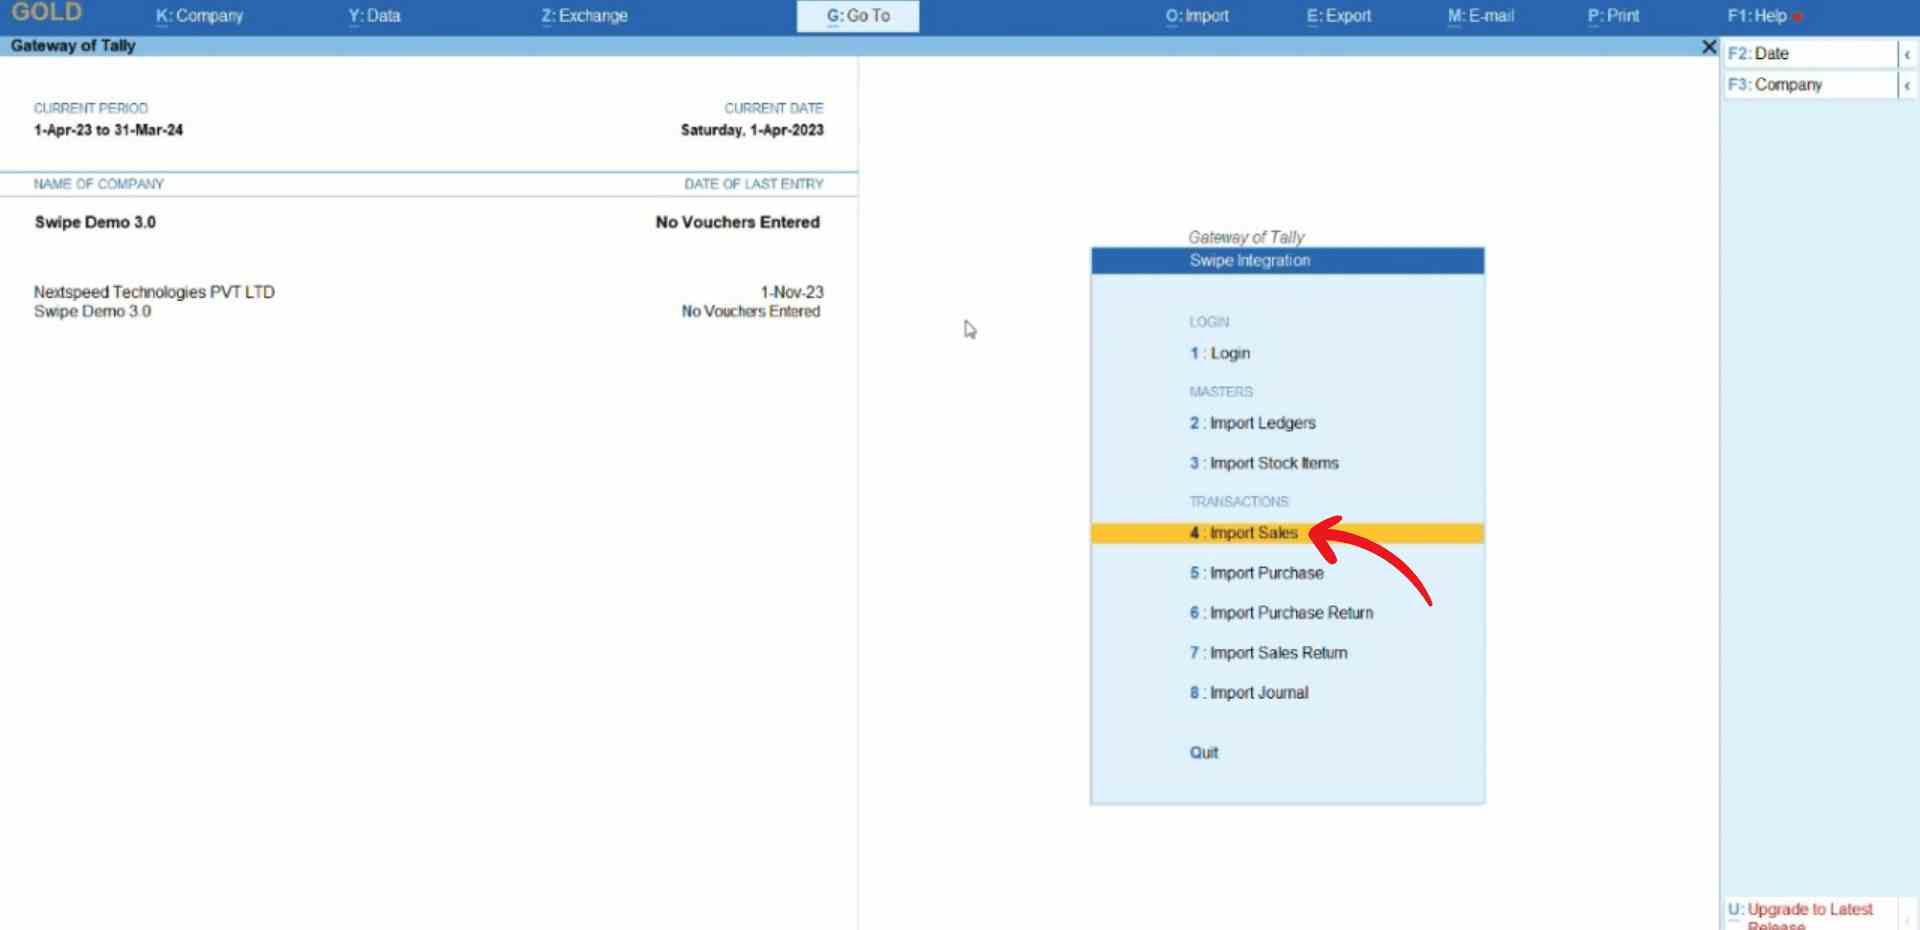
Step 5: Import Sales.
Click on the “Import Sales” option under the Masters section.
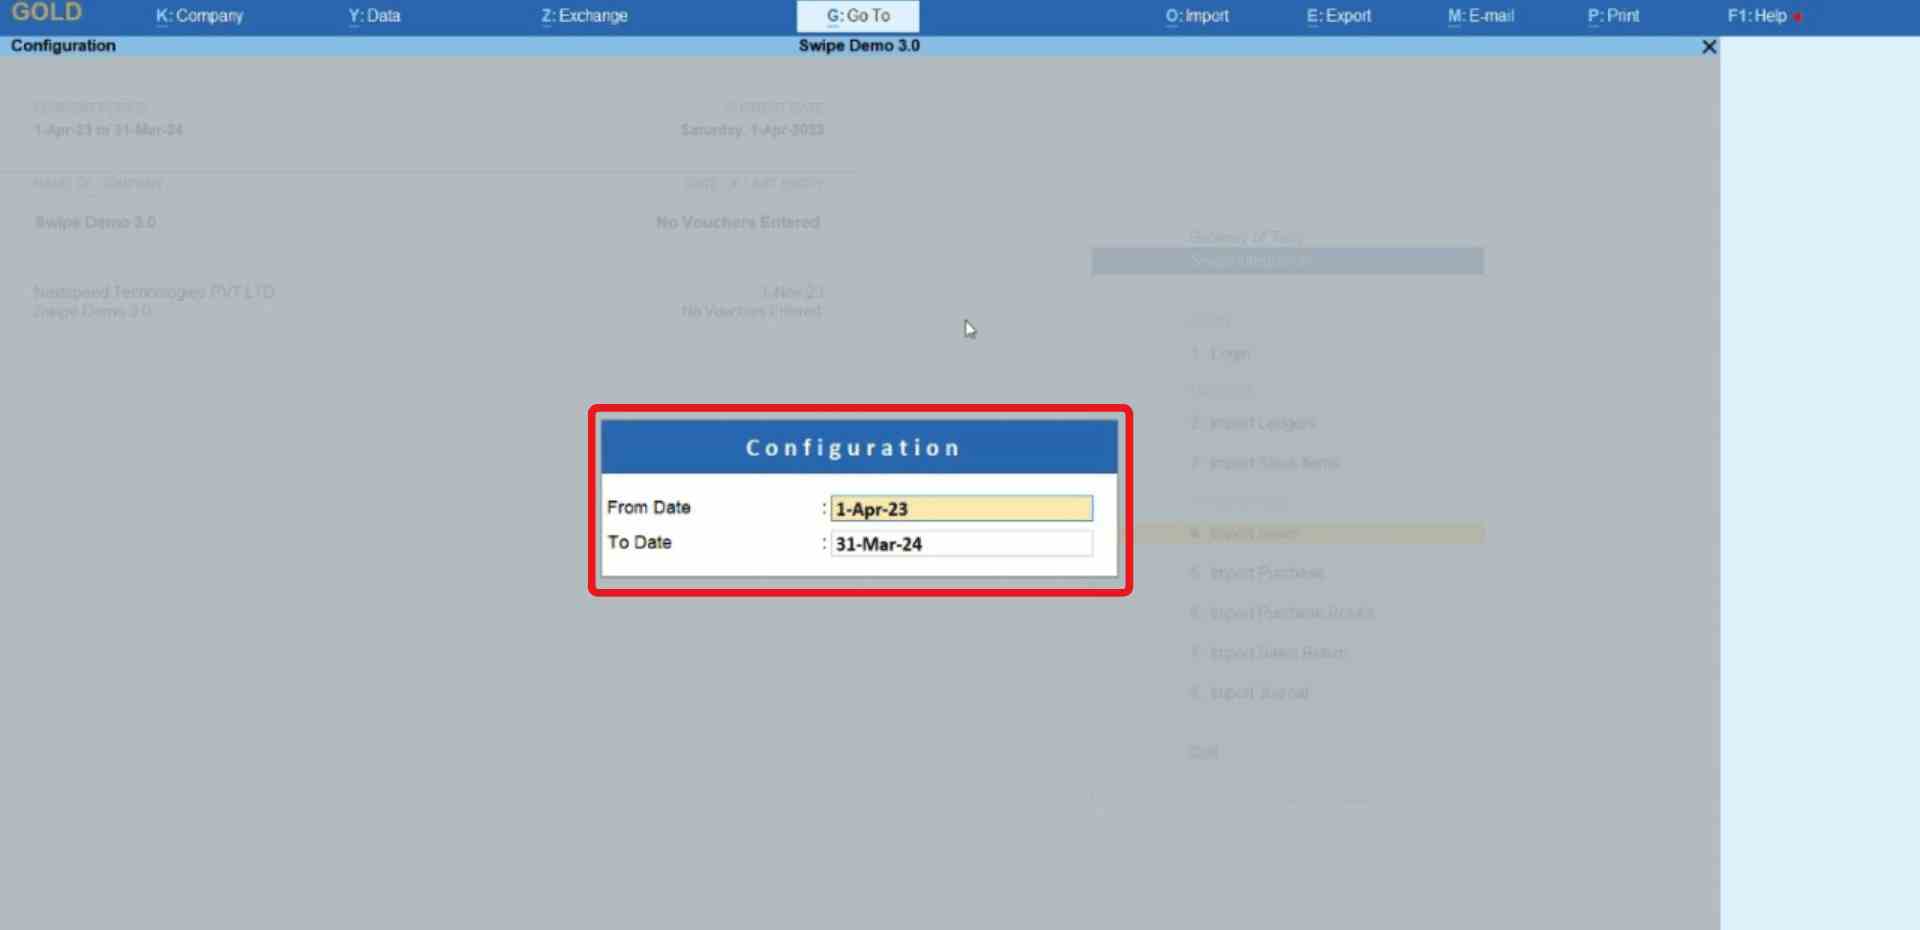
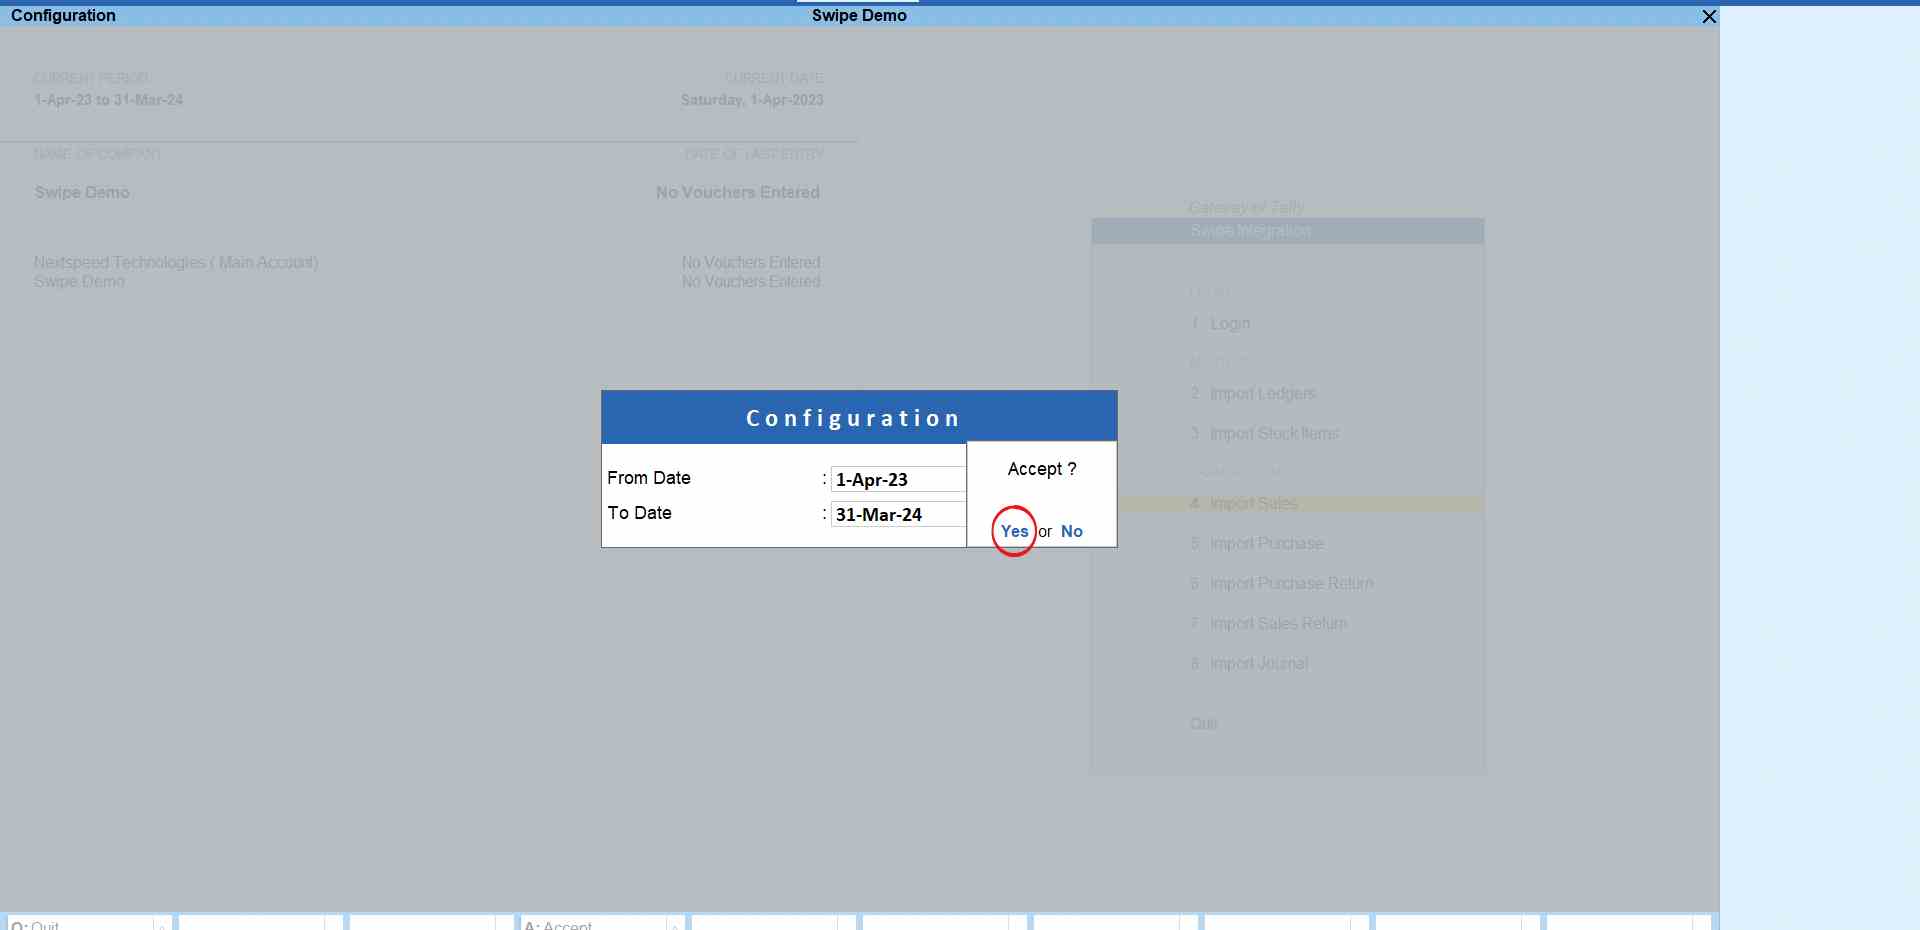
A pop-up appears. Here, enter the timeline of sales invoices you want to import and click Yes to confirm your action.
Please wait until the data is fetched from Swipe.
Step 6: Check the Error List.
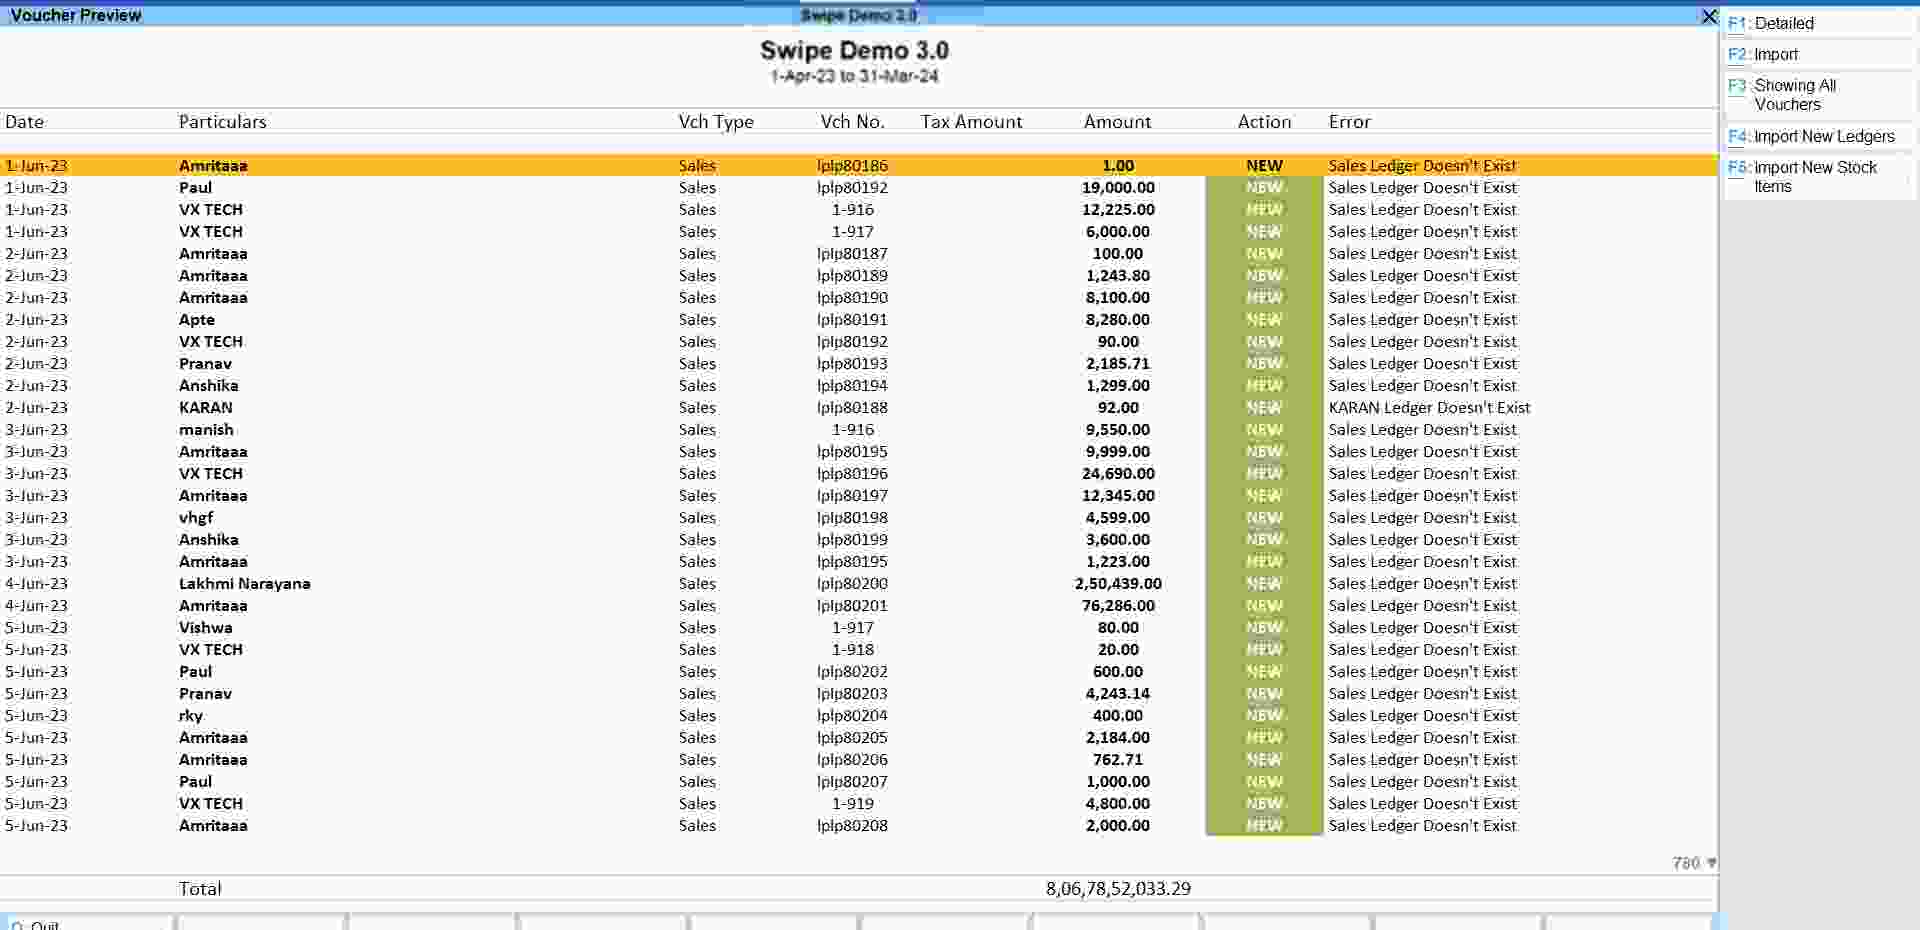
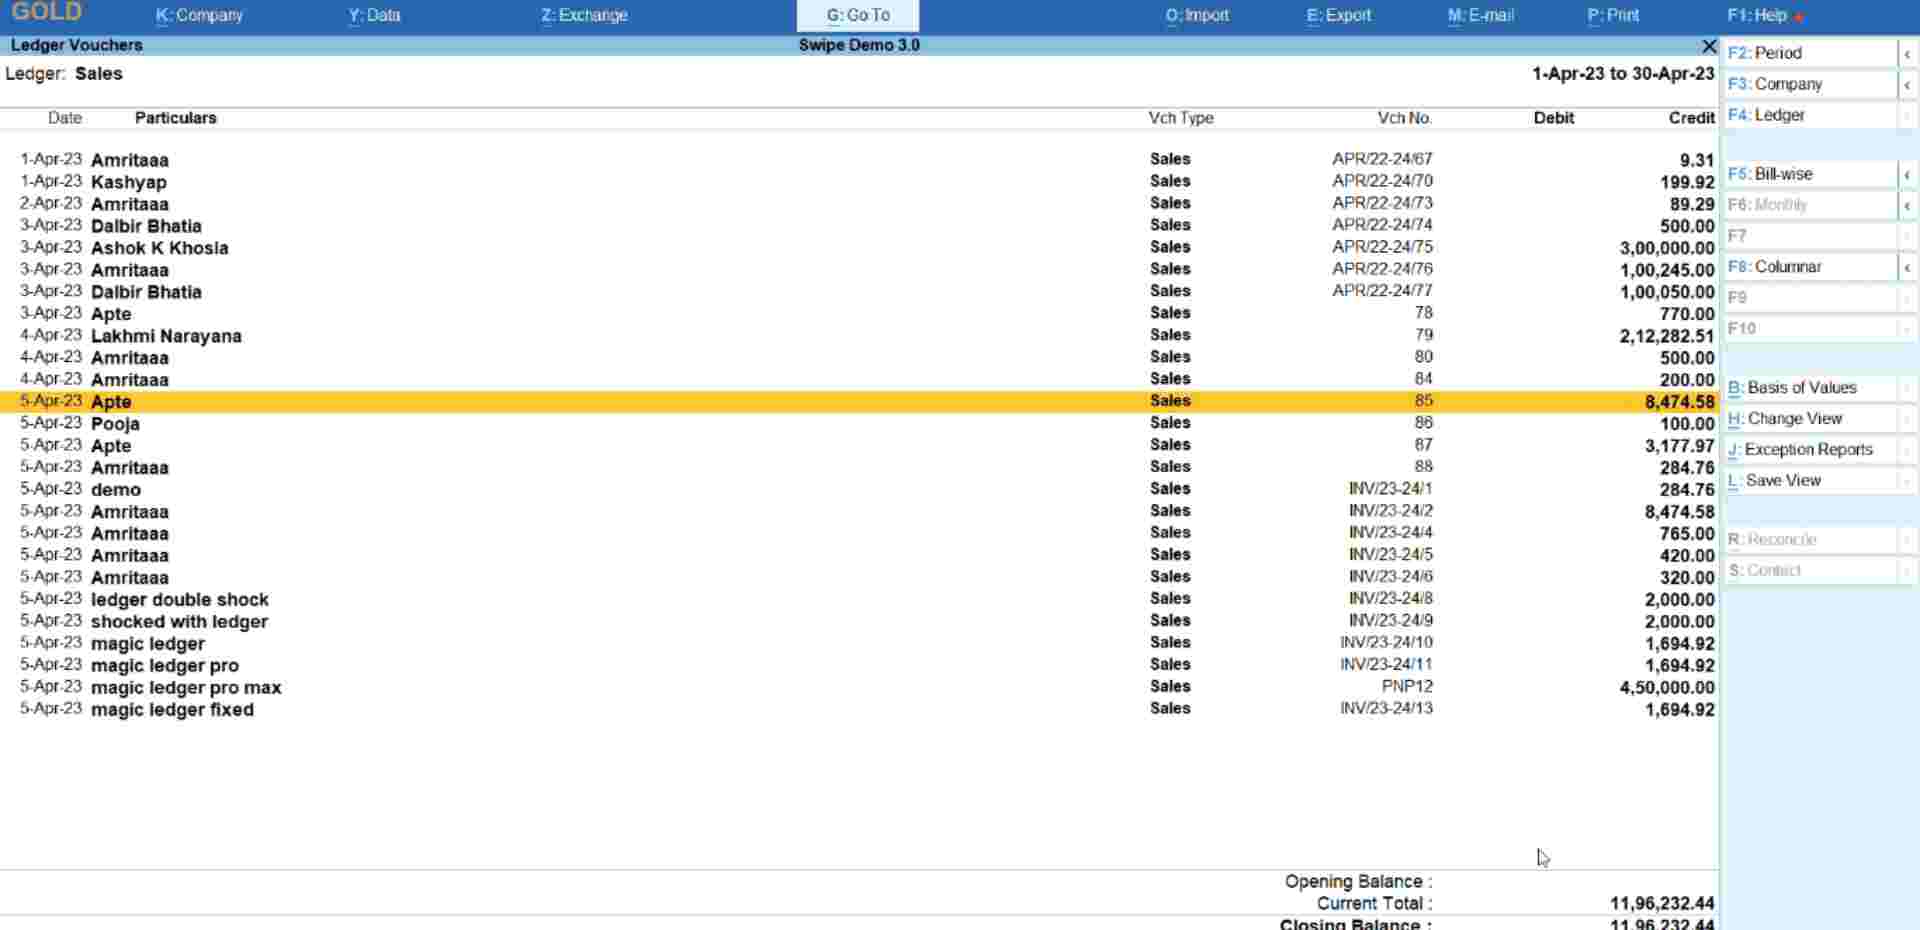
After fetching the data, a preview page appears, displaying the sales invoice data.
To review any errors, please follow the steps below to resolve the issue.
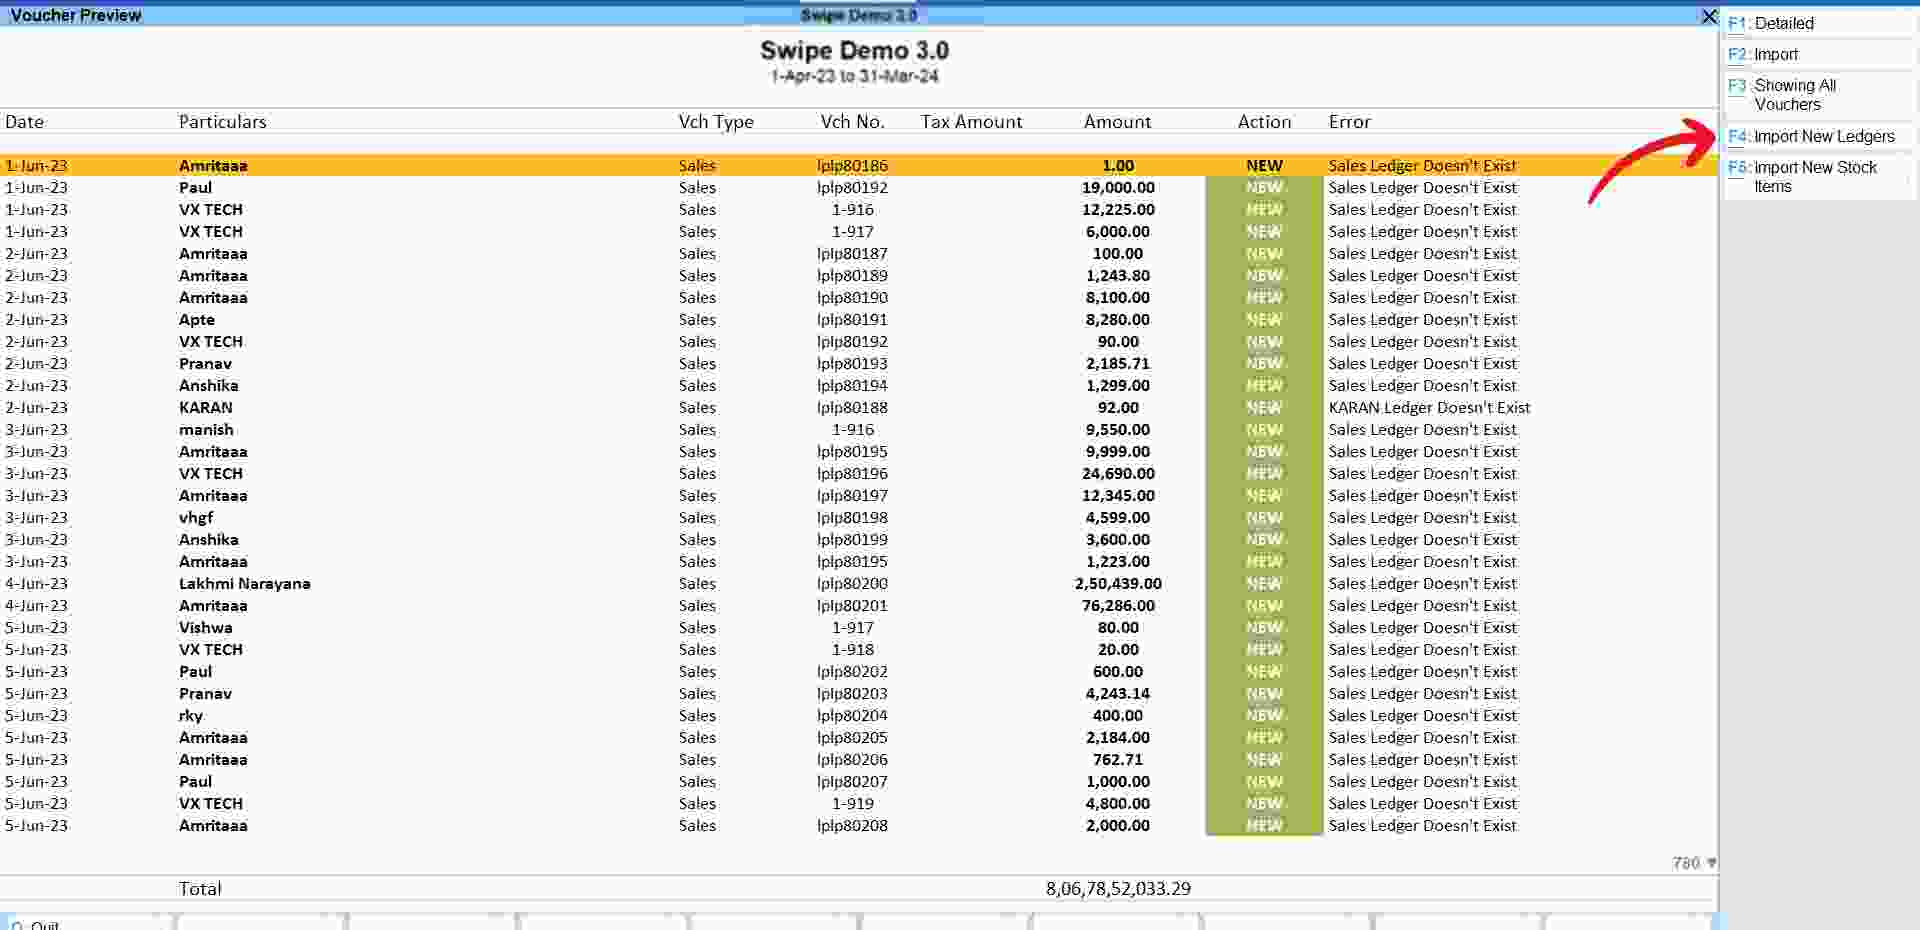
For the error “Ledgers Doesn’t Exist”: Click on the “Import New Ledgers” option present at the top right corner of the screen or press the F4 key on your keyboard.
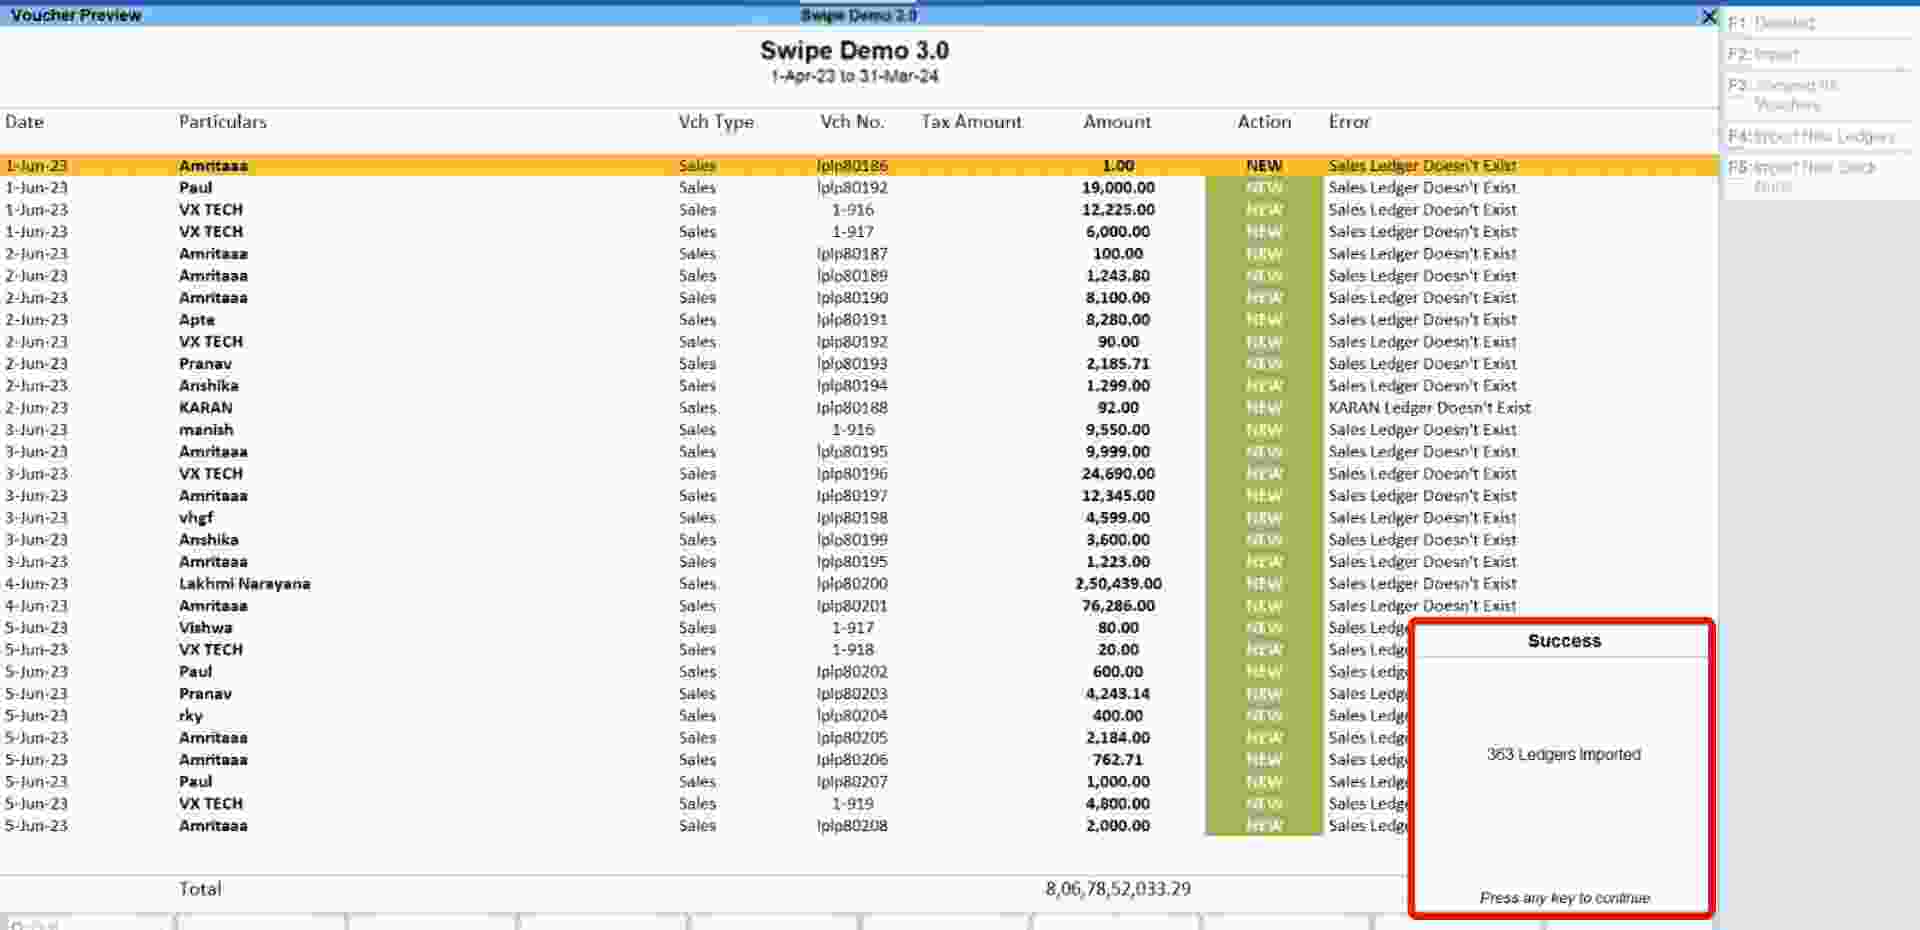
Congratulations! You have successfully imported new ledgers and a pop-up appears at the bottom of the screen informing the screen. Press any key to continue.
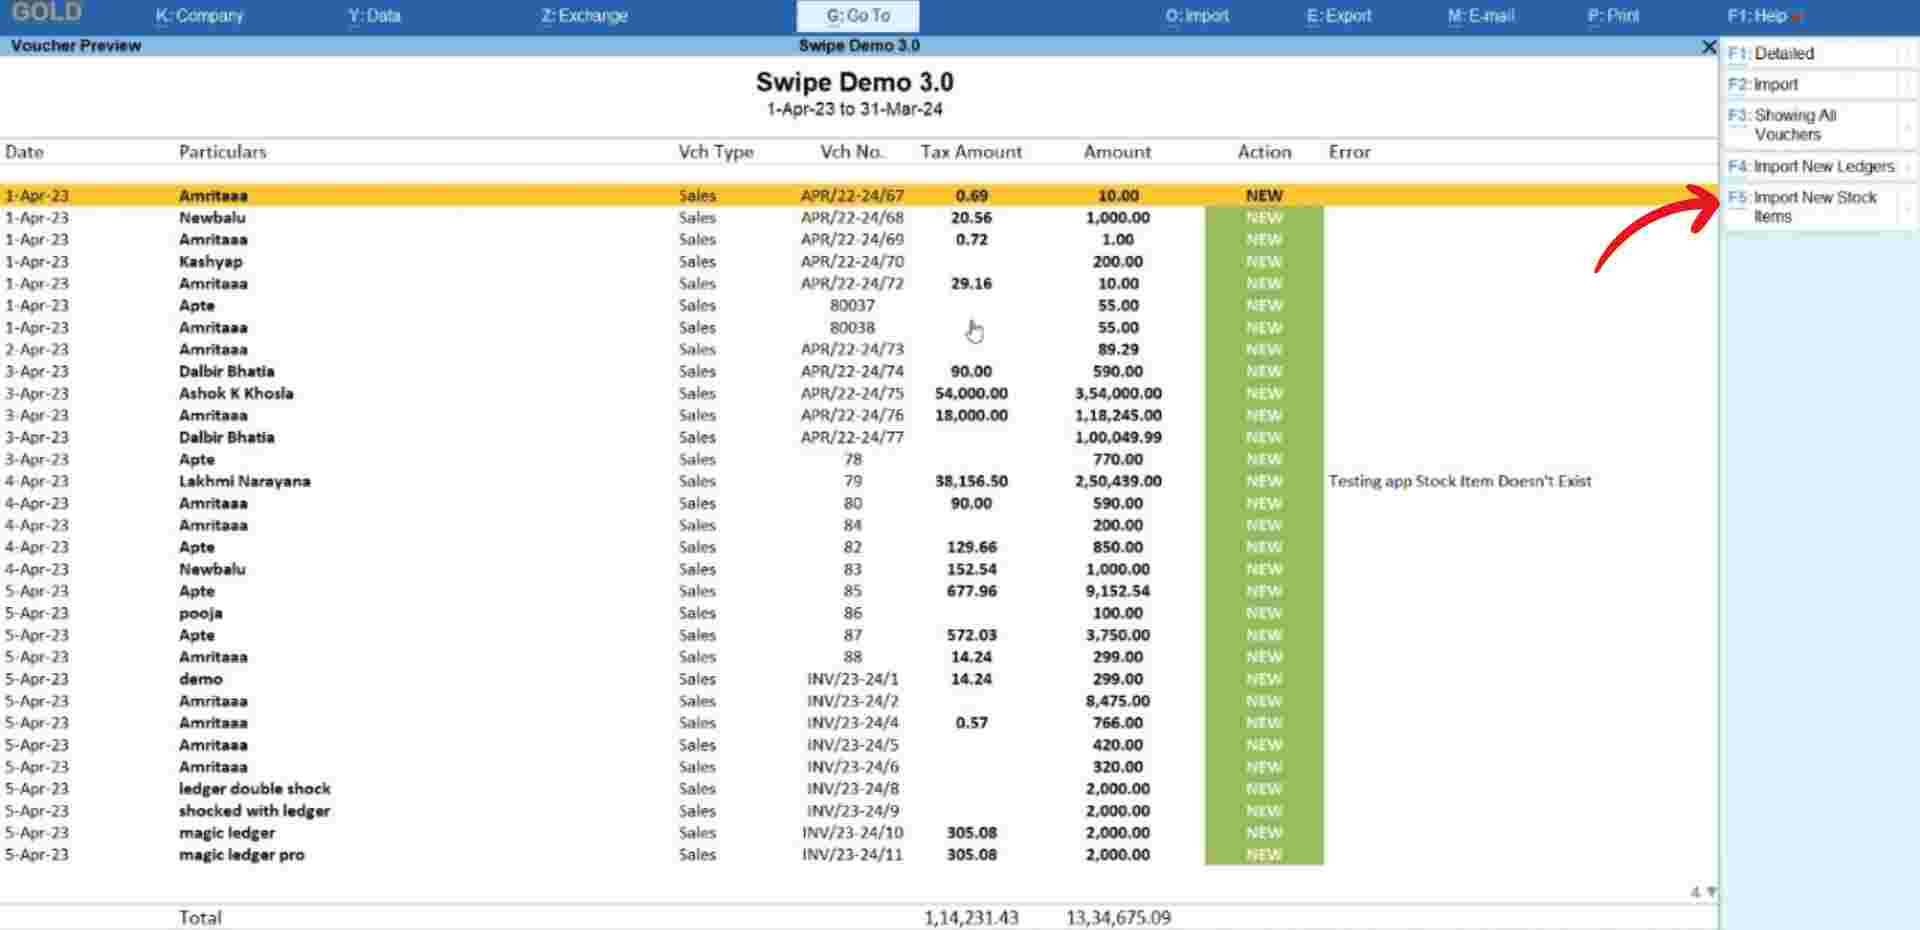
For the error “Stock Items Doesn't Exist": Click on the “Import New Stock Items” option present at the top right corner of the screen or press the F5 key on your keyboard.
Congratulations! You have successfully imported new stock items and a pop-up appears at the bottom of the screen informing the screen. Press any key to continue.
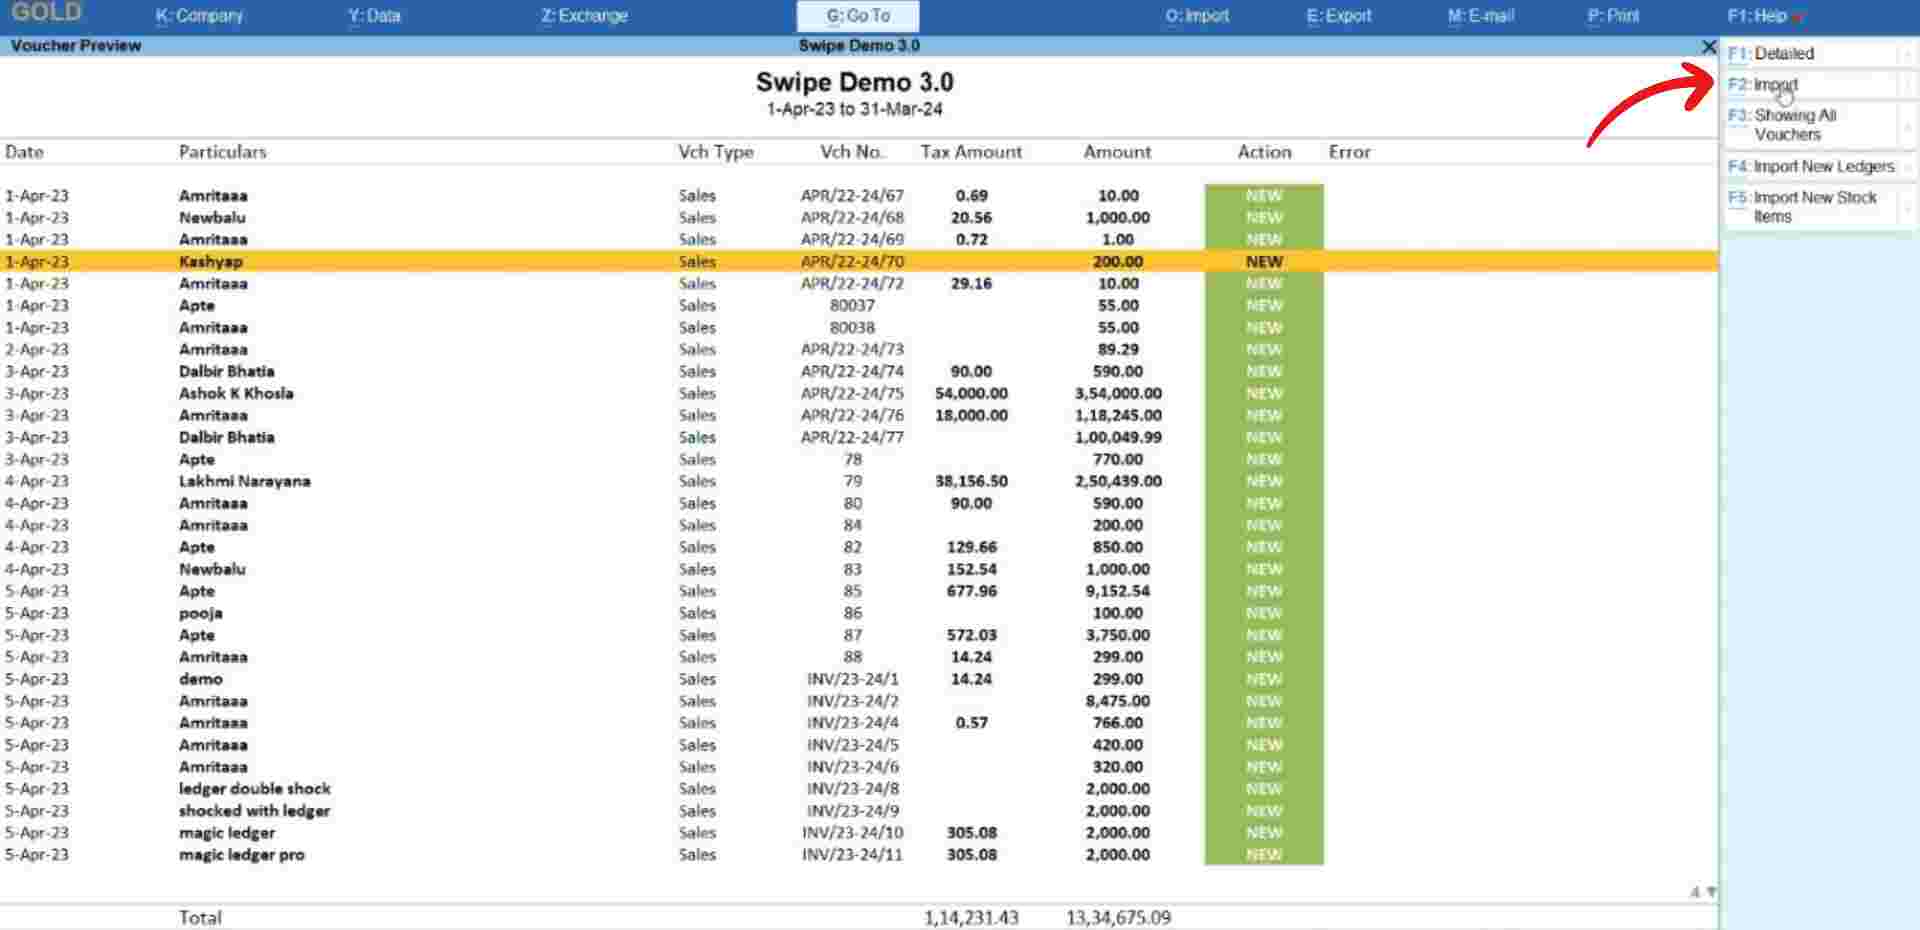
Step 7: Import the data.
Click on the “Import” option present at the top right corner of the screen or press the F2 key on your keyboard.
Now, confirm your action by clicking on the “Yes” option from the pop-up.
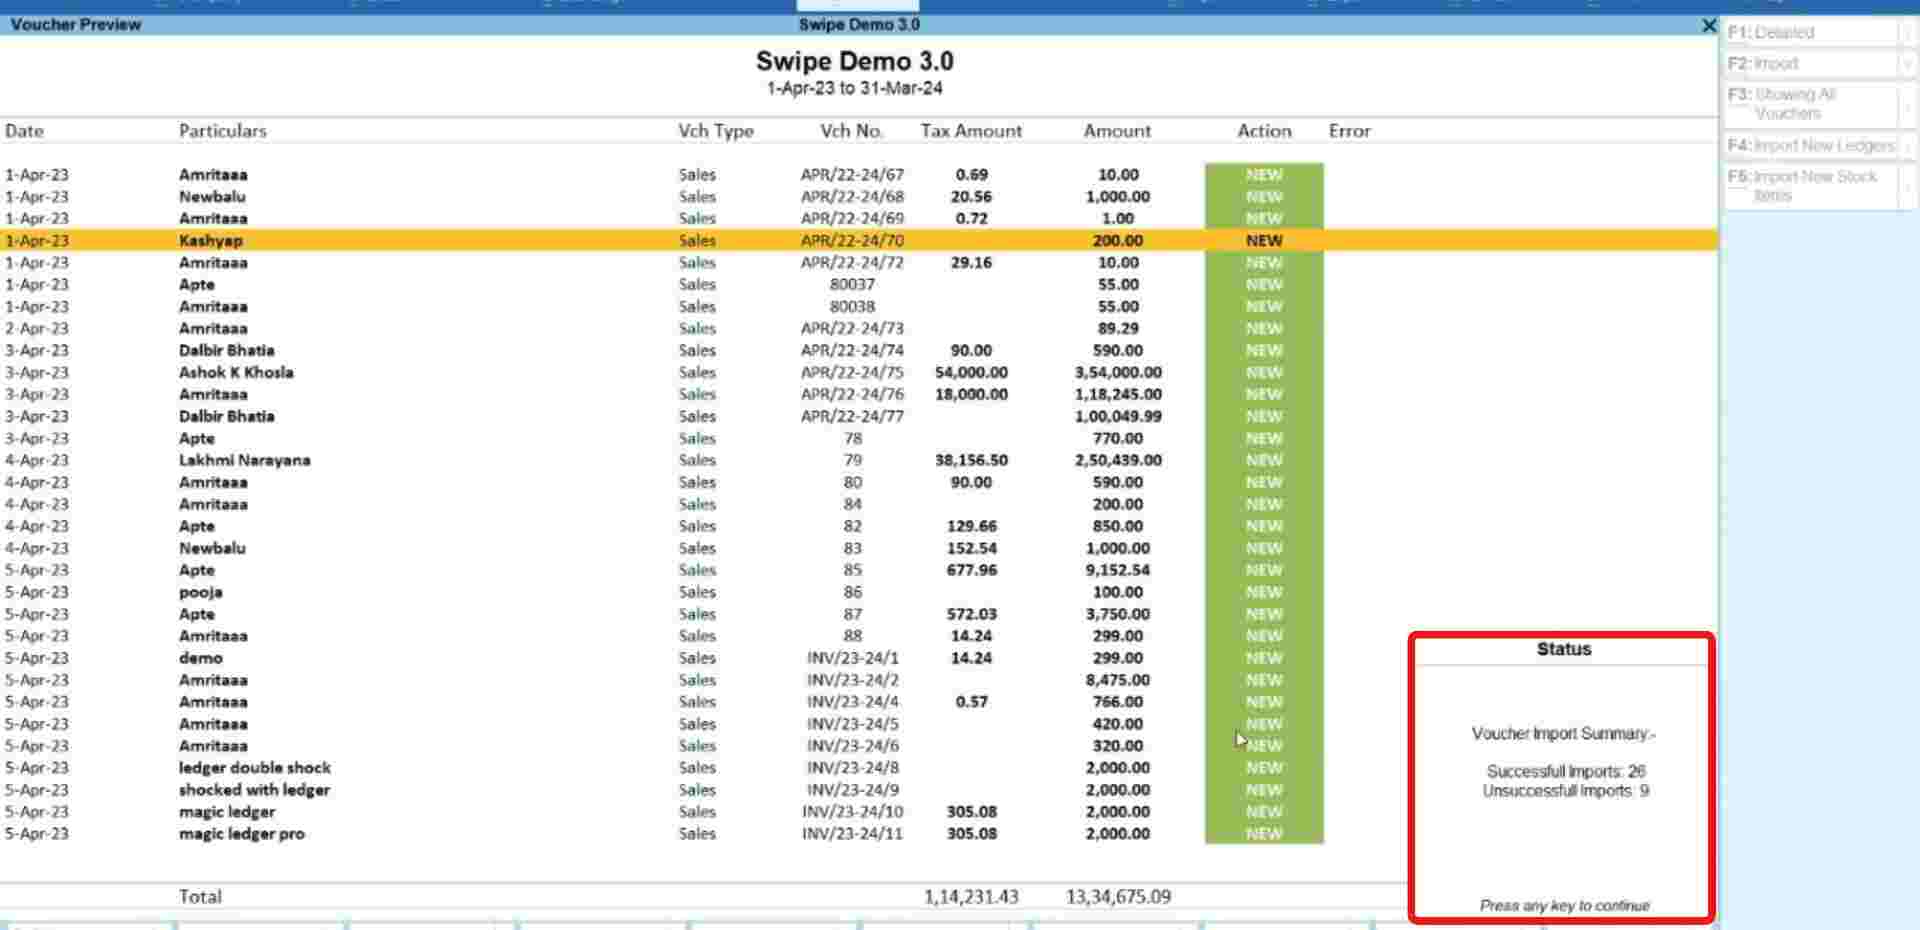
Congratulations, You have successfully imported sales invoice data from your Swipe account to your Tally account, and a pop-up appears at the bottom of the screen informing the same.
Press any key to continue.
How to import purchase invoices from Swipe to Tally
Note: The response time and overall functioning speed of data import are determined by your computer's processor, not by Swipe or Tally software. If you haven't made mandatory changes to your settings to import transactions, please follow the below steps. If you have already made mandatory changes, please skip to step 4.
Step 1: Go to the Alter.
Click on "Atler" which is under the Masters section of “Gateway of Tally”.
Step 2: Click on the voucher type.
A new page appears. Here, click on “Voucher Type” under the Accounting Masters section.
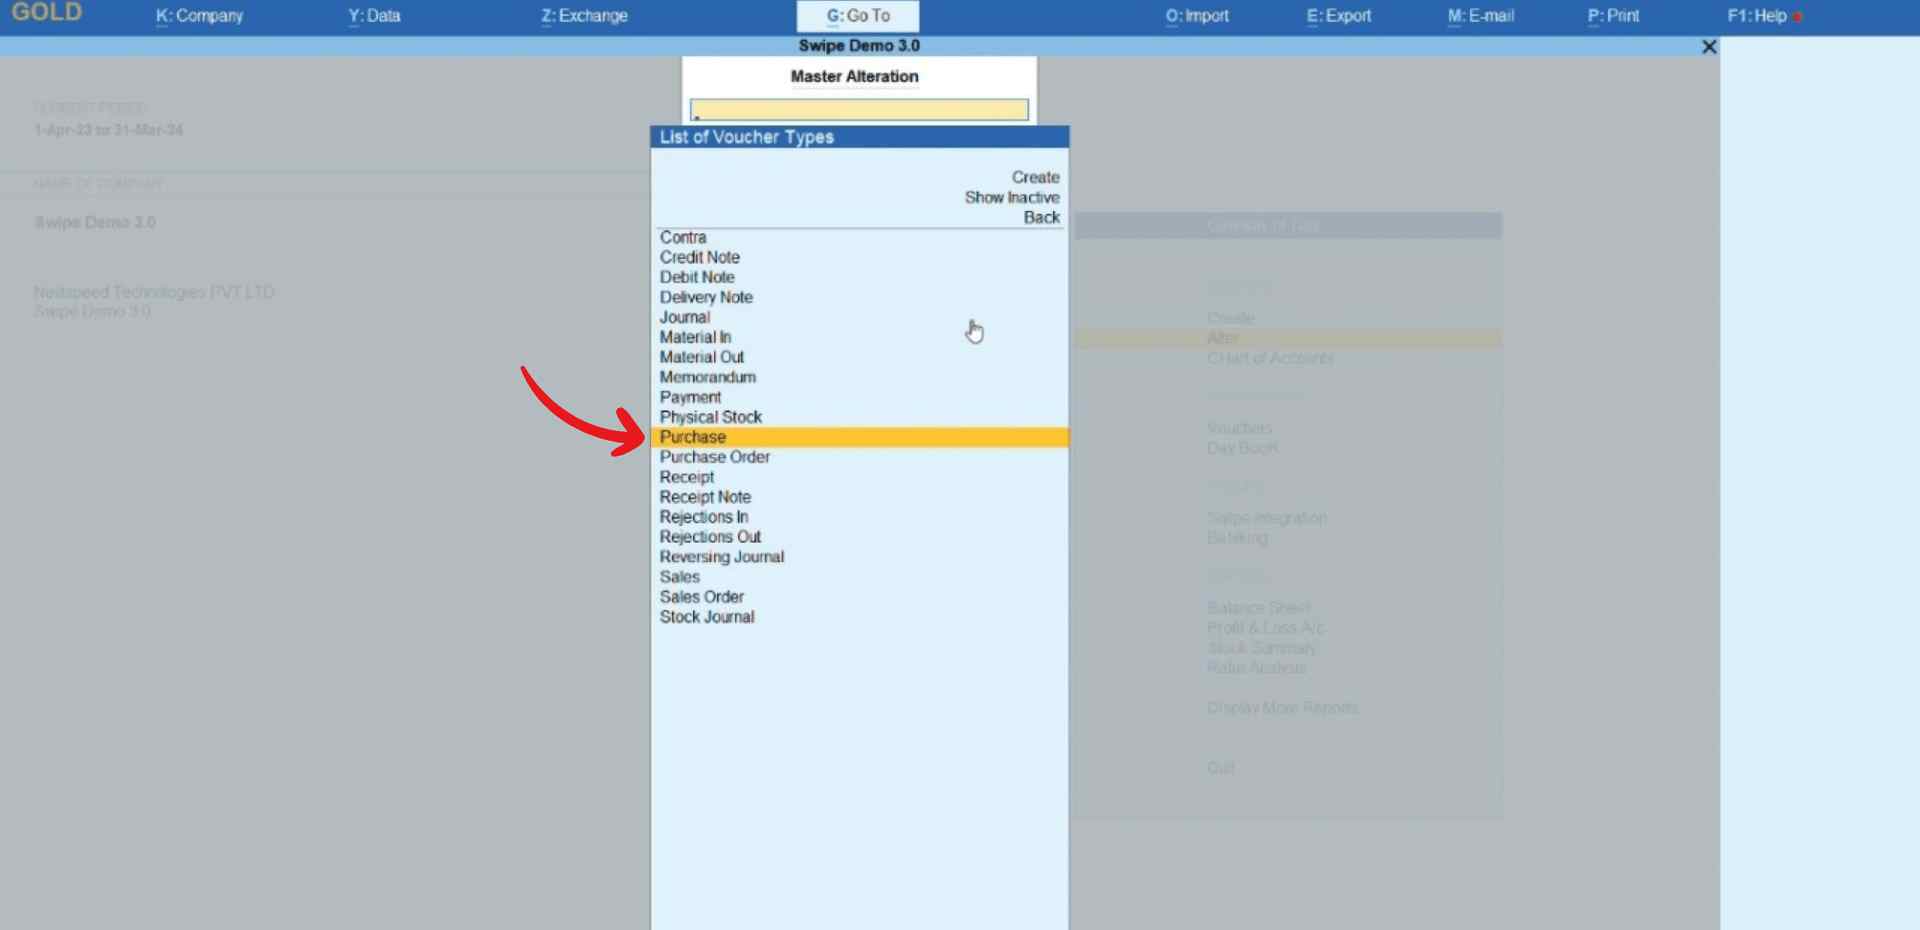
Step 3: Select purchase.
Now, select the “purchase” option from the menu.
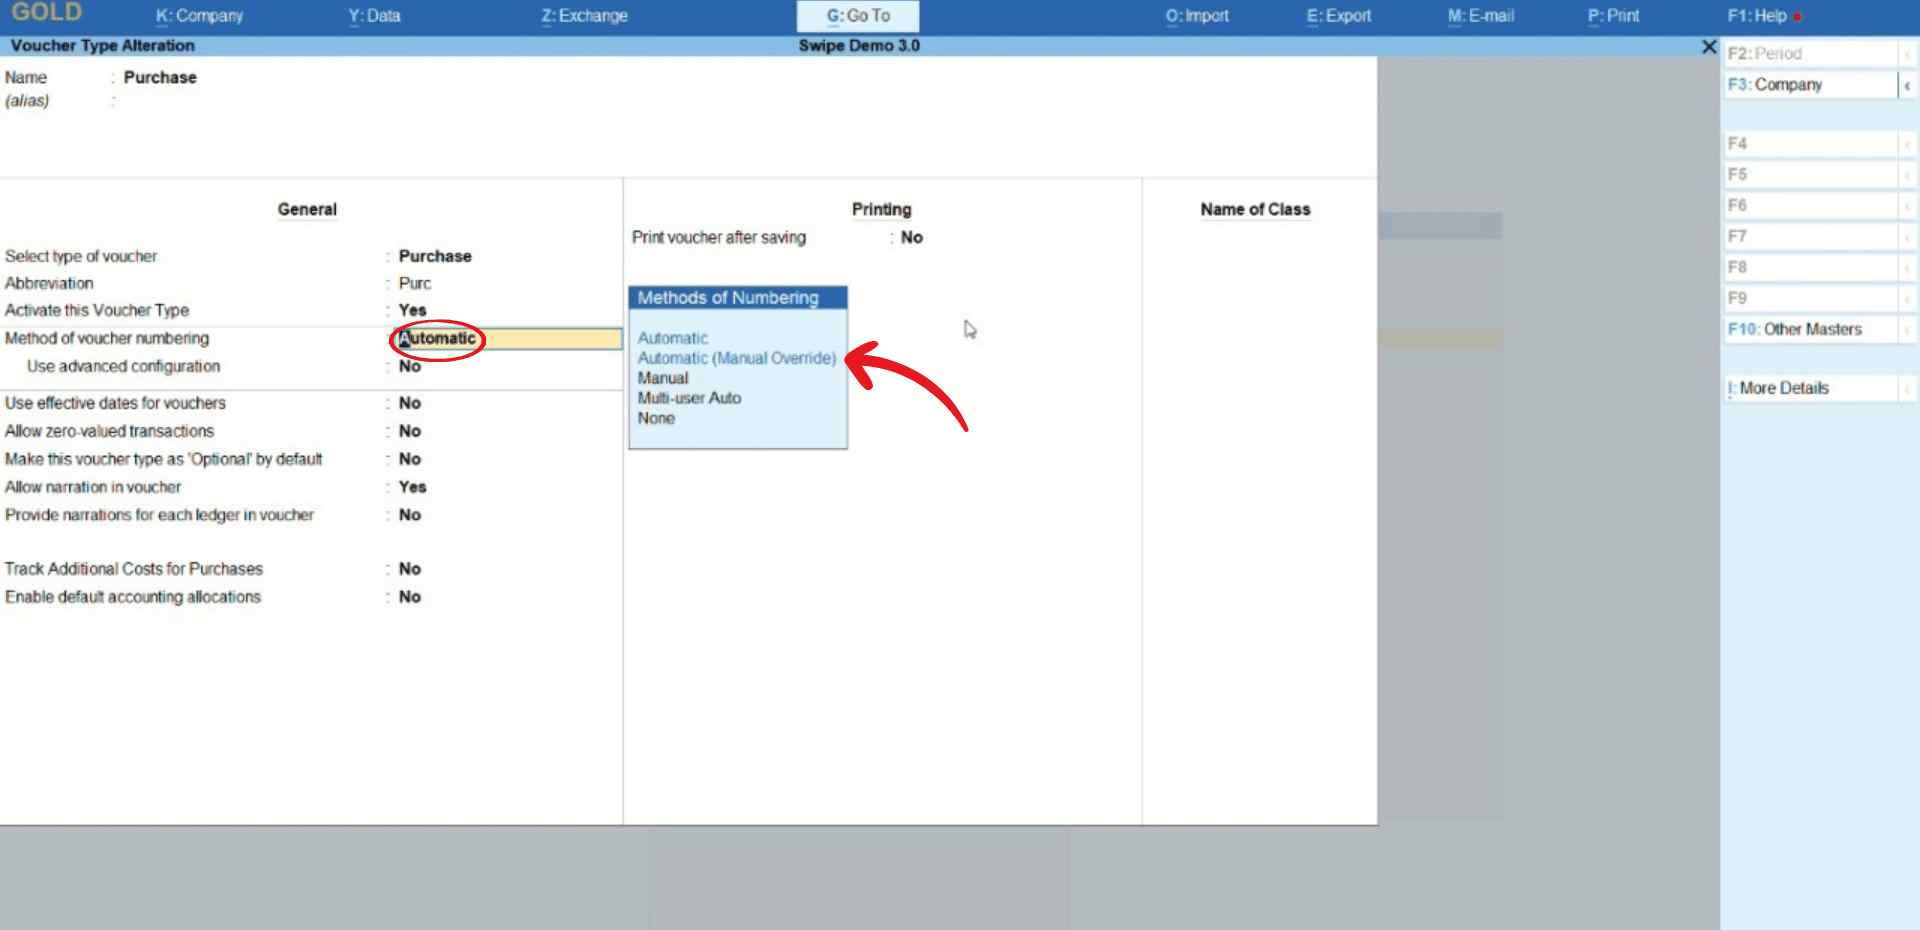
Change “Method of Voucher Numbering” to Automatic (Manual Override)
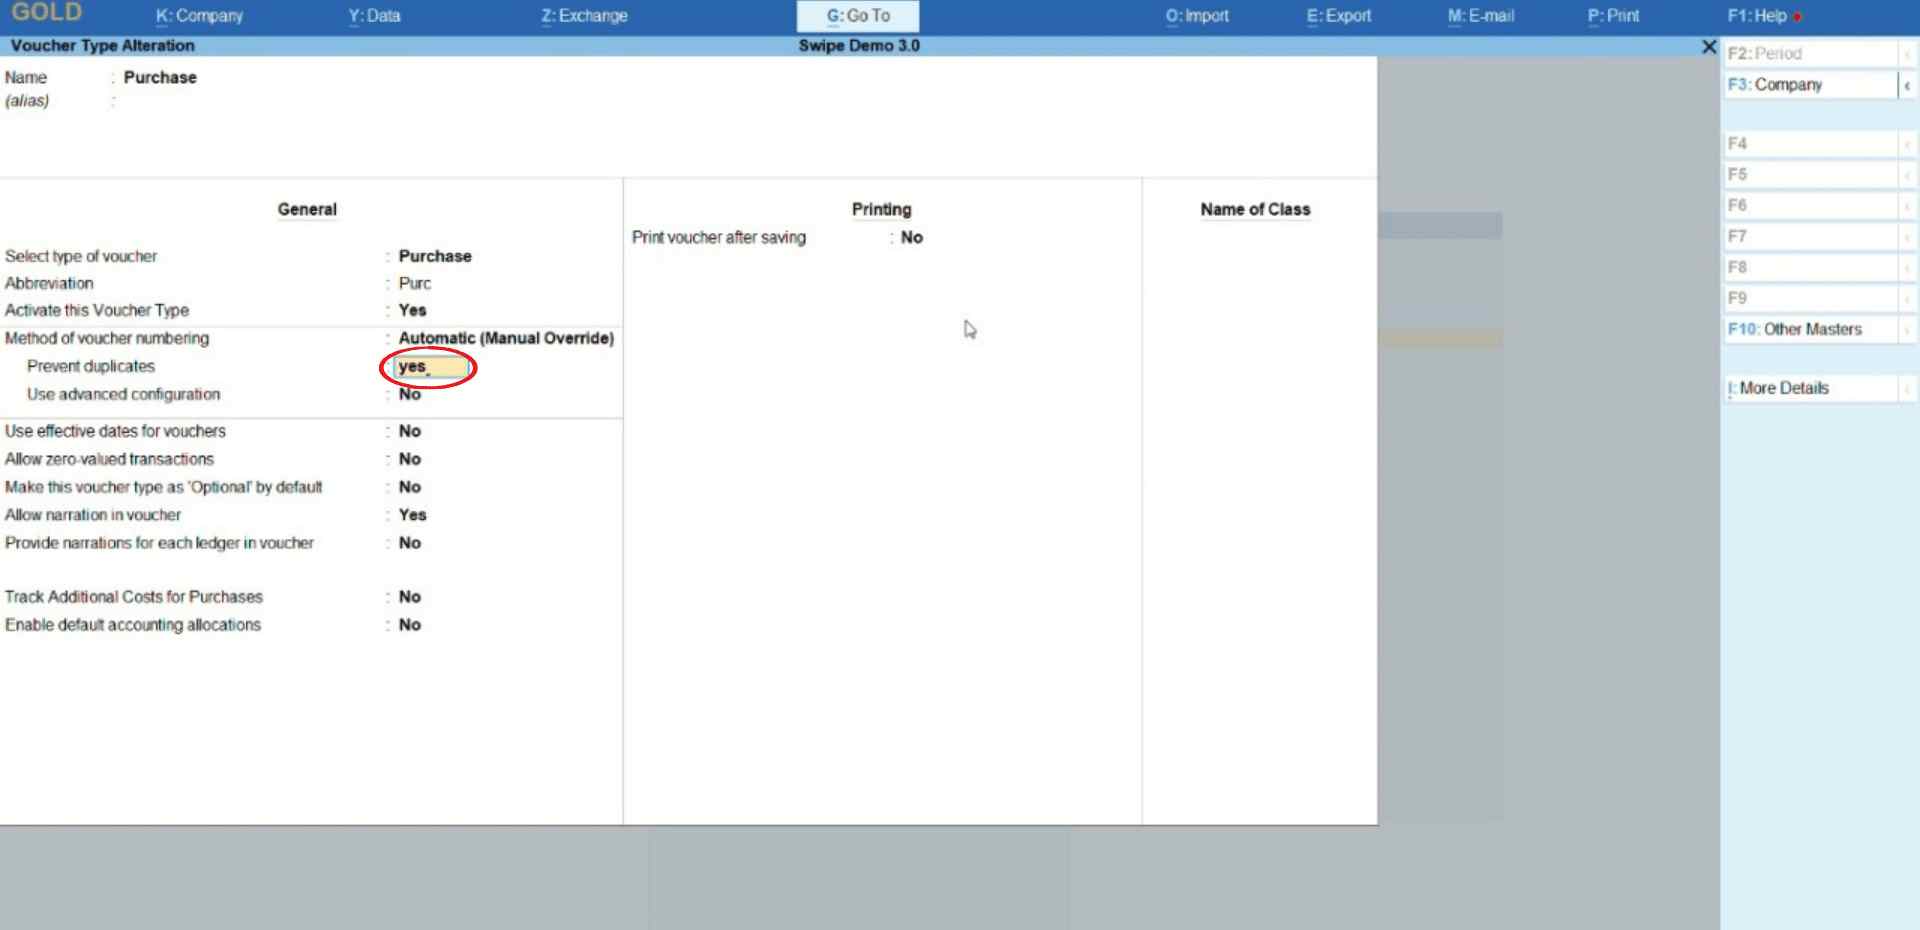
Type yes in the box next to "prevent duplicates”.
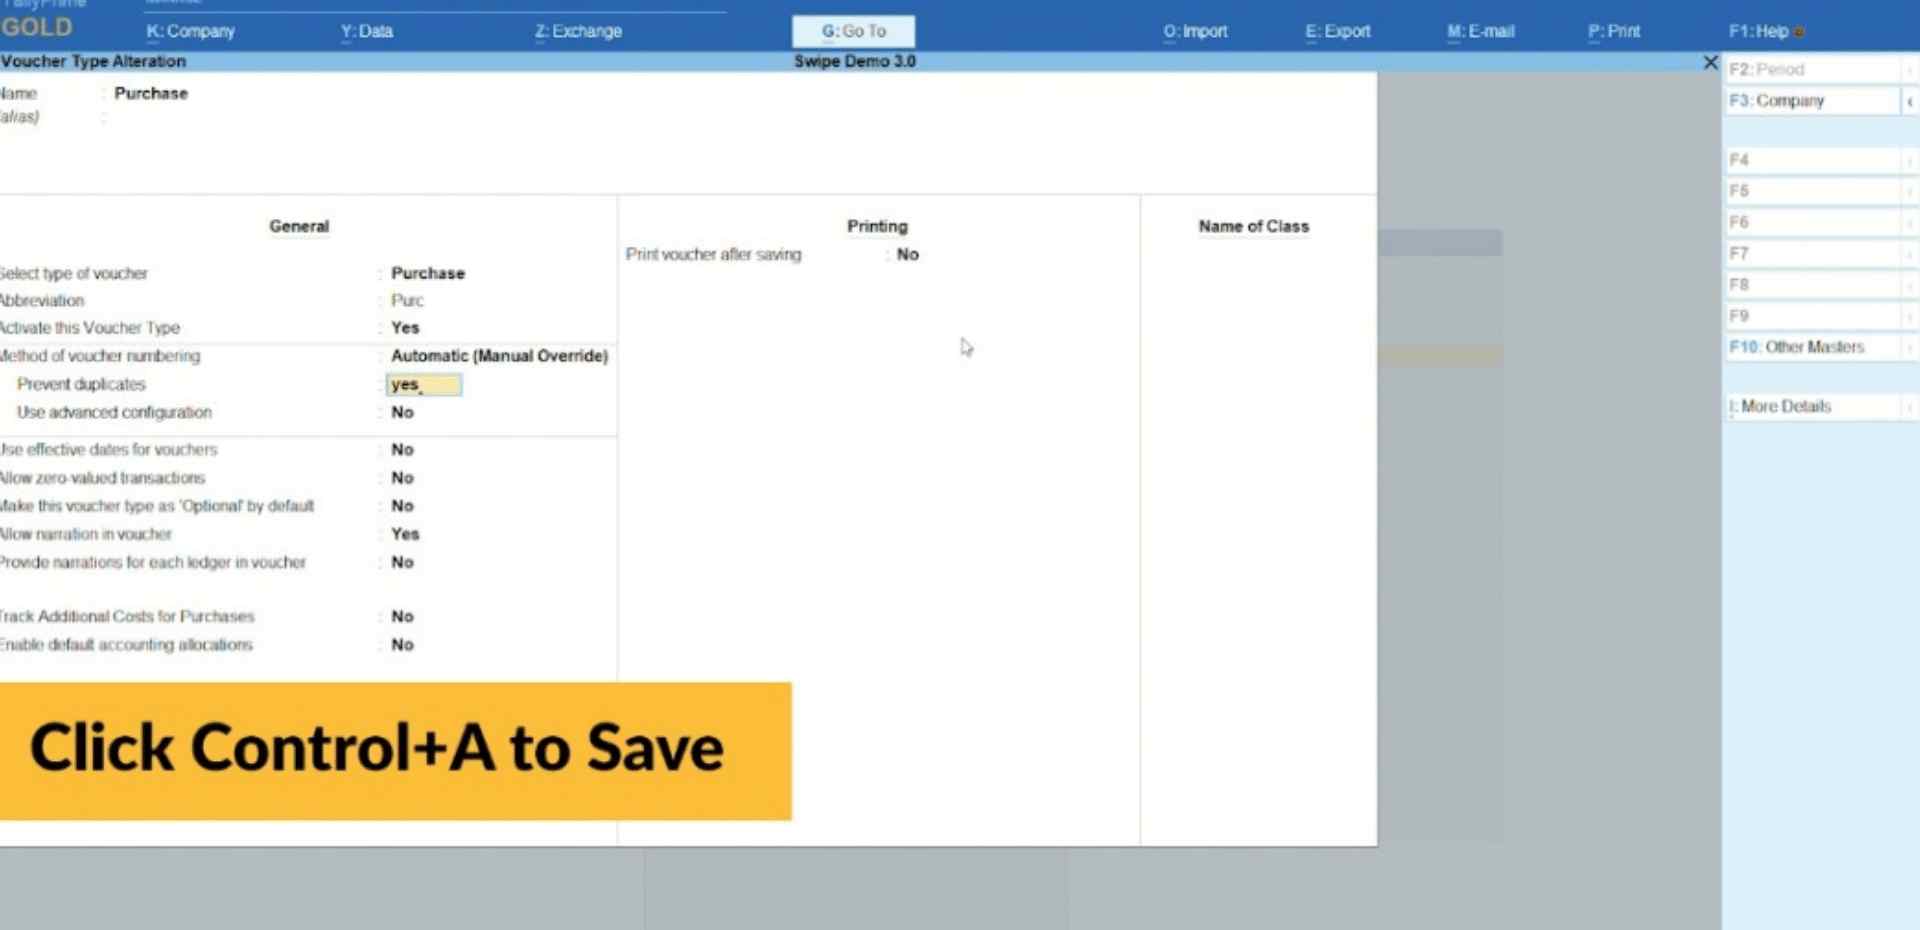
Now, press Control+A on your keyboard to save the settings and press “Esc” to go back to “Gateway of Tally”.
Step 4: Go to Swipe Integration.
Go to "Swipe Integration" which is under the Utilities section of “Gateway of Tally”.
Step 5: Import purchase.
Click on the “Import purchase” option under the Masters section.
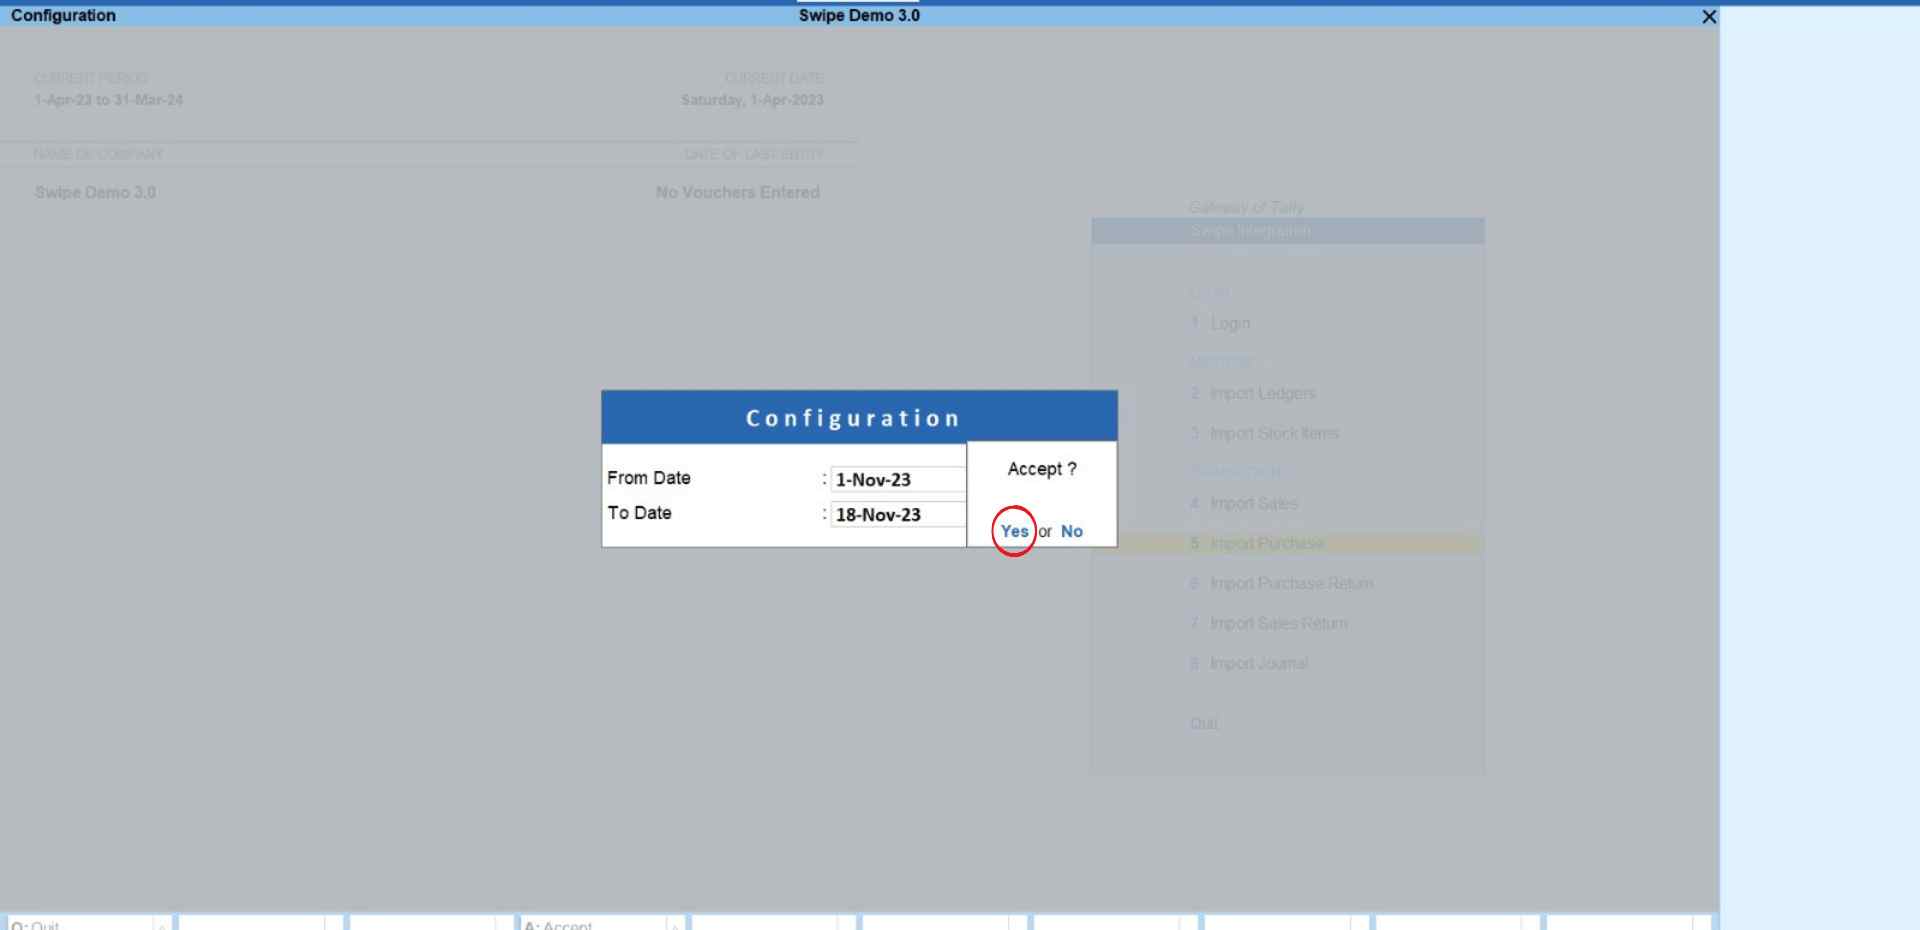
A pop-up appears. Here, enter the timeline of purchase invoices you want to import and click Yes to confirm your action.
Please wait until the data is fetched from Swipe.
Step 6: Check the Error List.
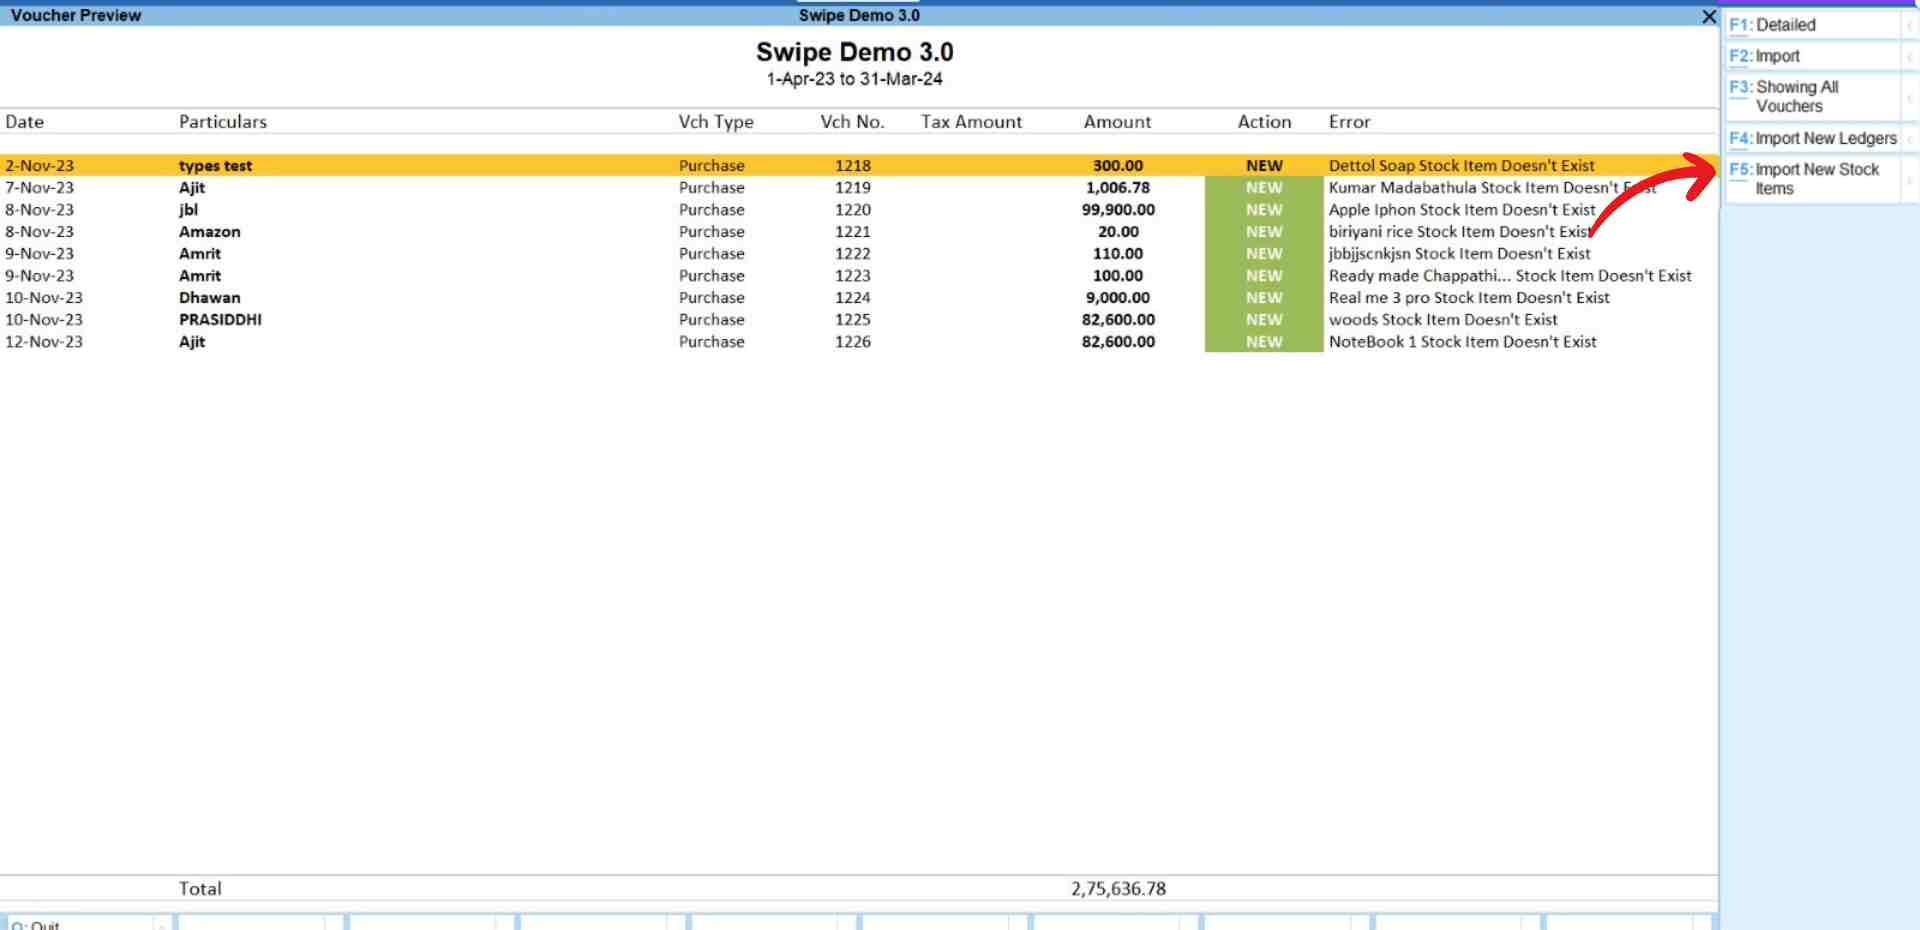
After fetching the data, a preview page appears, displaying the purchase invoice data.
To review any errors, please follow the steps below to resolve the issue.
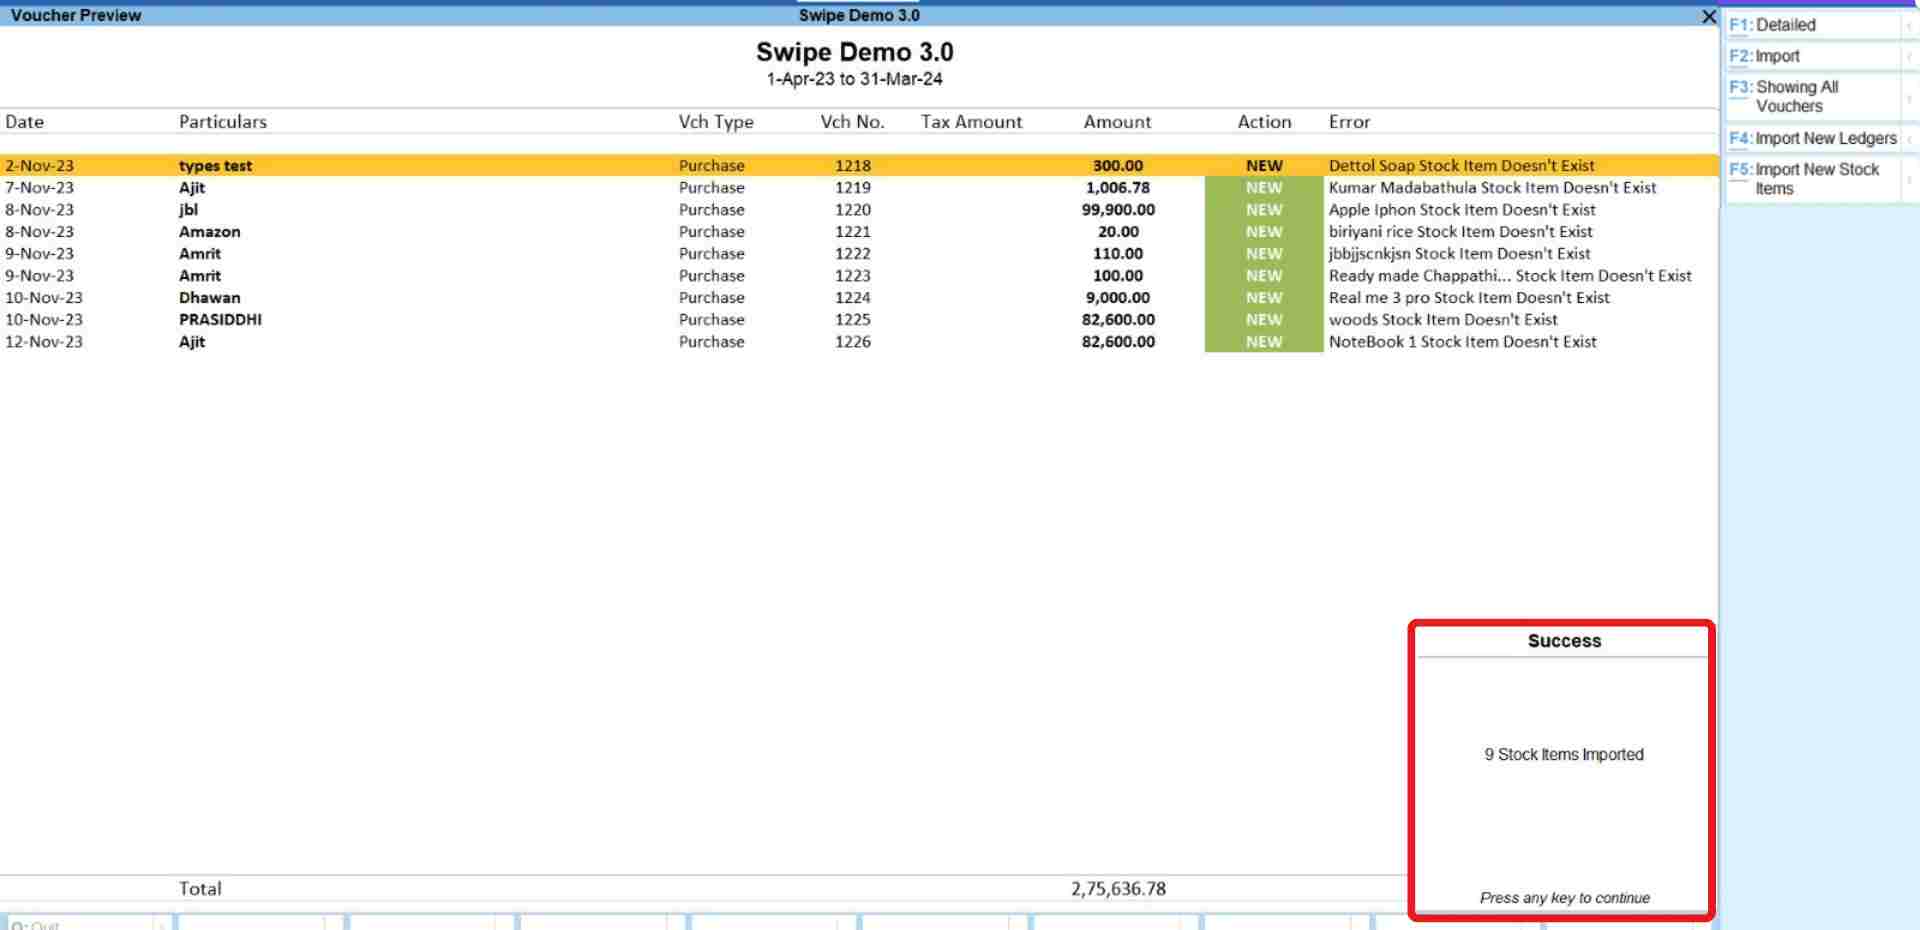
For the error “Stock Items Doesn't Exist": Click on the “Import New Stock Items” option present at the top right corner of the screen or press the F5 key on your keyboard.
Congratulations! You have successfully imported new stock items and a pop-up appears at the bottom of the screen informing the screen. Press any key to continue.
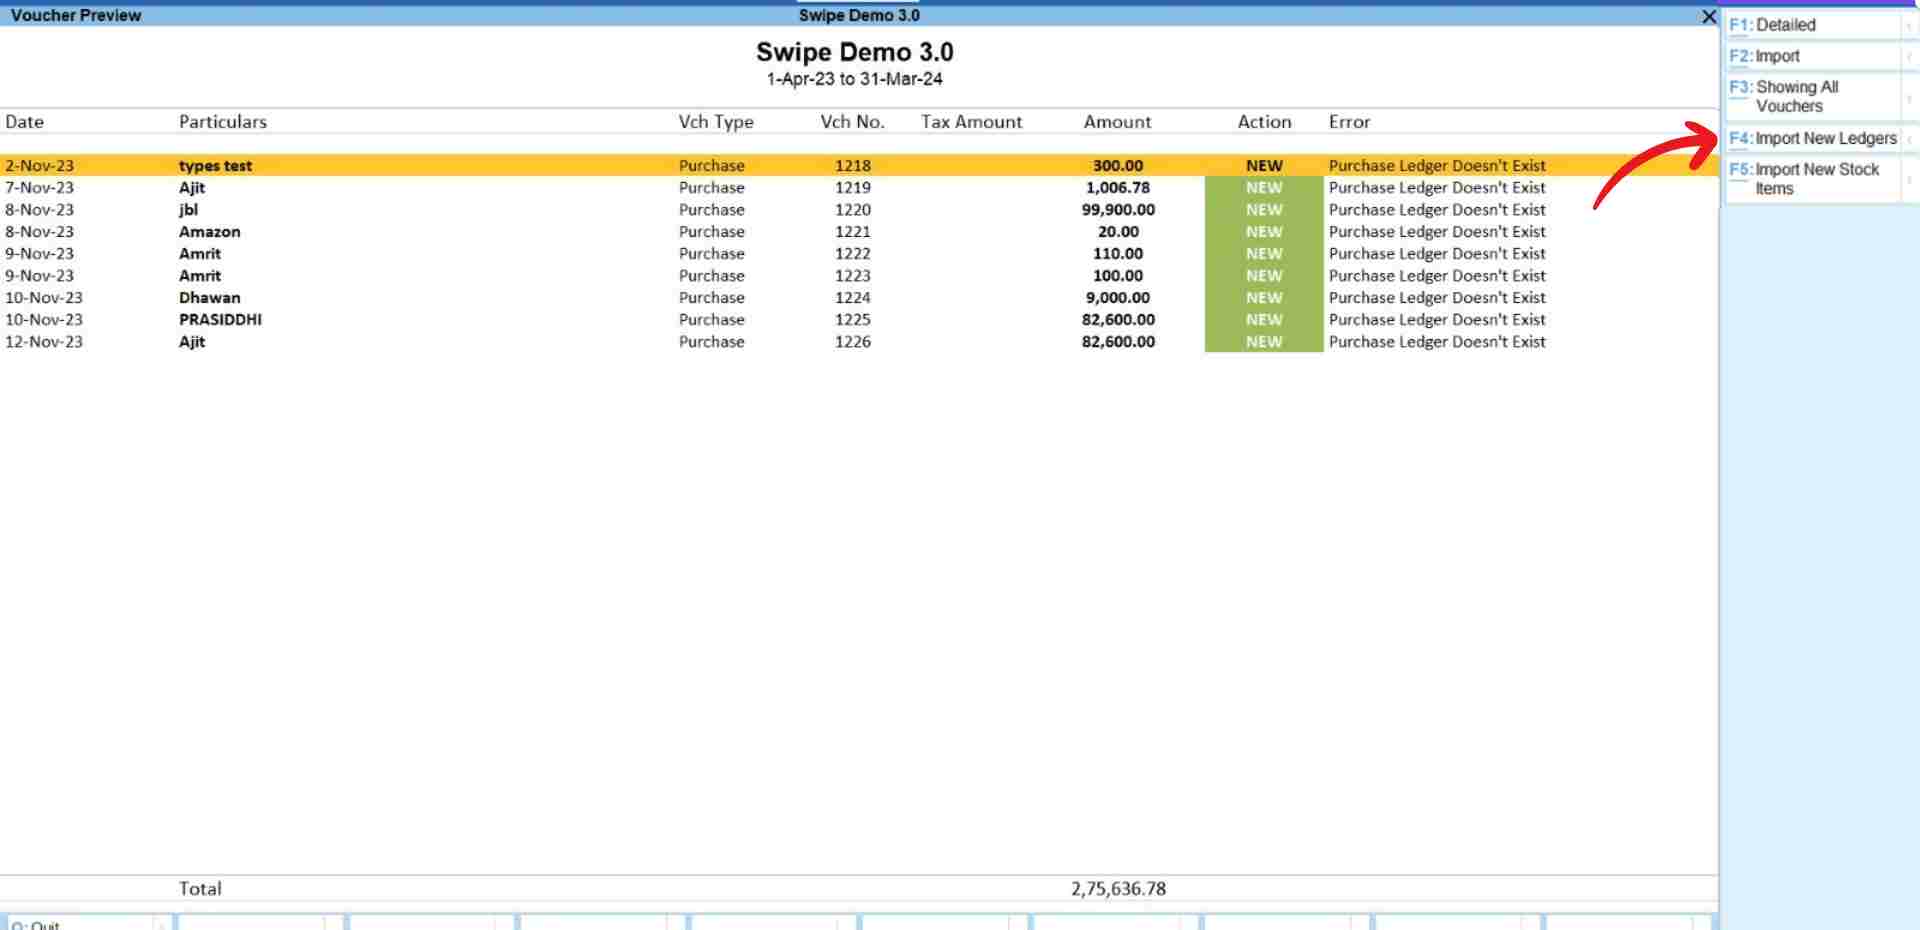
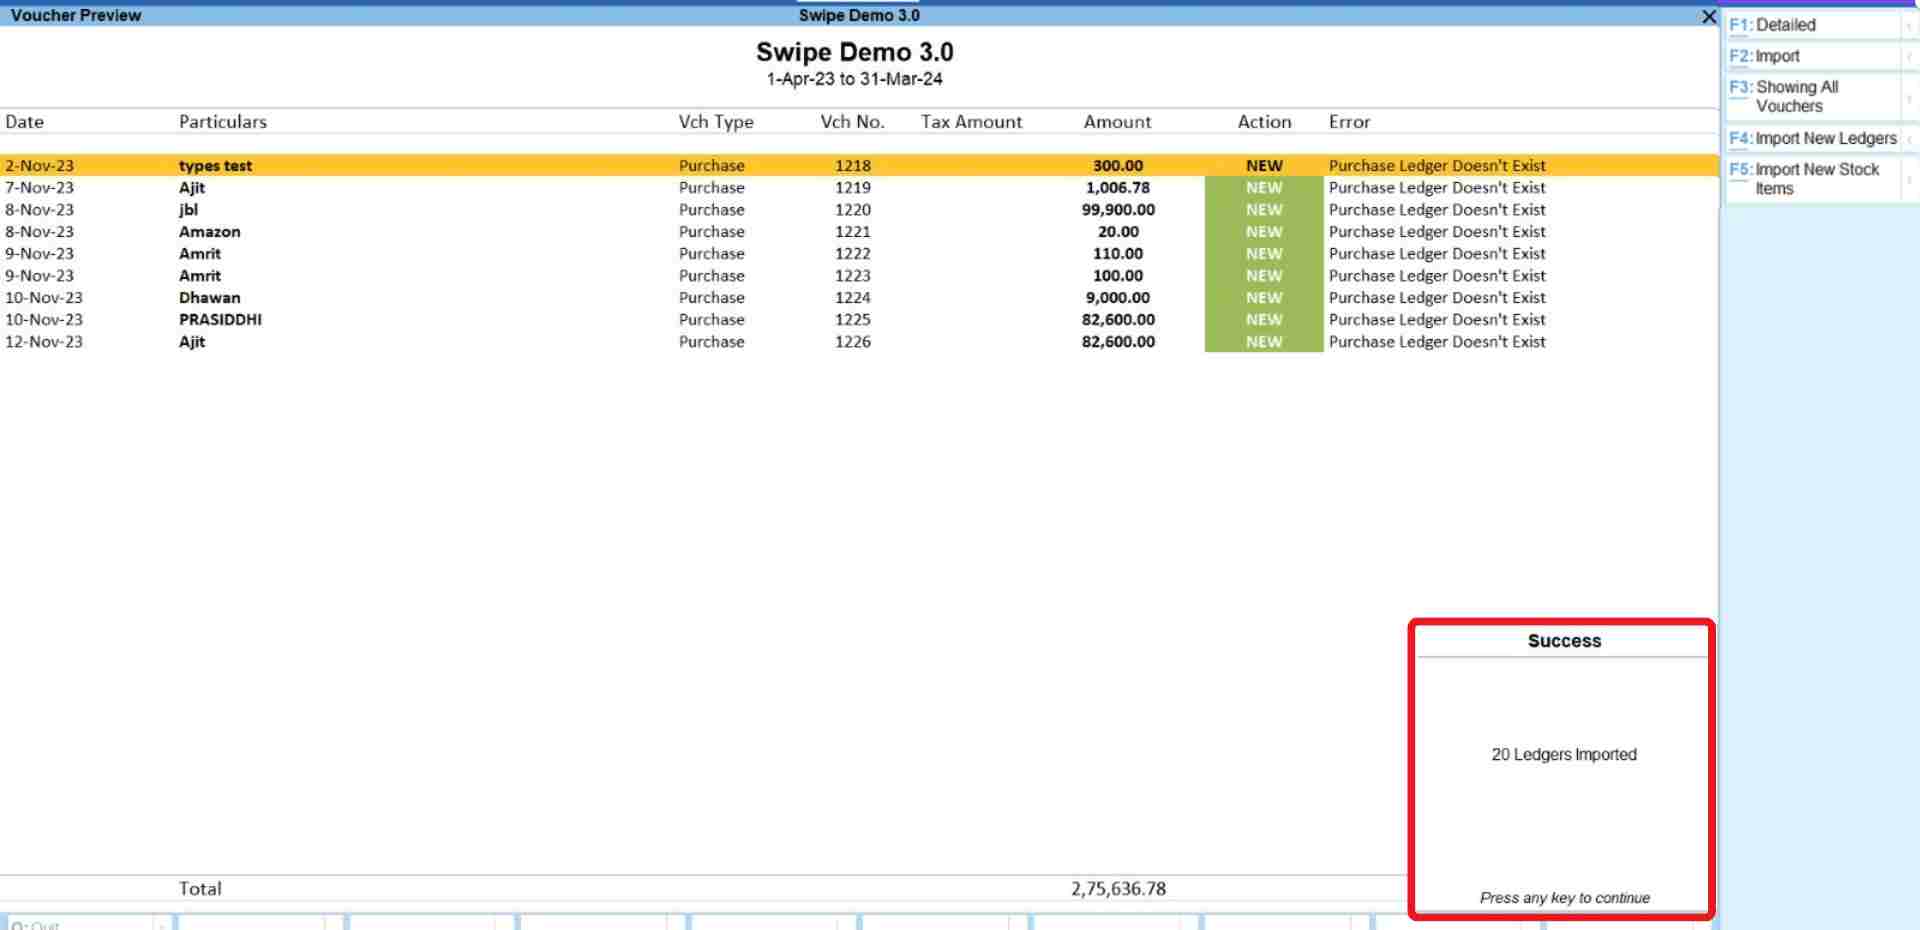
For the error “Ledgers Doesn’t Exist”: Click on the “Import New Ledgers” option present at the top right corner of the screen or press the F4 key on your keyboard.
Congratulations! You have successfully imported new ledgers and a pop-up appears at the bottom of the screen informing the screen. Press any key to continue.
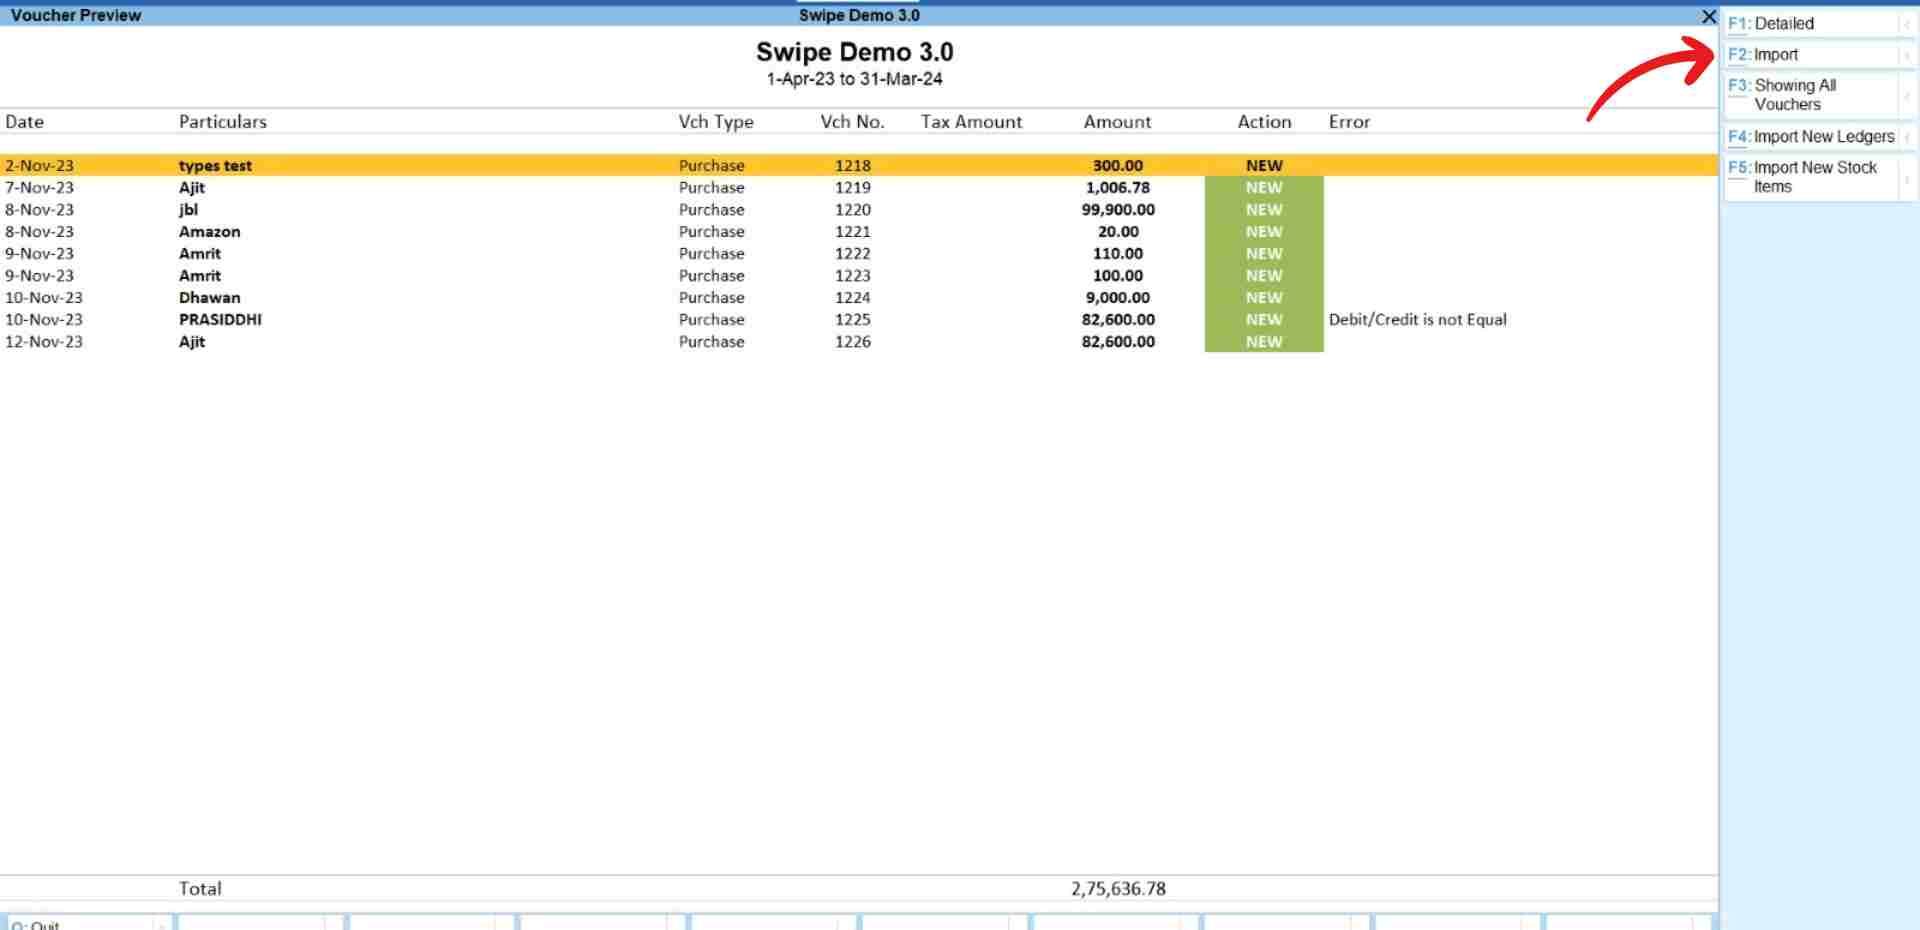
Step 7: Import the data.
Click on the “Import” option present at the top right corner of the screen or press the F2 key on your keyboard.
Now, confirm your action by clicking on the “Yes” option from the pop-up.
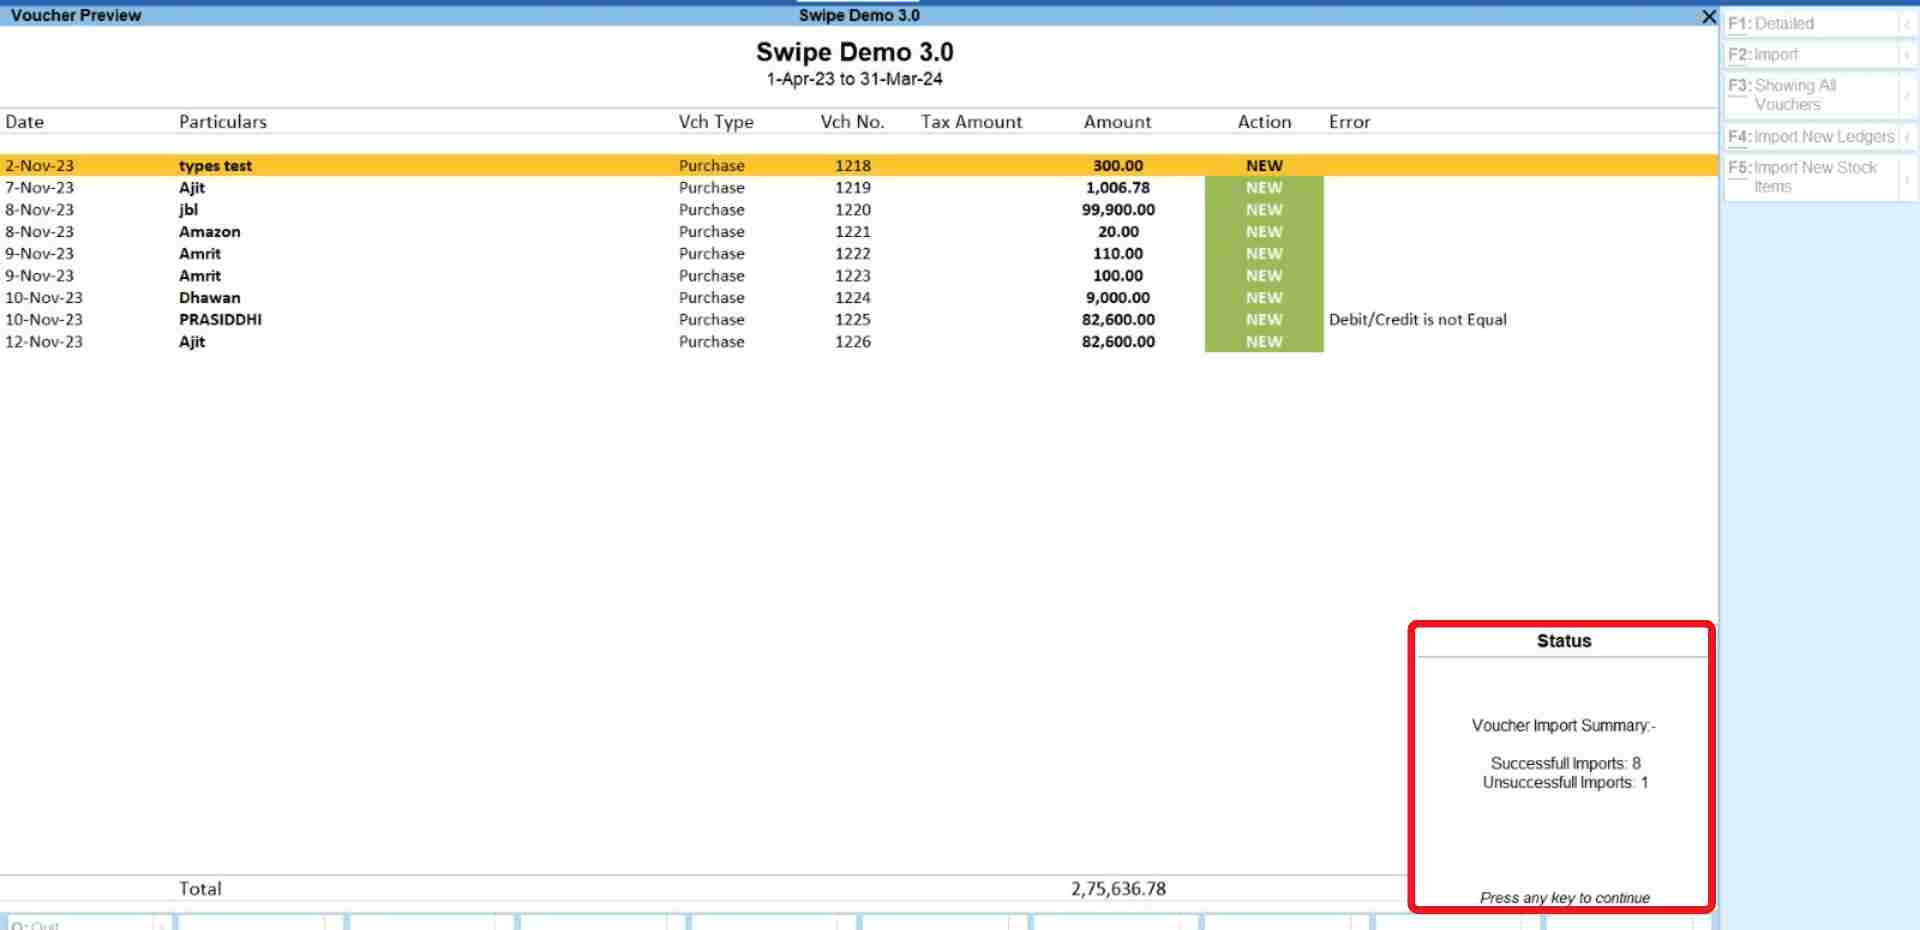
Congratulations, You have successfully imported purchase invoice data from your Swipe account to your Tally account, and a pop-up appears at the bottom of the screen informing the same.
Press any key to continue.
How to import credit notes from Swipe to Tally
Note: The response time and overall functioning speed of Tally are determined by your computer's processor, not by Swipe or Tally software. If you haven't made mandatory changes to your settings to import transactions, please follow the below steps. If you have already made mandatory changes, please skip to step 4.
Step 1: Go to the Alter.
Click on "Atler" which is under the Masters section of “Gateway of Tally”.
Step 2: Click on the voucher type.
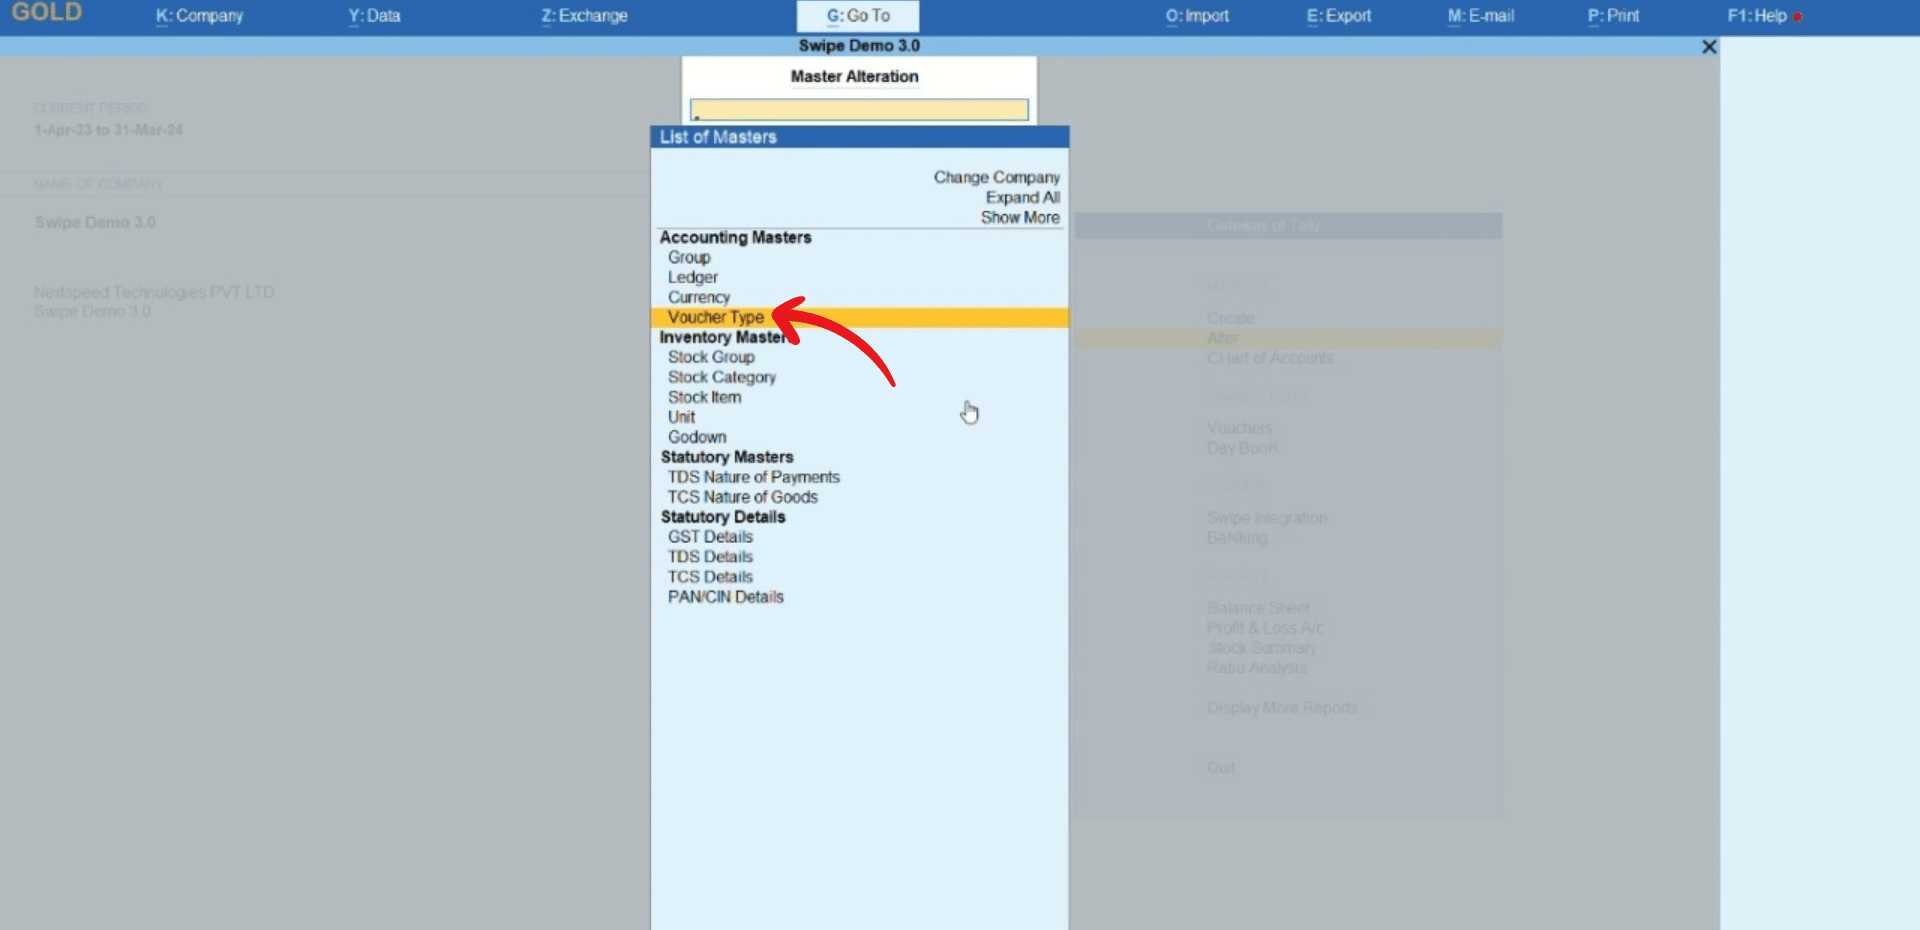
A new page appears. Here, click on “Voucher Type” under the Accounting Masters section.
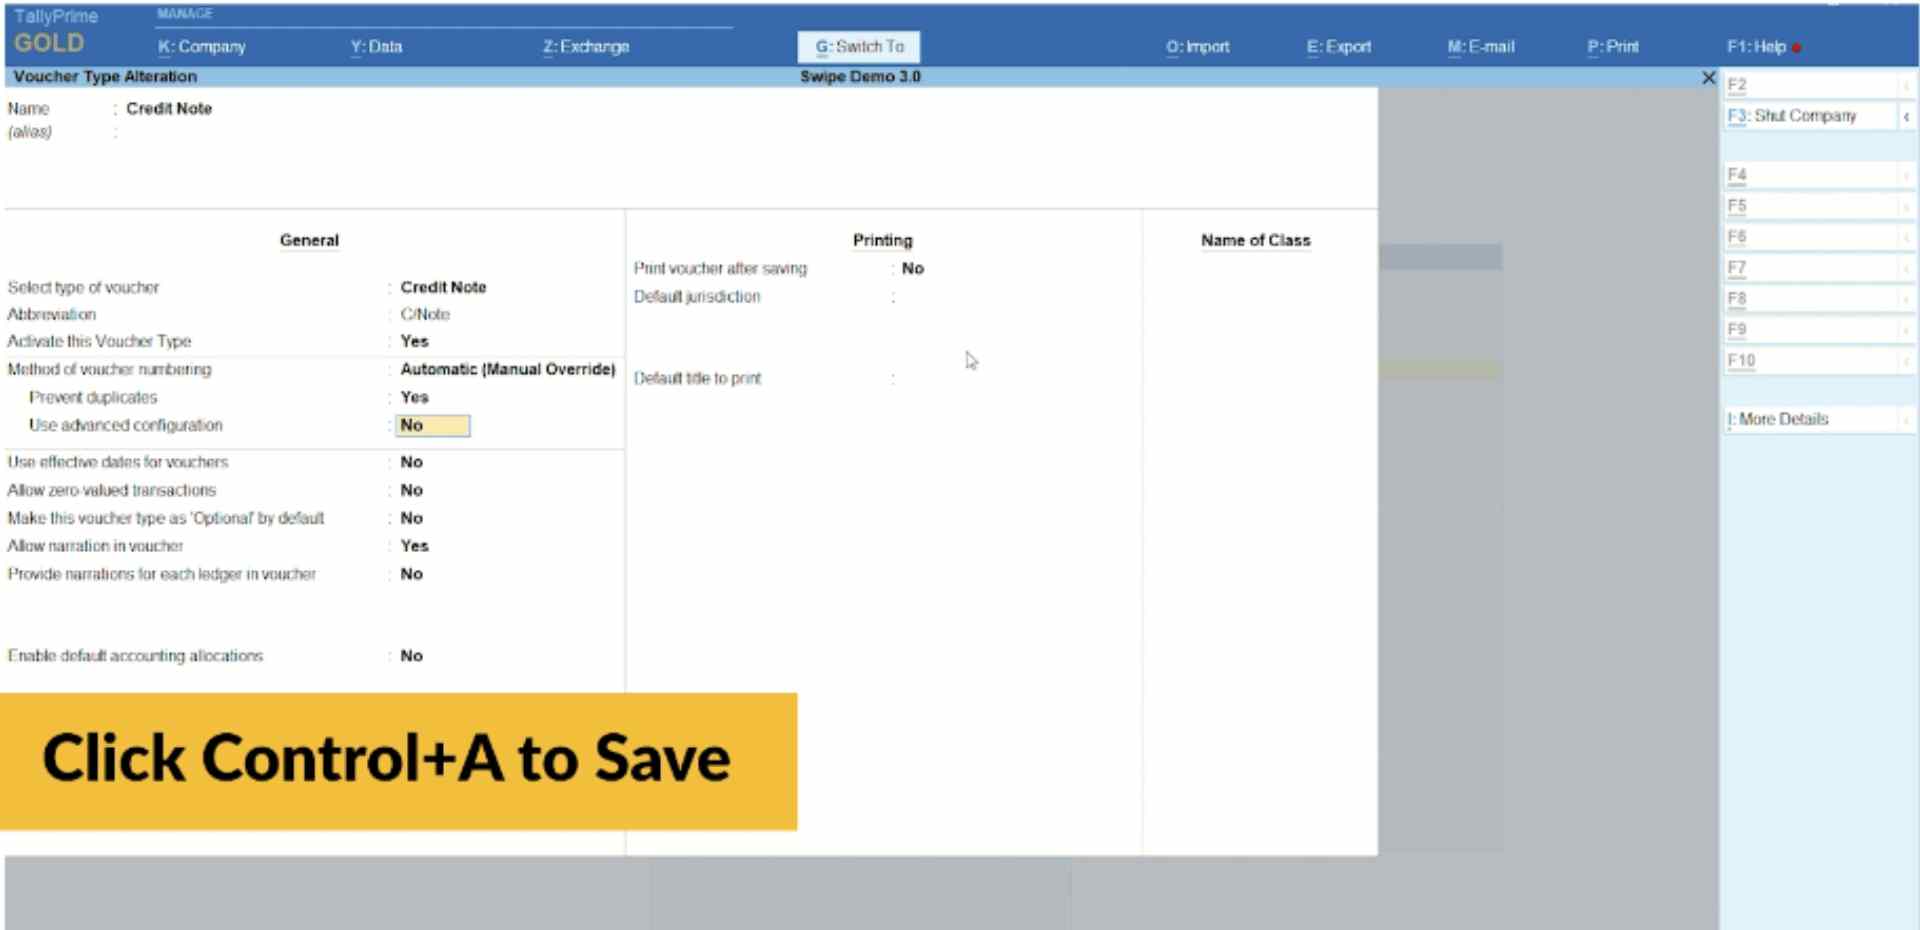
Step 3: Select credit note.
Now, select the “Credit Note” option from the menu.
Change “Method of Voucher Numbering” to Automatic (Manual Override)
Type yes in the box next to "prevent duplicates”.
Now, press Control+A on your keyboard to save the settings and press “Esc” to go back to “Gateway of Tally”.
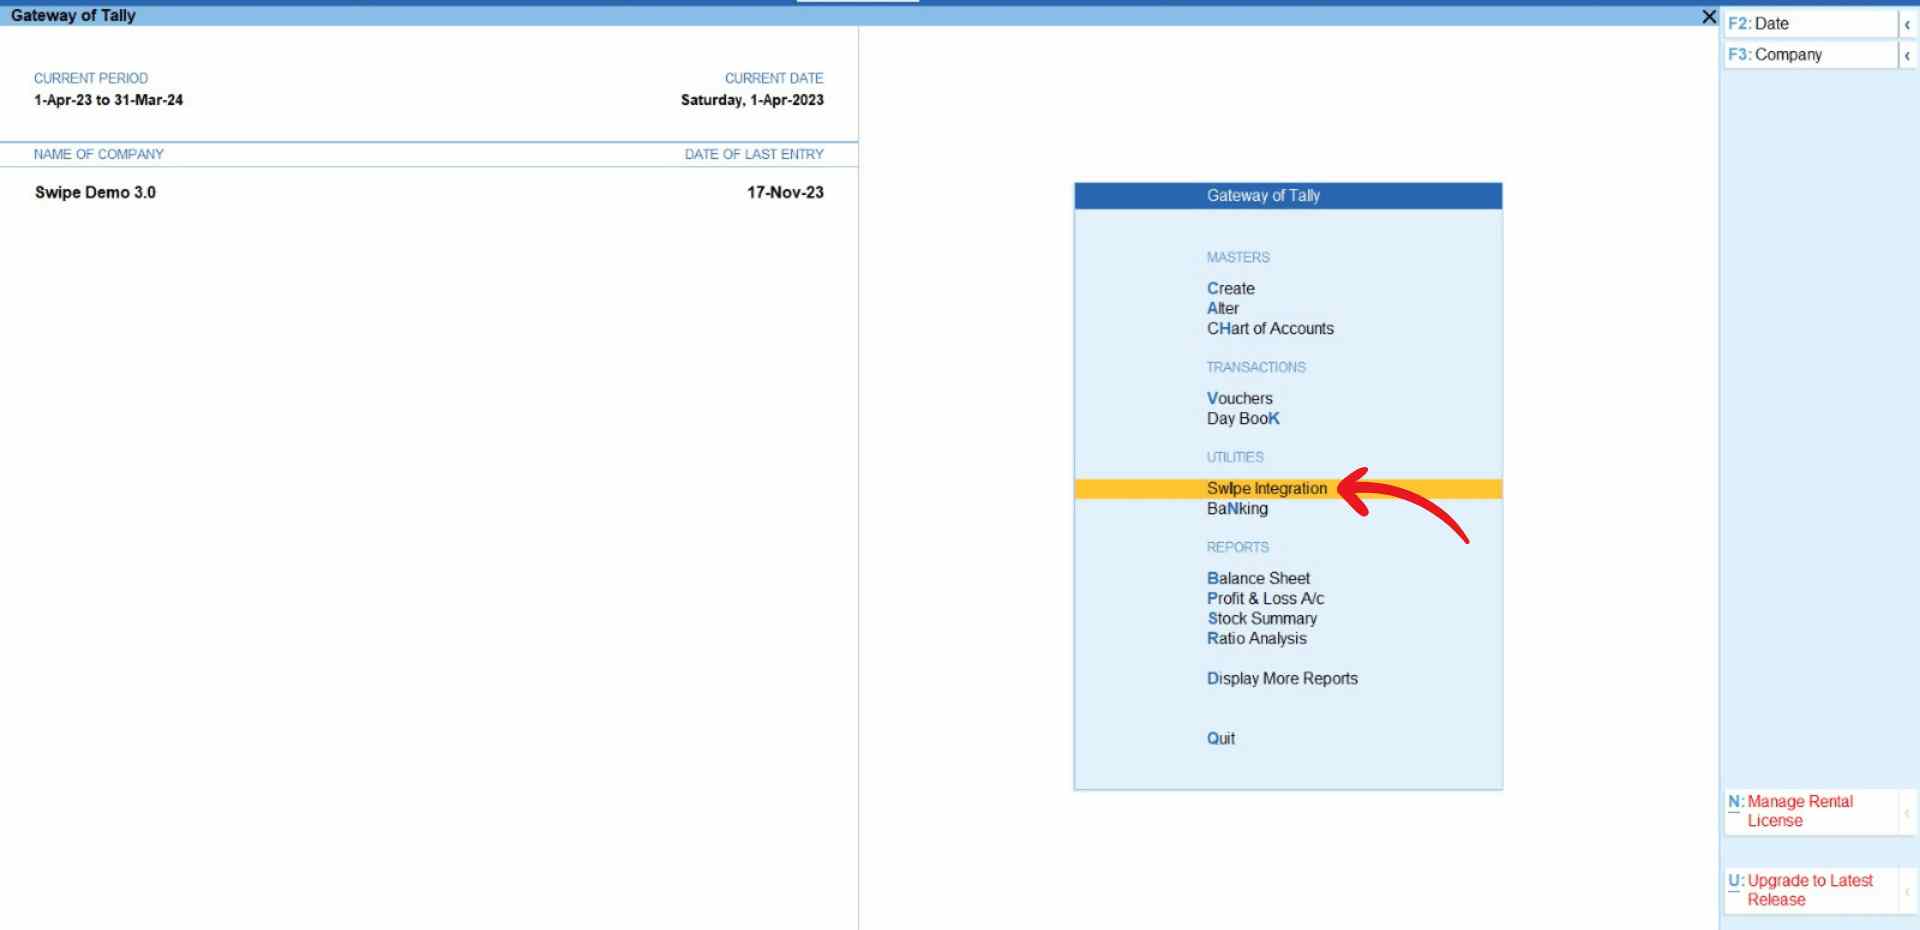
Step 4: Go to Swipe Integration.
Go to "Swipe Integration" which is under the Utilities section of “Gateway of Tally”.
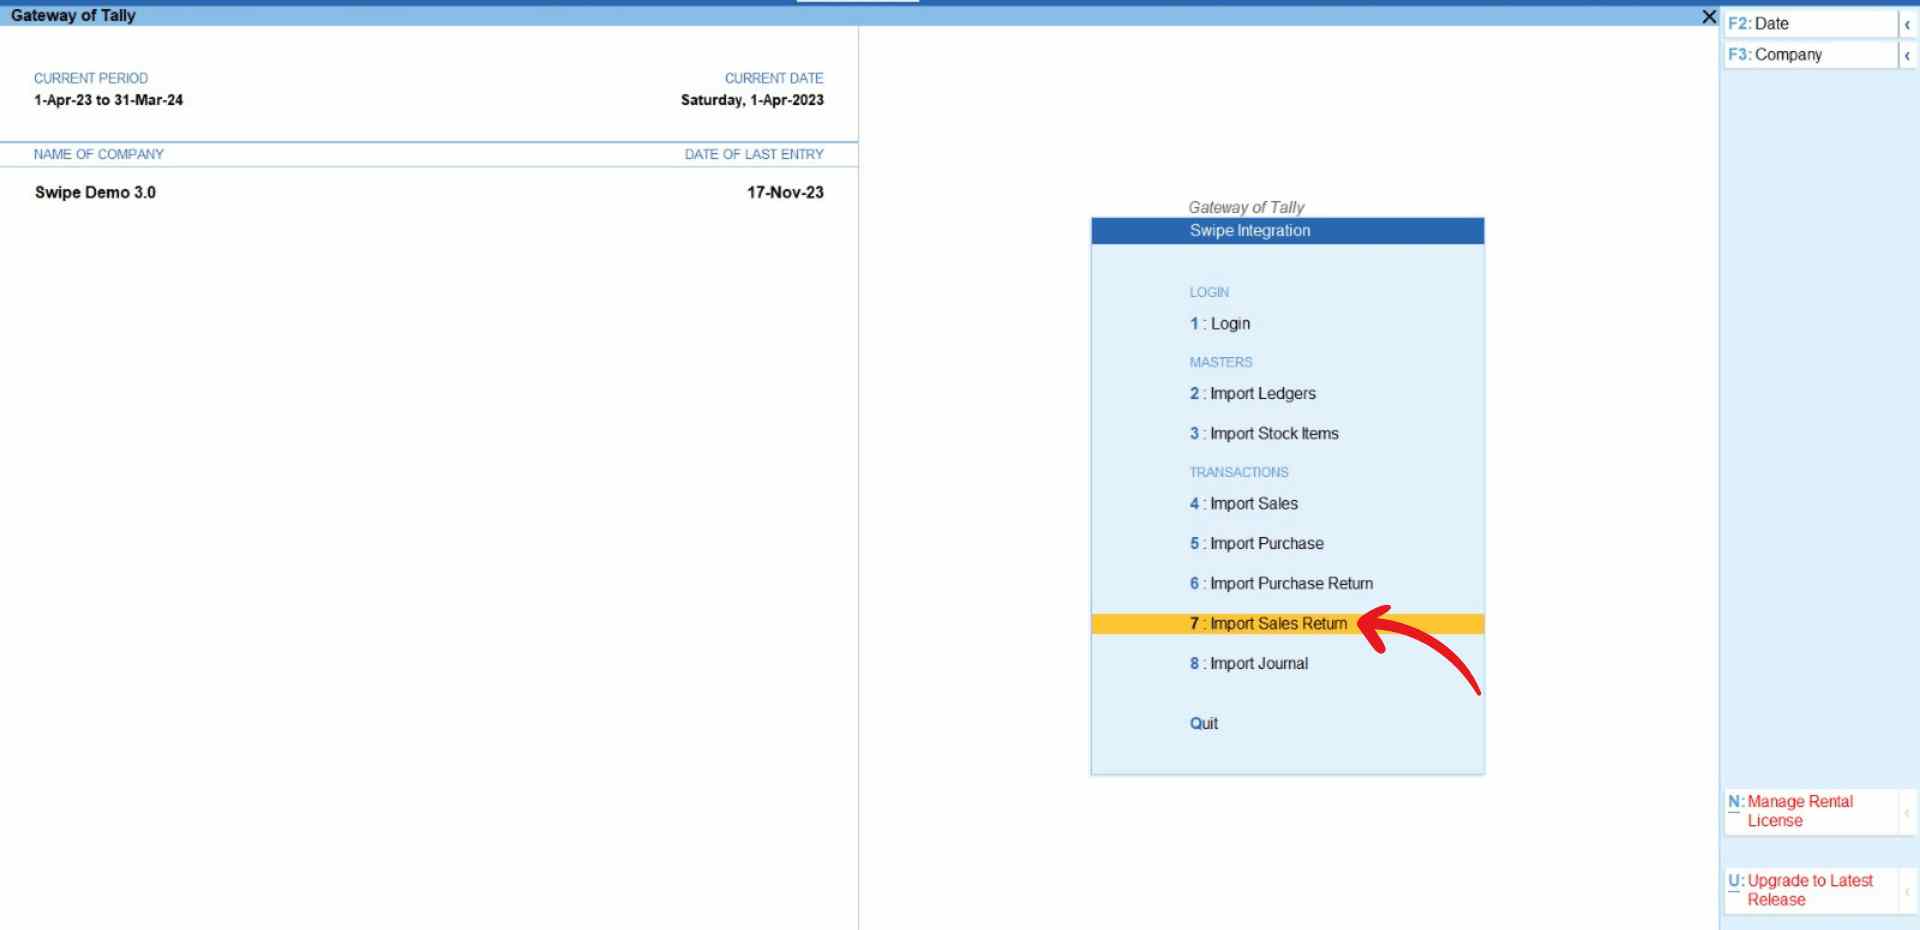
Step 5: Import sales return.
Click on the “Import Sales Return” option under the Masters section.
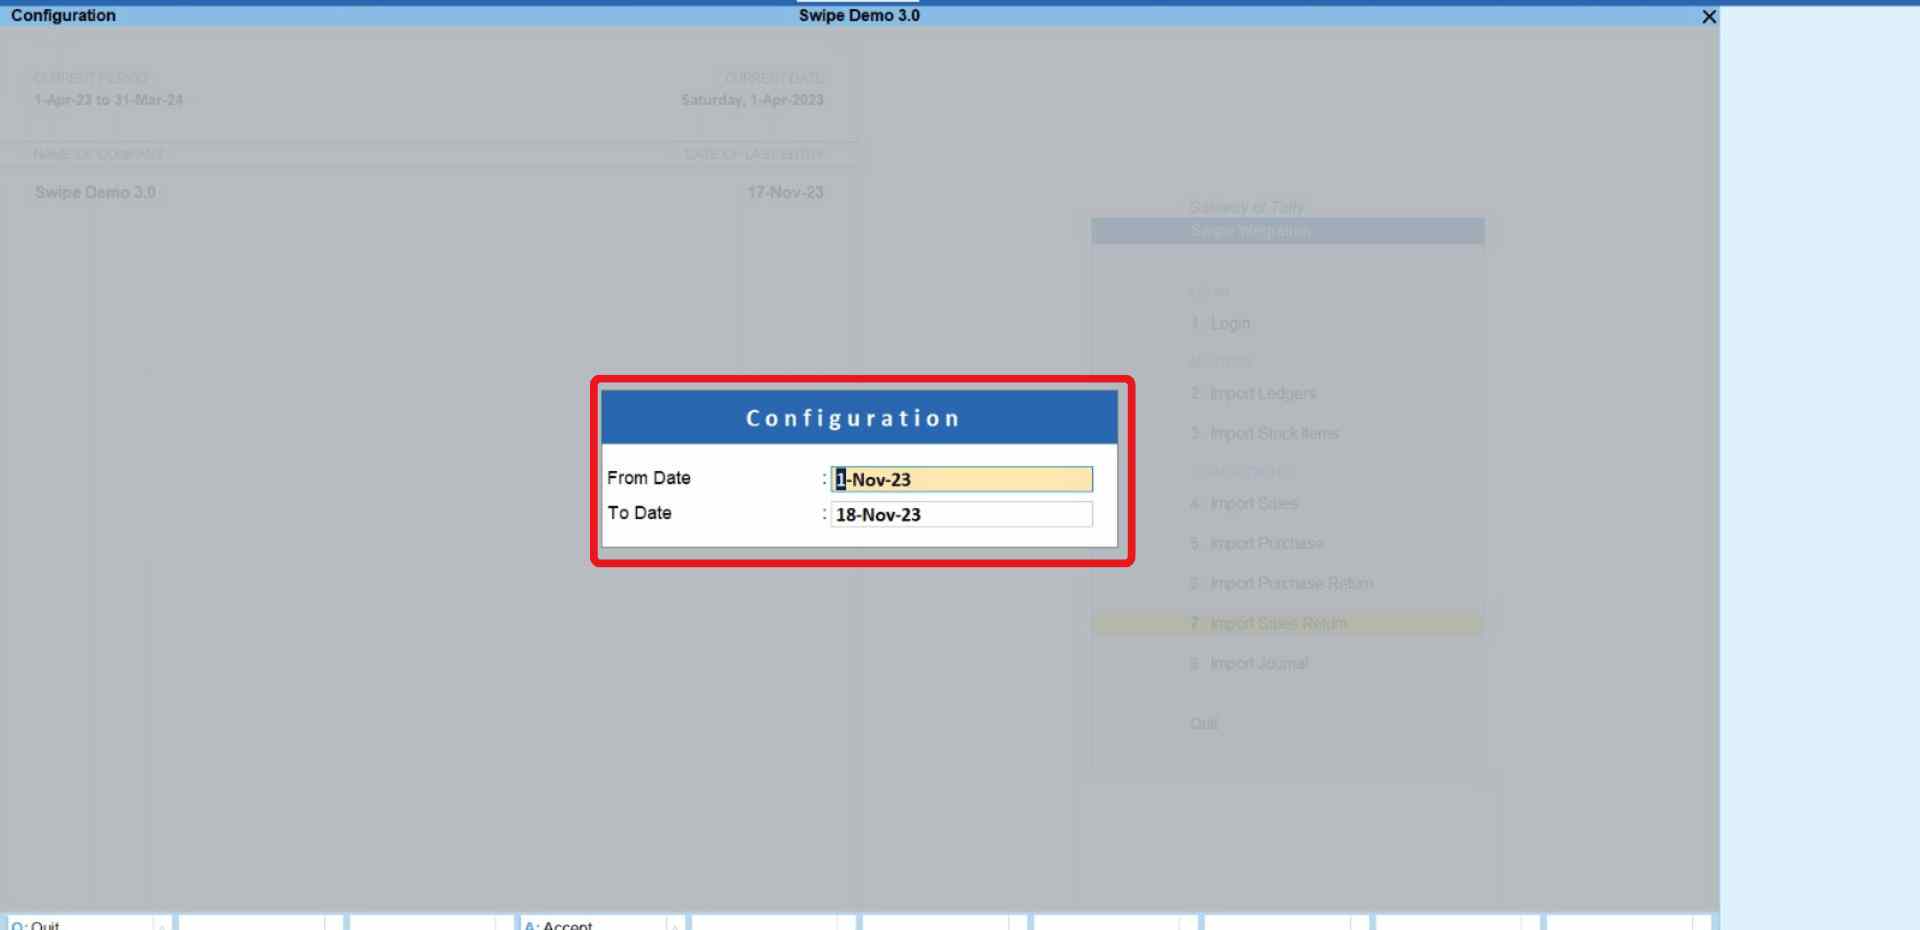
A pop-up appears. Here, enter the timeline of credit notes you want to import and click Yes to confirm your action.
Please wait until the data is fetched from Swipe.
Step 6: Check the Error List.
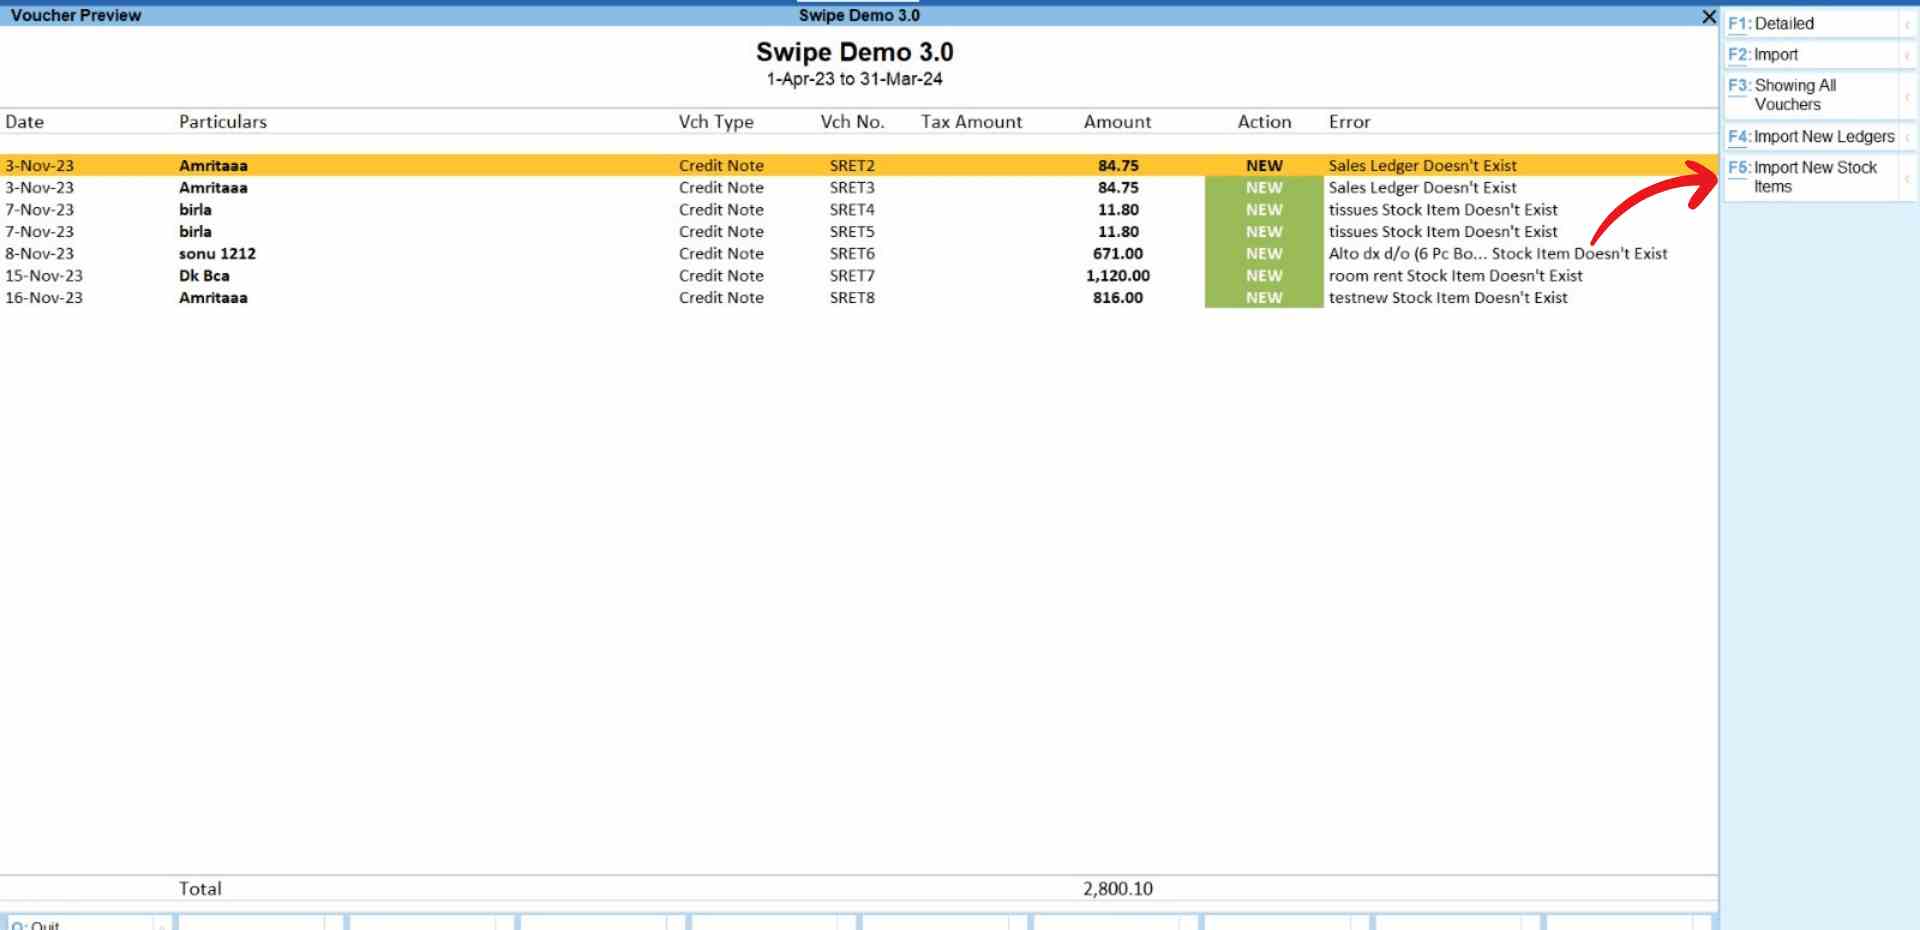
After fetching the data, a preview page appears, displaying the credit notes data.
To review any errors, please follow the steps below to resolve the issue.
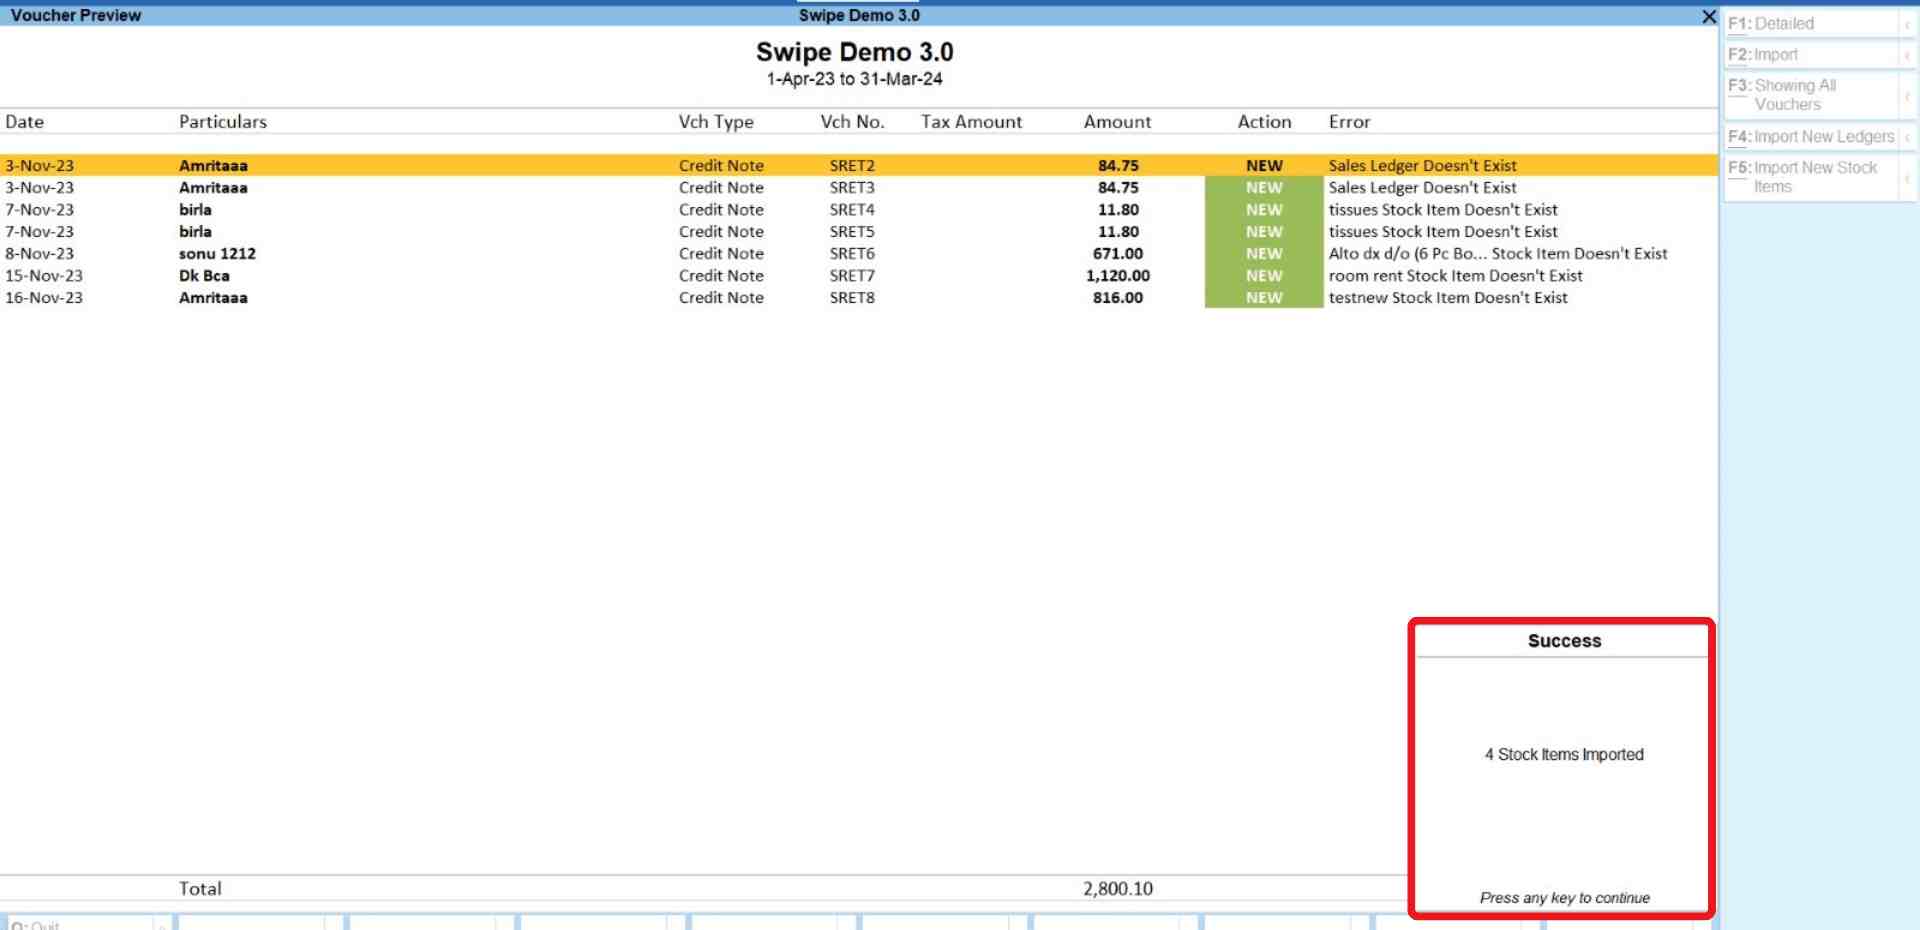
For the error “Stock Items Doesn't Exist": Click on the “Import New Stock Items” option present at the top right corner of the screen or press the F5 key on your keyboard.
Congratulations! You have successfully imported new stock items and a pop-up appears at the bottom of the screen informing the screen. Press any key to continue.
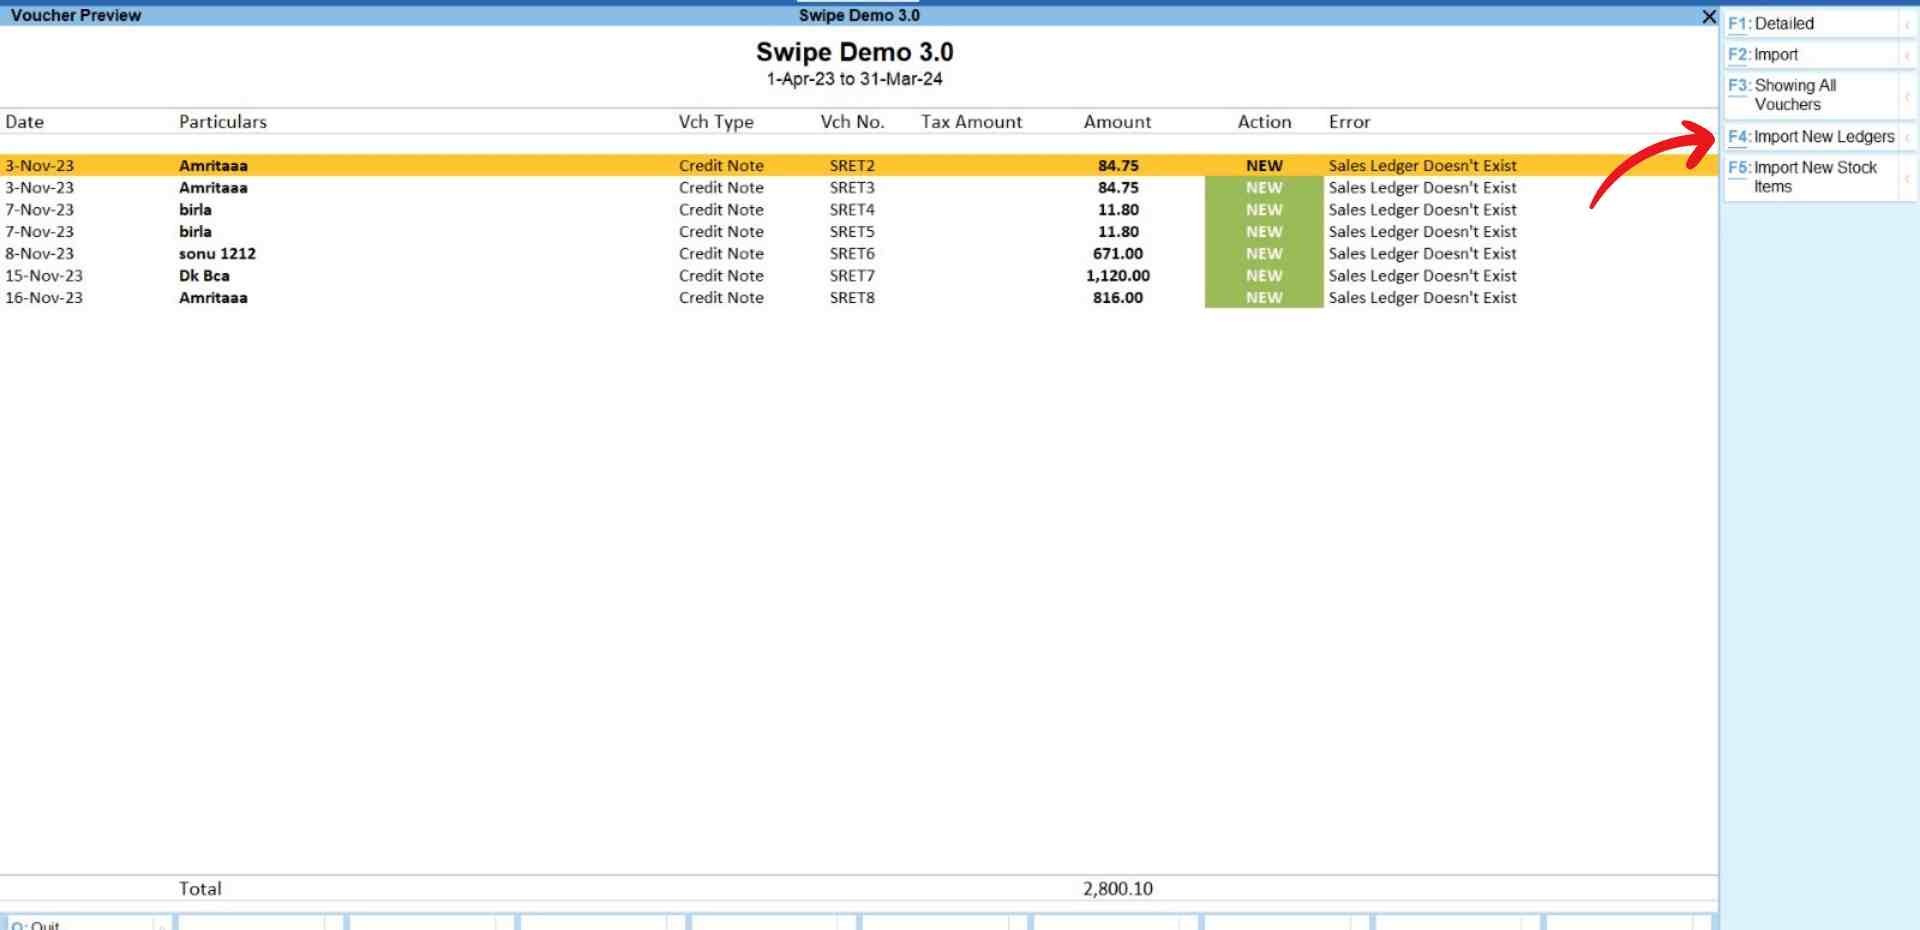
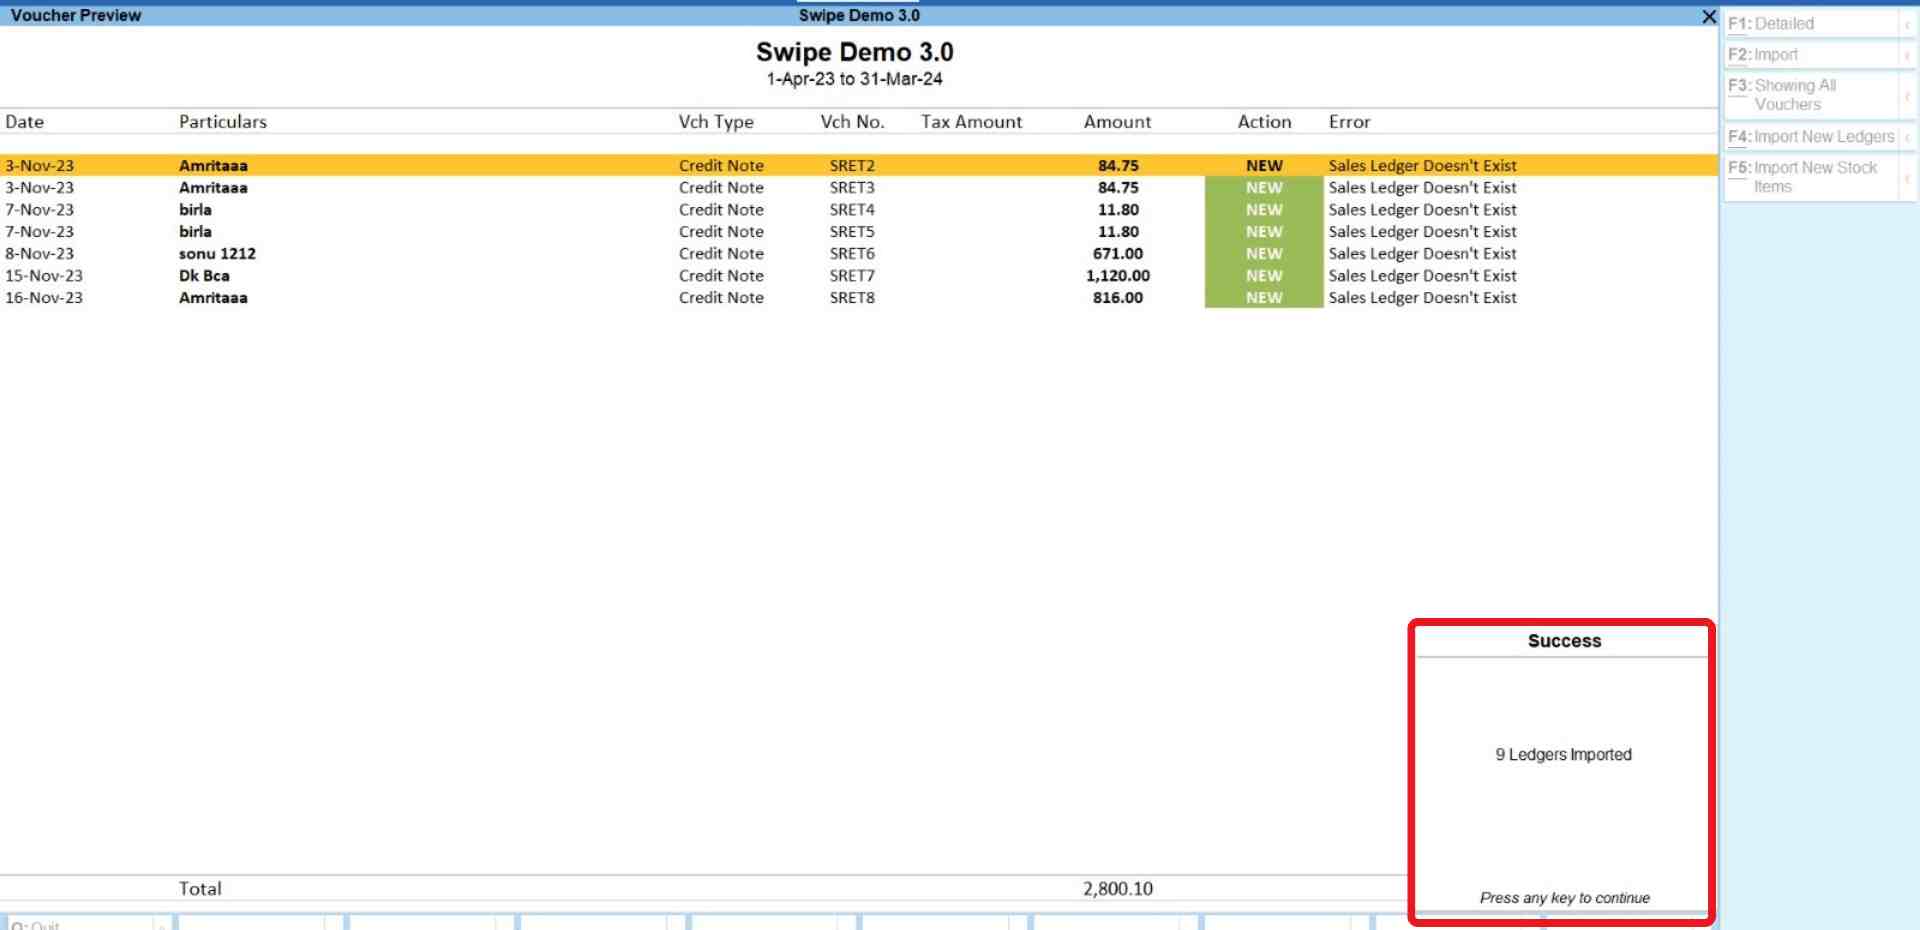
For the error “Ledgers Doesn’t Exist”: Click on the “Import New Ledgers” option present at the top right corner of the screen or press the F4 key on your keyboard.
Congratulations! You have successfully imported new ledgers and a pop-up appears at the bottom of the screen informing the screen. Press any key to continue.
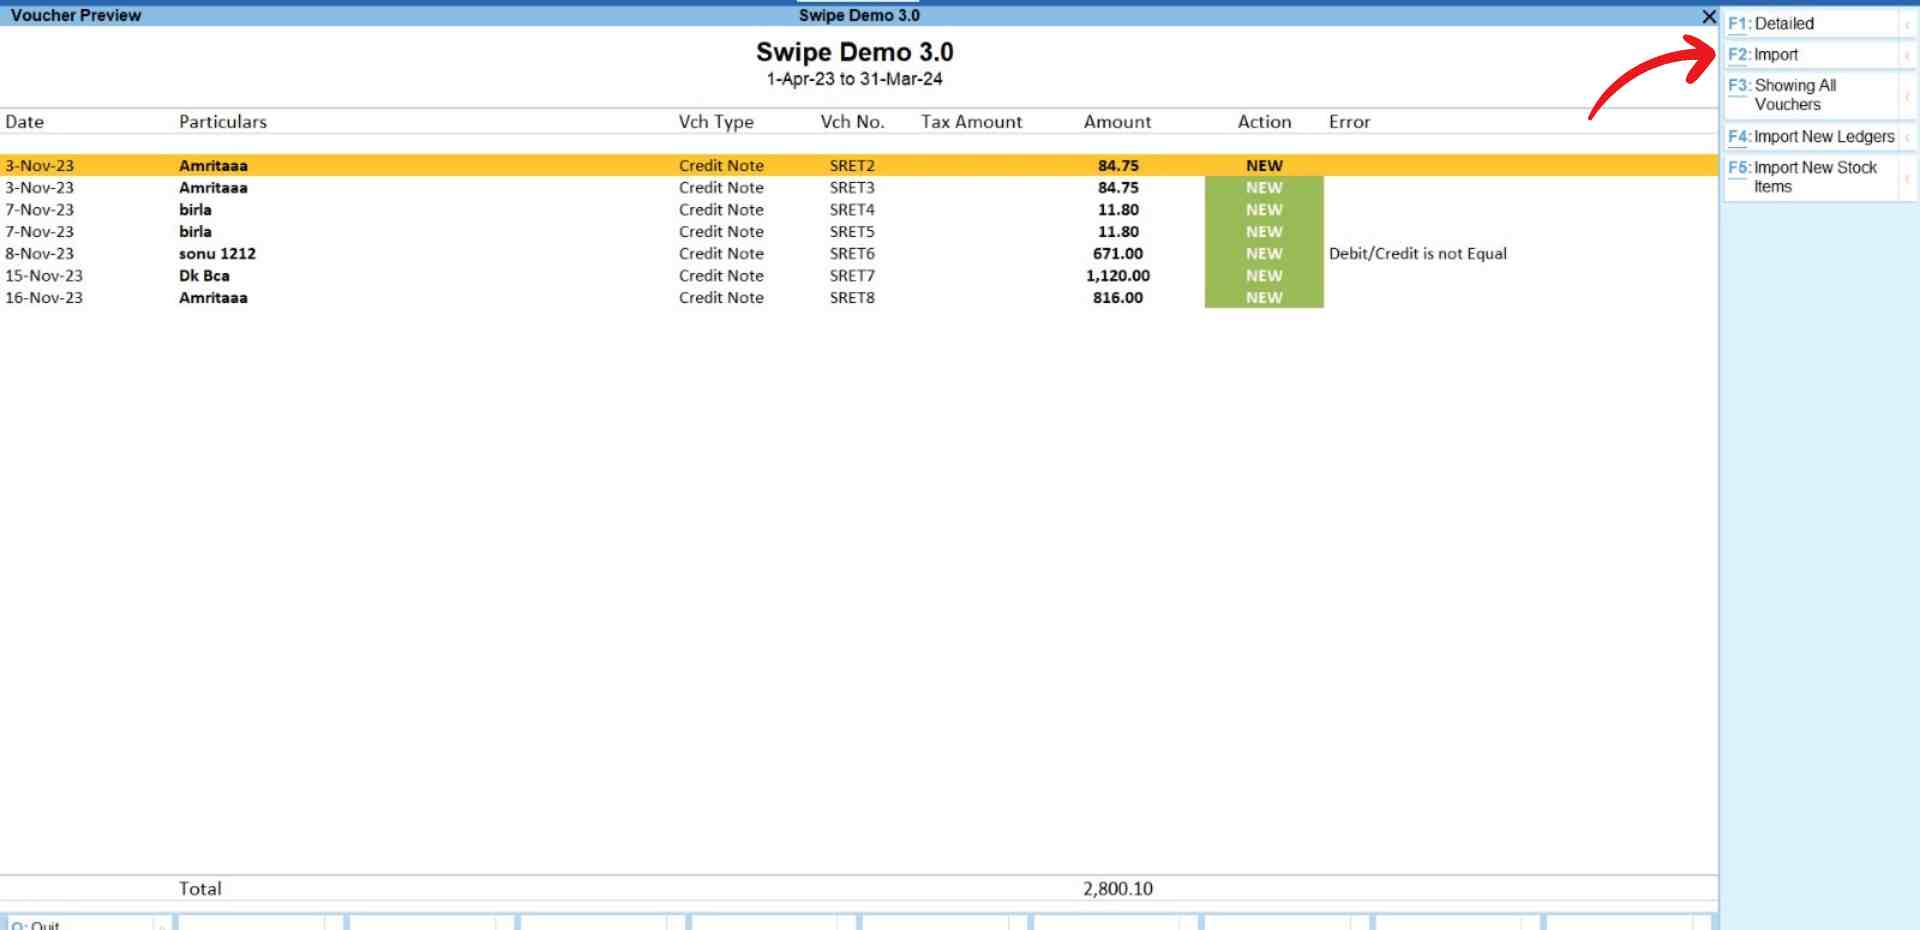
Step 7: Import the data.
Click on the “Import” option present at the top right corner of the screen or press the F2 key on your keyboard.
Now, confirm your action by clicking on the “Yes” option from the pop-up.
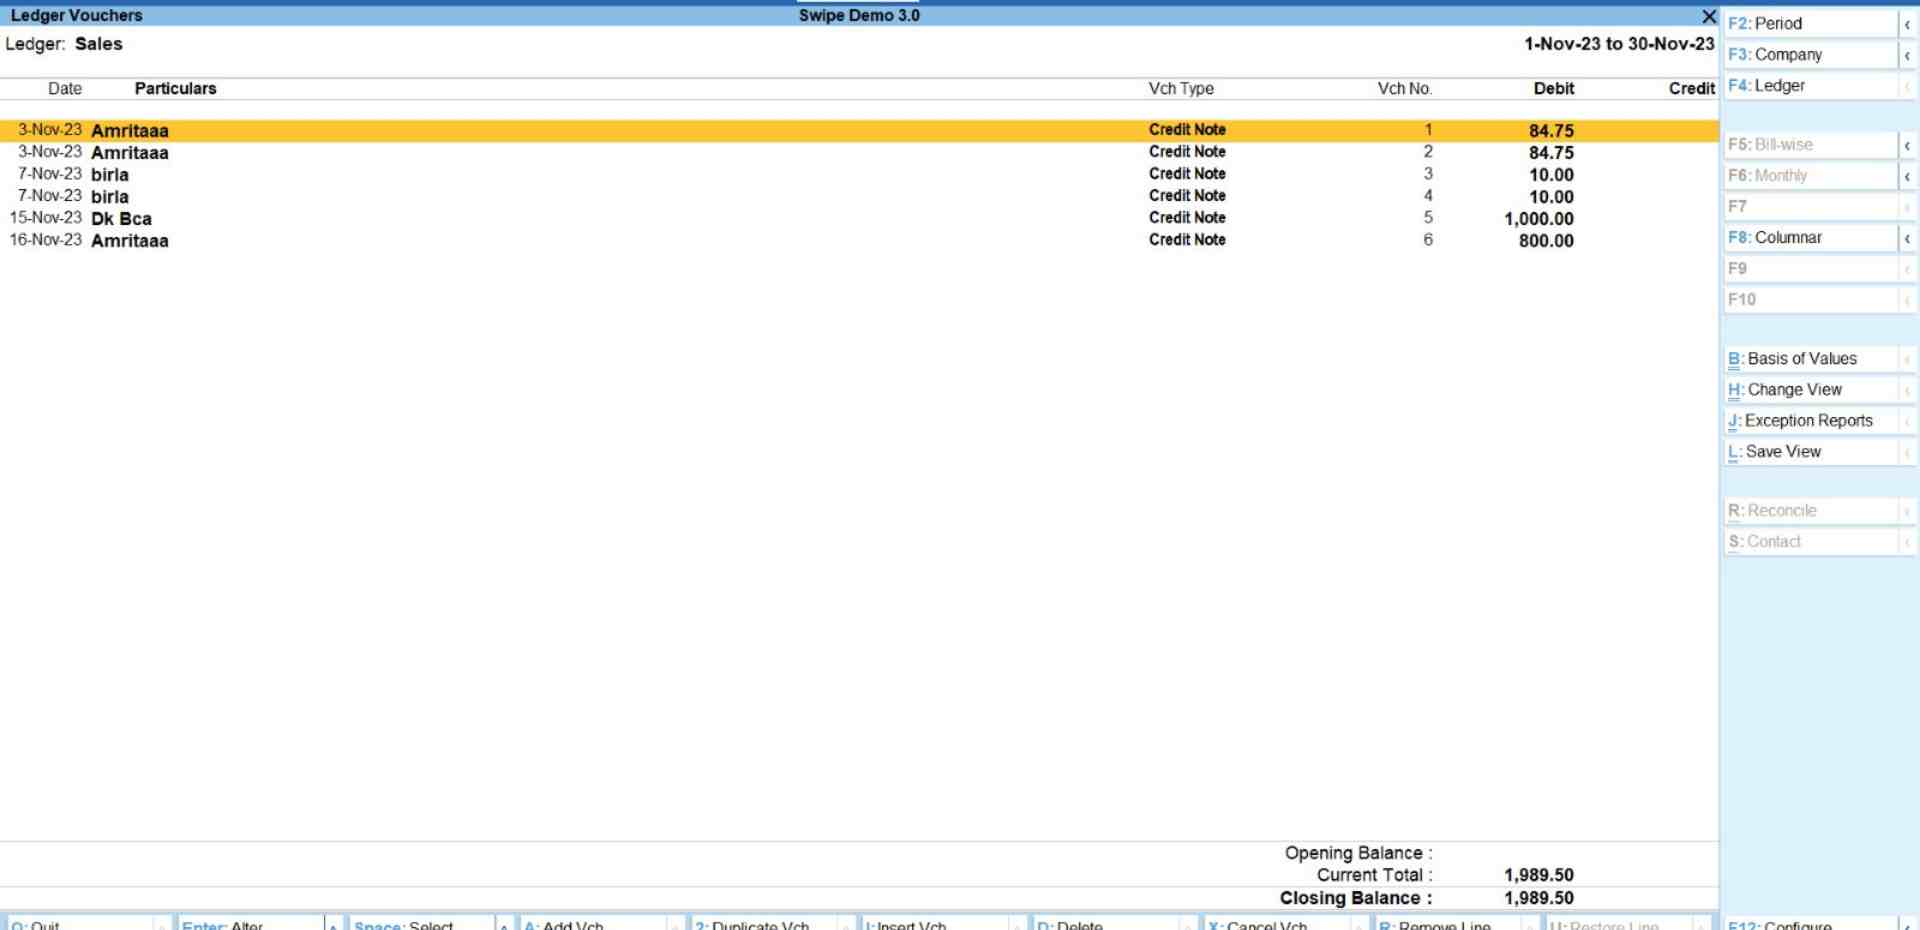
Congratulations, You have successfully imported credit notes data from your Swipe account to your Tally account, and a pop-up appears at the bottom of the screen informing the same.
Press any key to continue.
How to import debit notes from Swipe to Tally
Note: The response time and overall functioning speed of Data import are determined by your computer's processor, not by Swipe or Tally software. If you haven't made mandatory changes to your settings to import transactions, please follow the below steps. If you have already made mandatory changes, please skip to step 4.
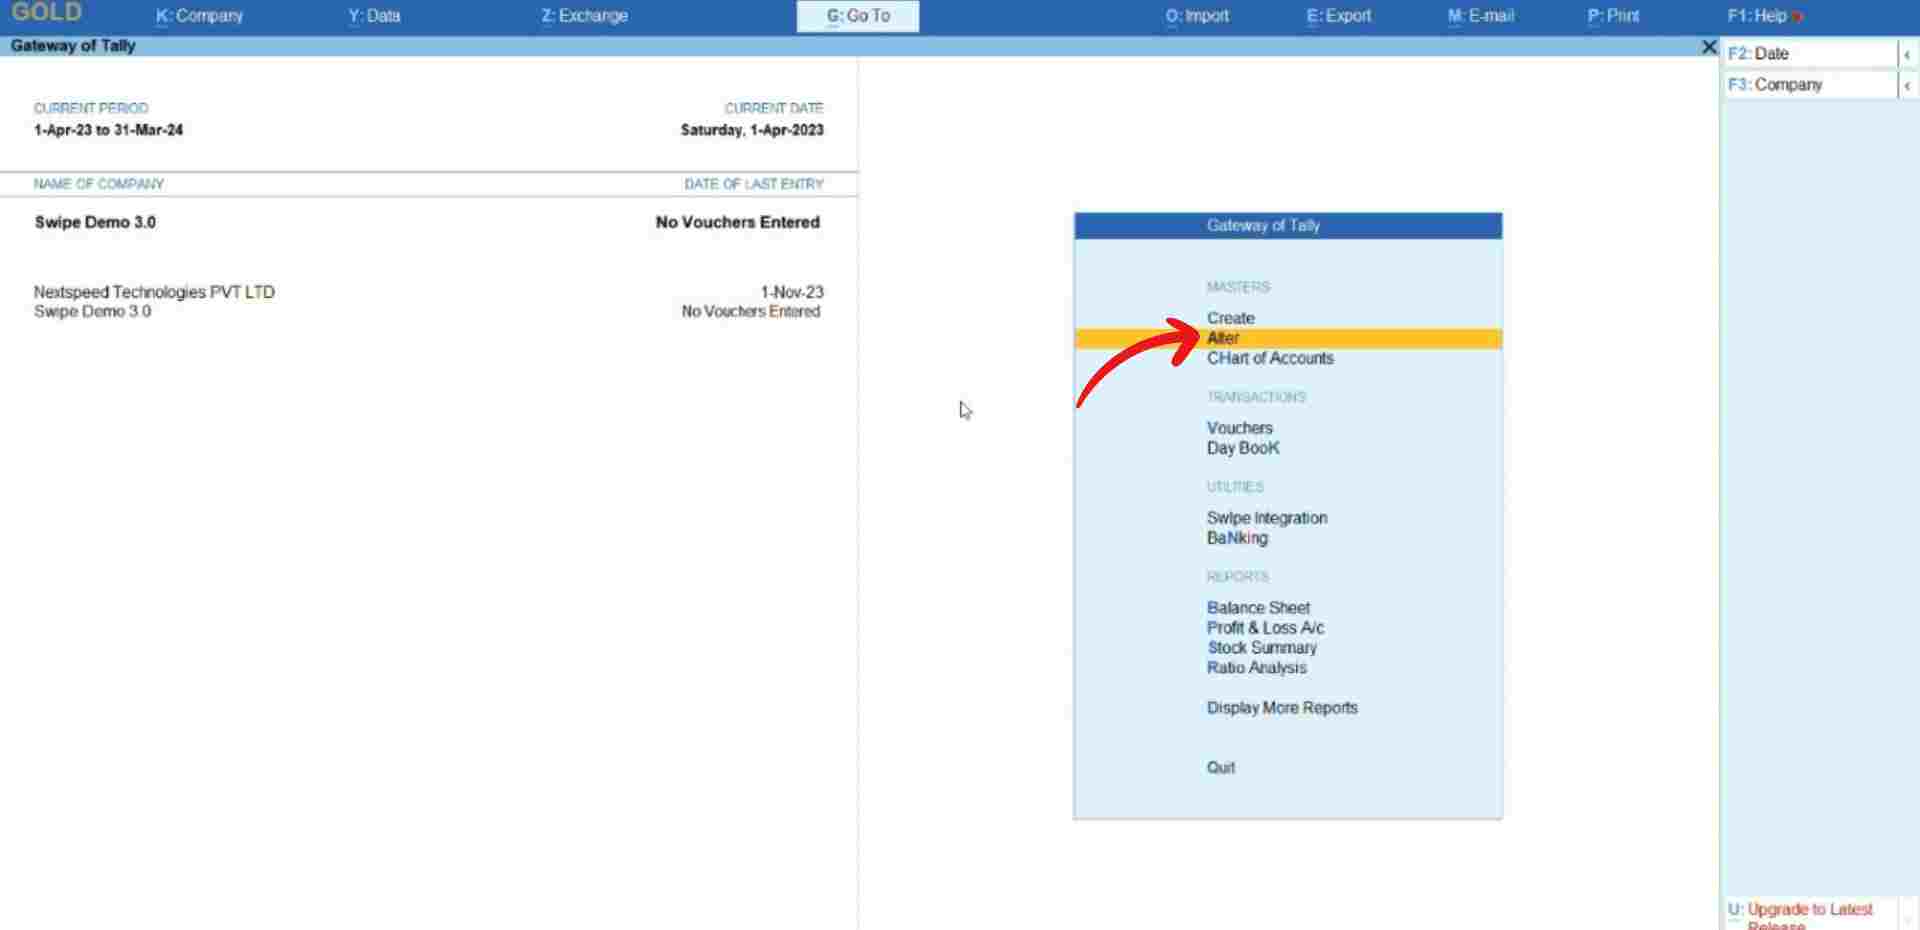
Step 1: Go to the Alter.
Click on "Atler" which is under the Masters section of “Gateway of Tally”.
Step 2: Click on the voucher type.
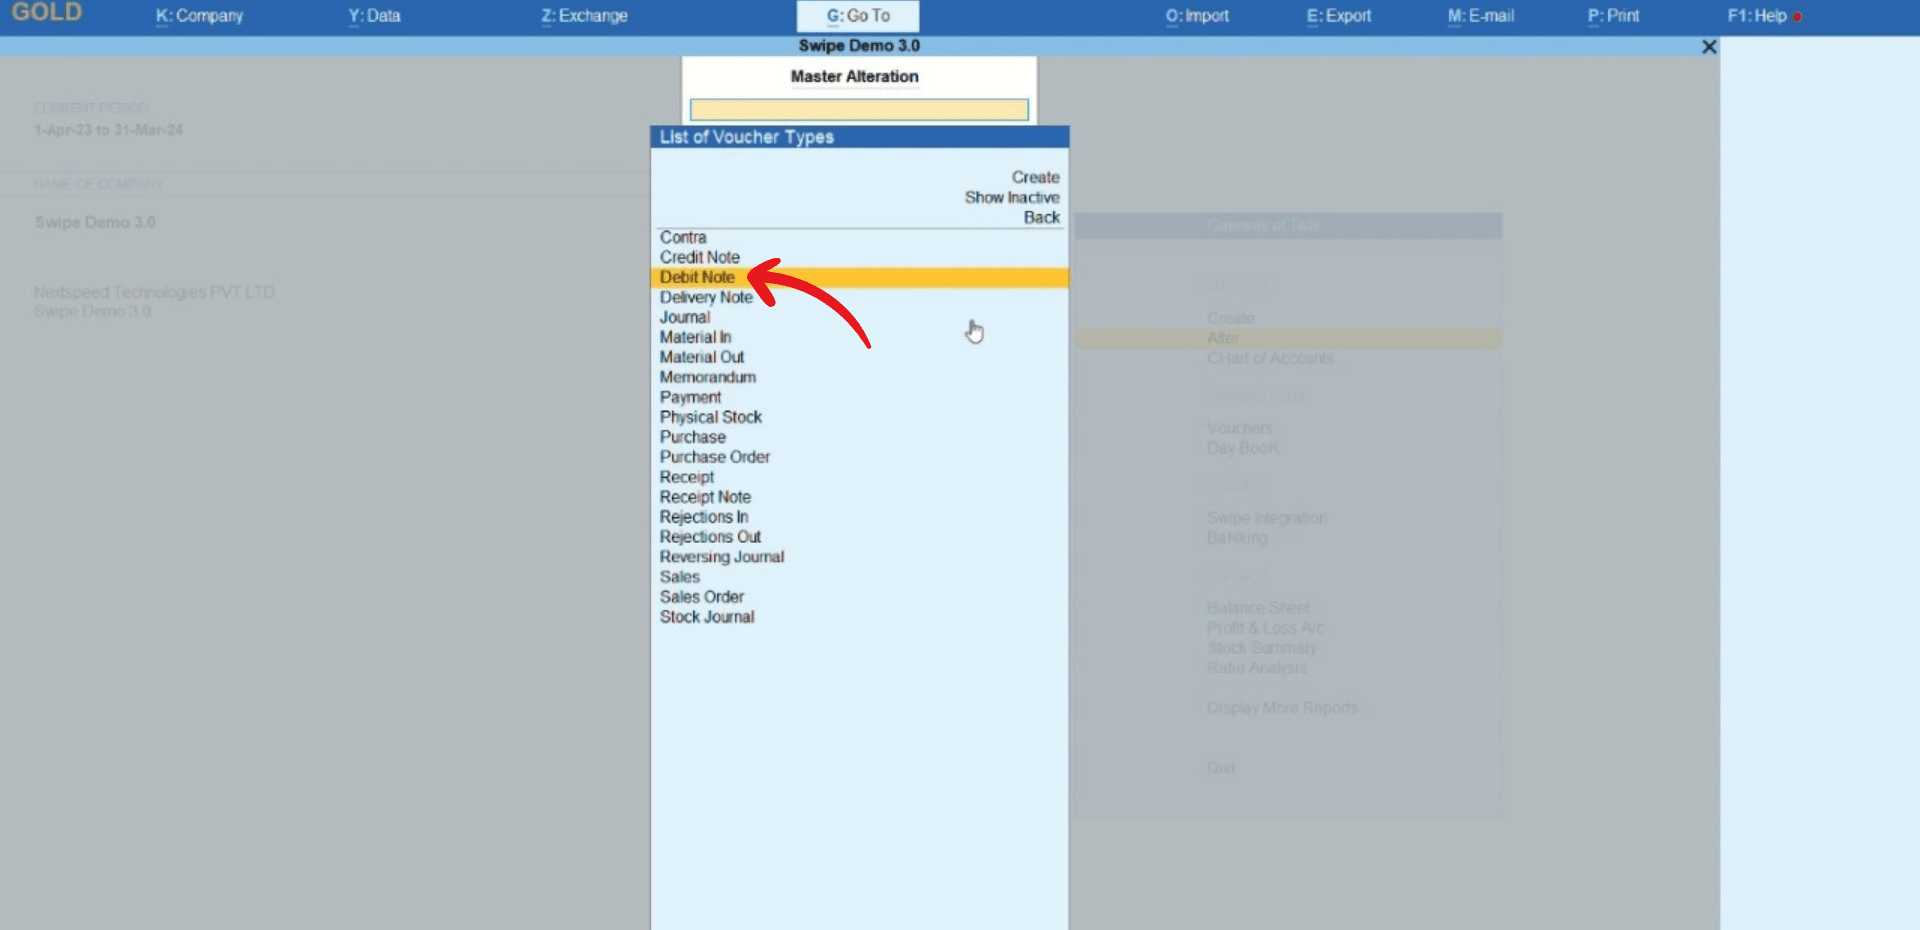
A new page appears. Here, click on “Voucher Type” under the Accounting Masters section.
Step 3: Select debit note.
Now, select the “debit note” option from the menu.
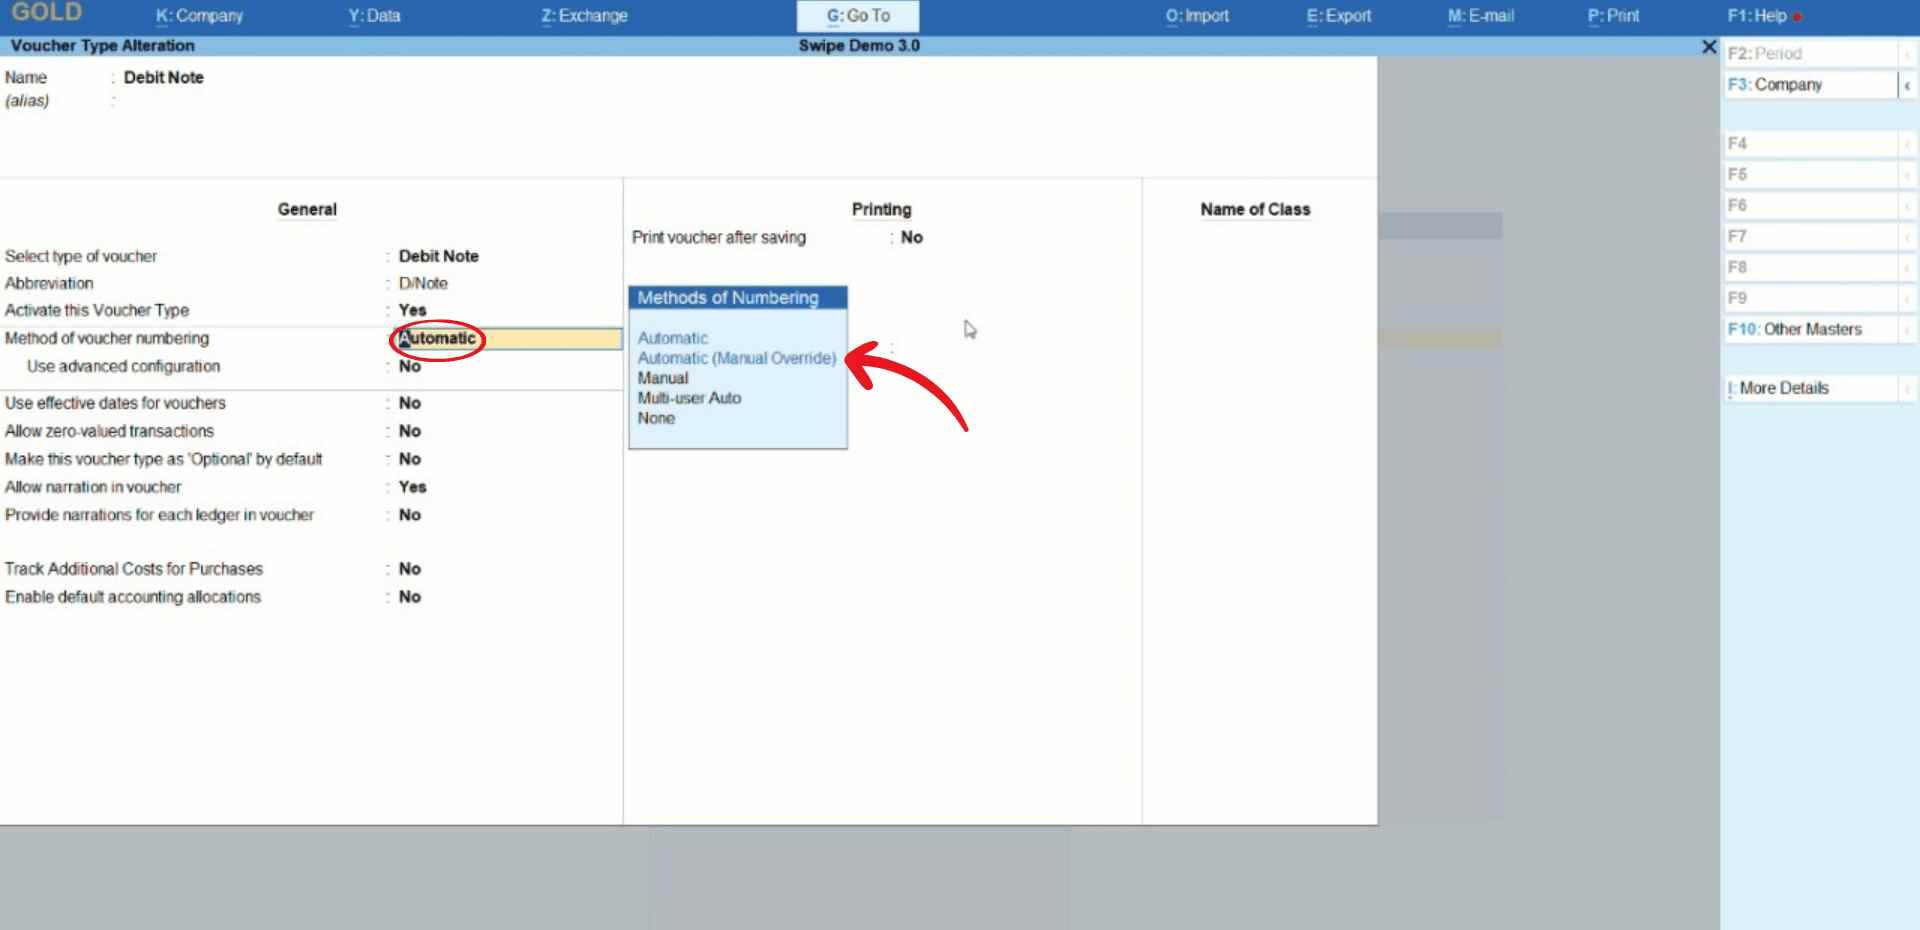
Change “Method of Voucher Numbering” to Automatic (Manual Override)
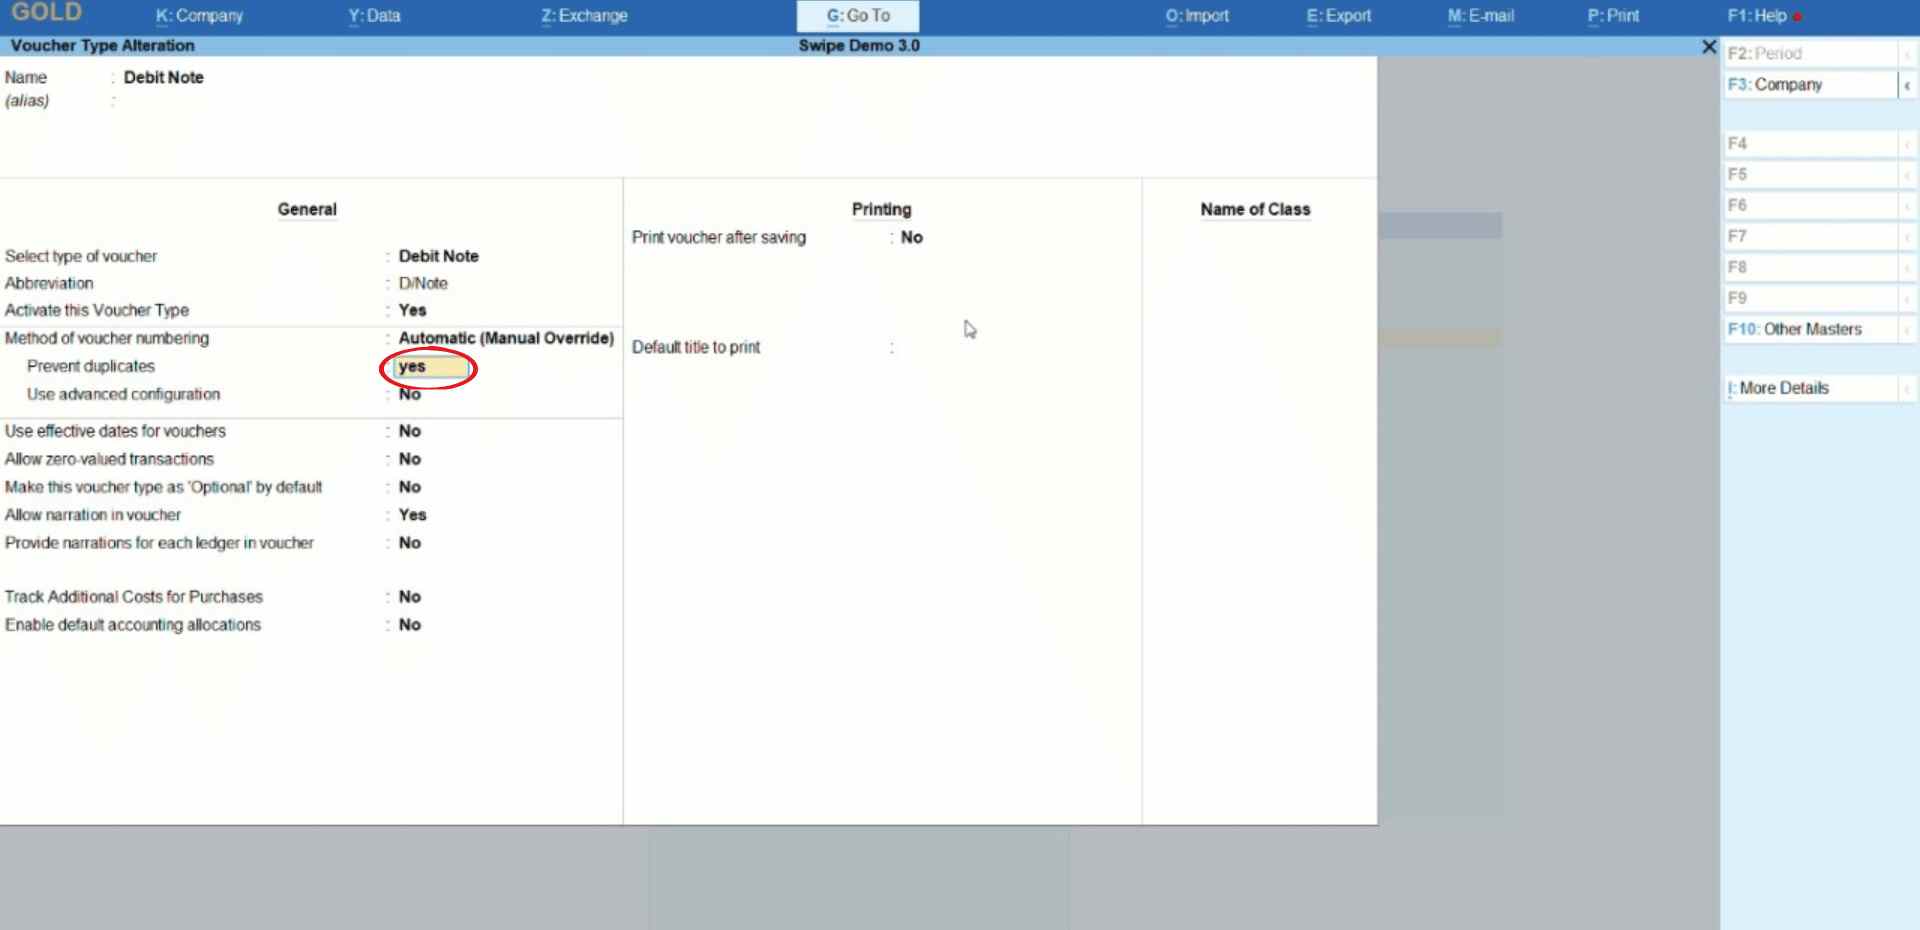
Type yes in the box next to "prevent duplicates”.
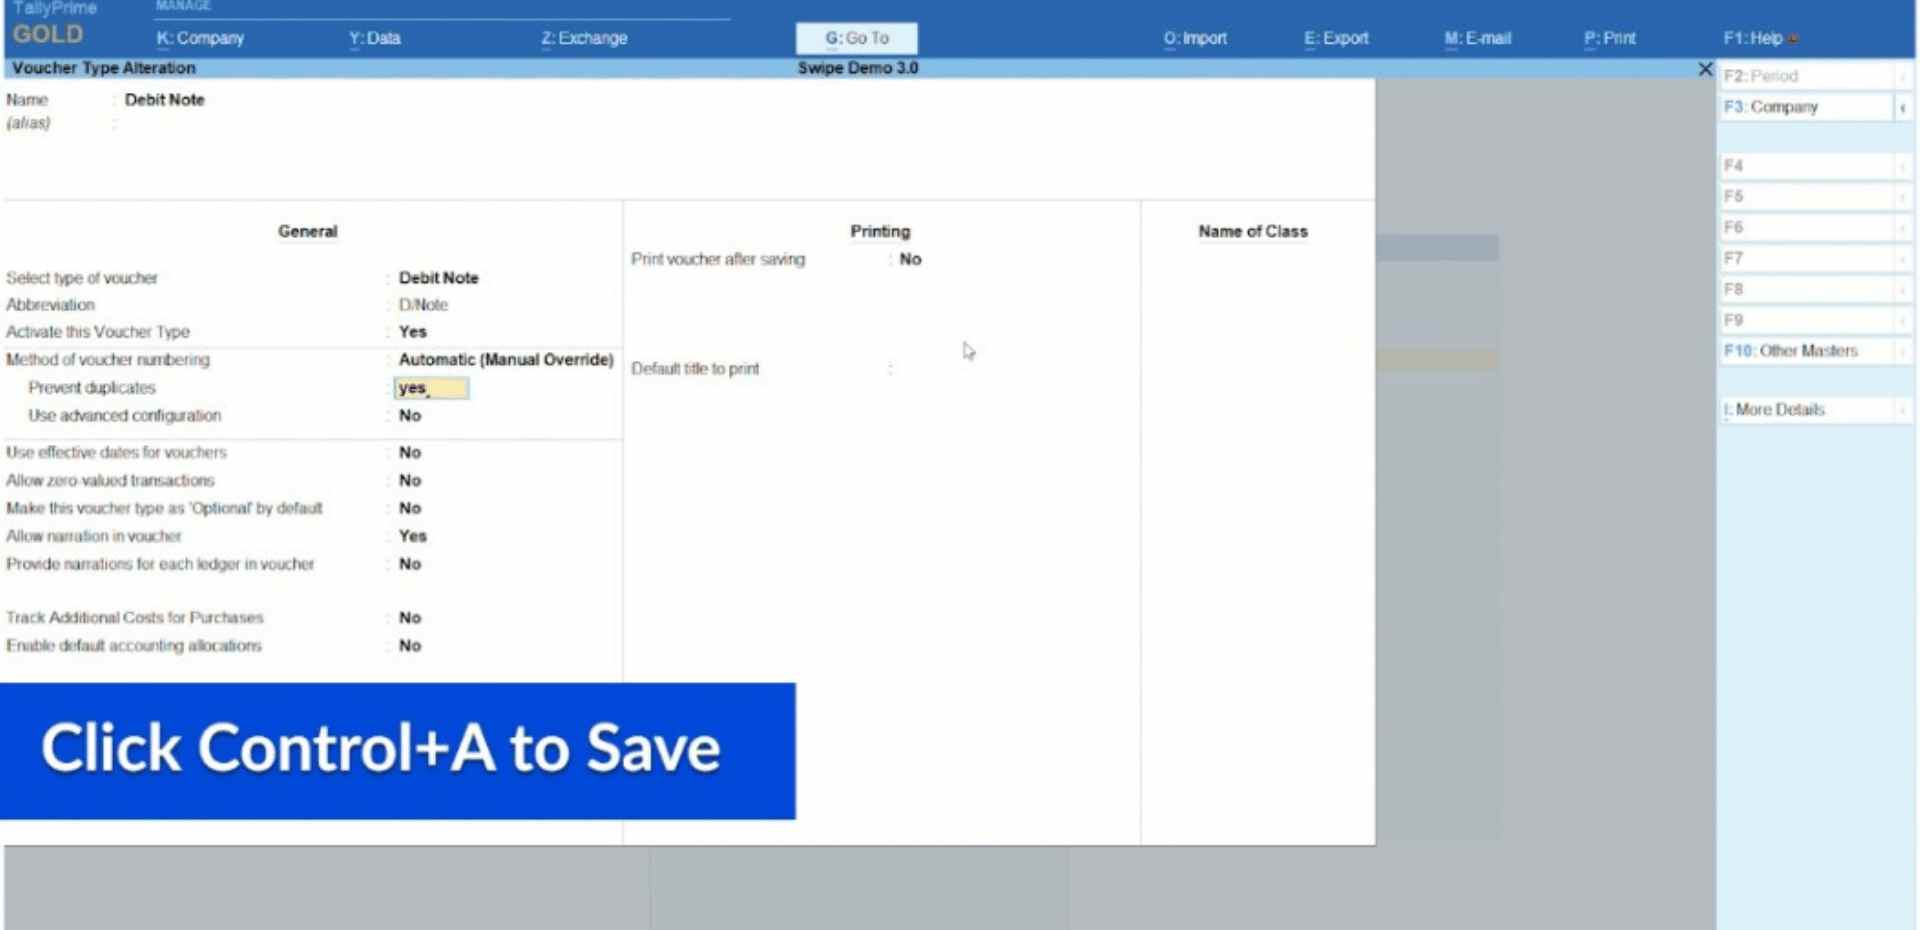
Now, press Control+A on your keyboard to save the settings and press “Esc” to go back to “Gateway of Tally”.
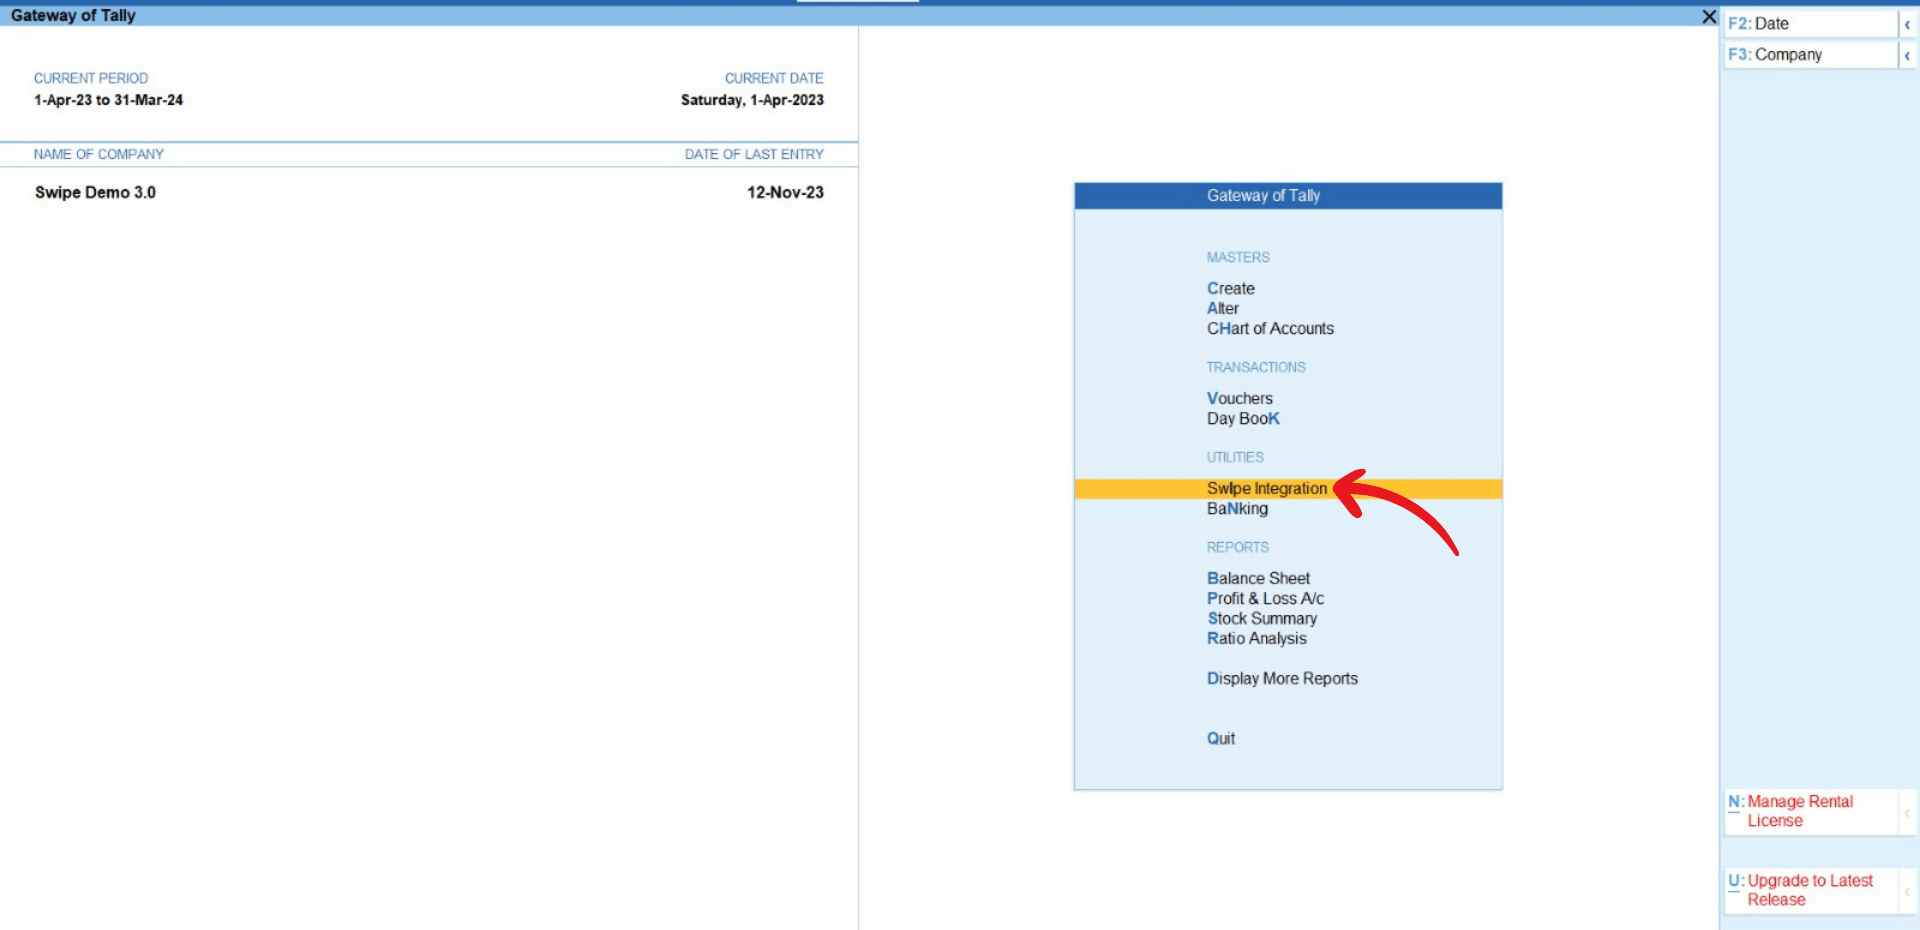
Step 4: Go to Swipe Integration.
Go to "Swipe Integration" which is under the Utilities section of “Gateway of Tally”.
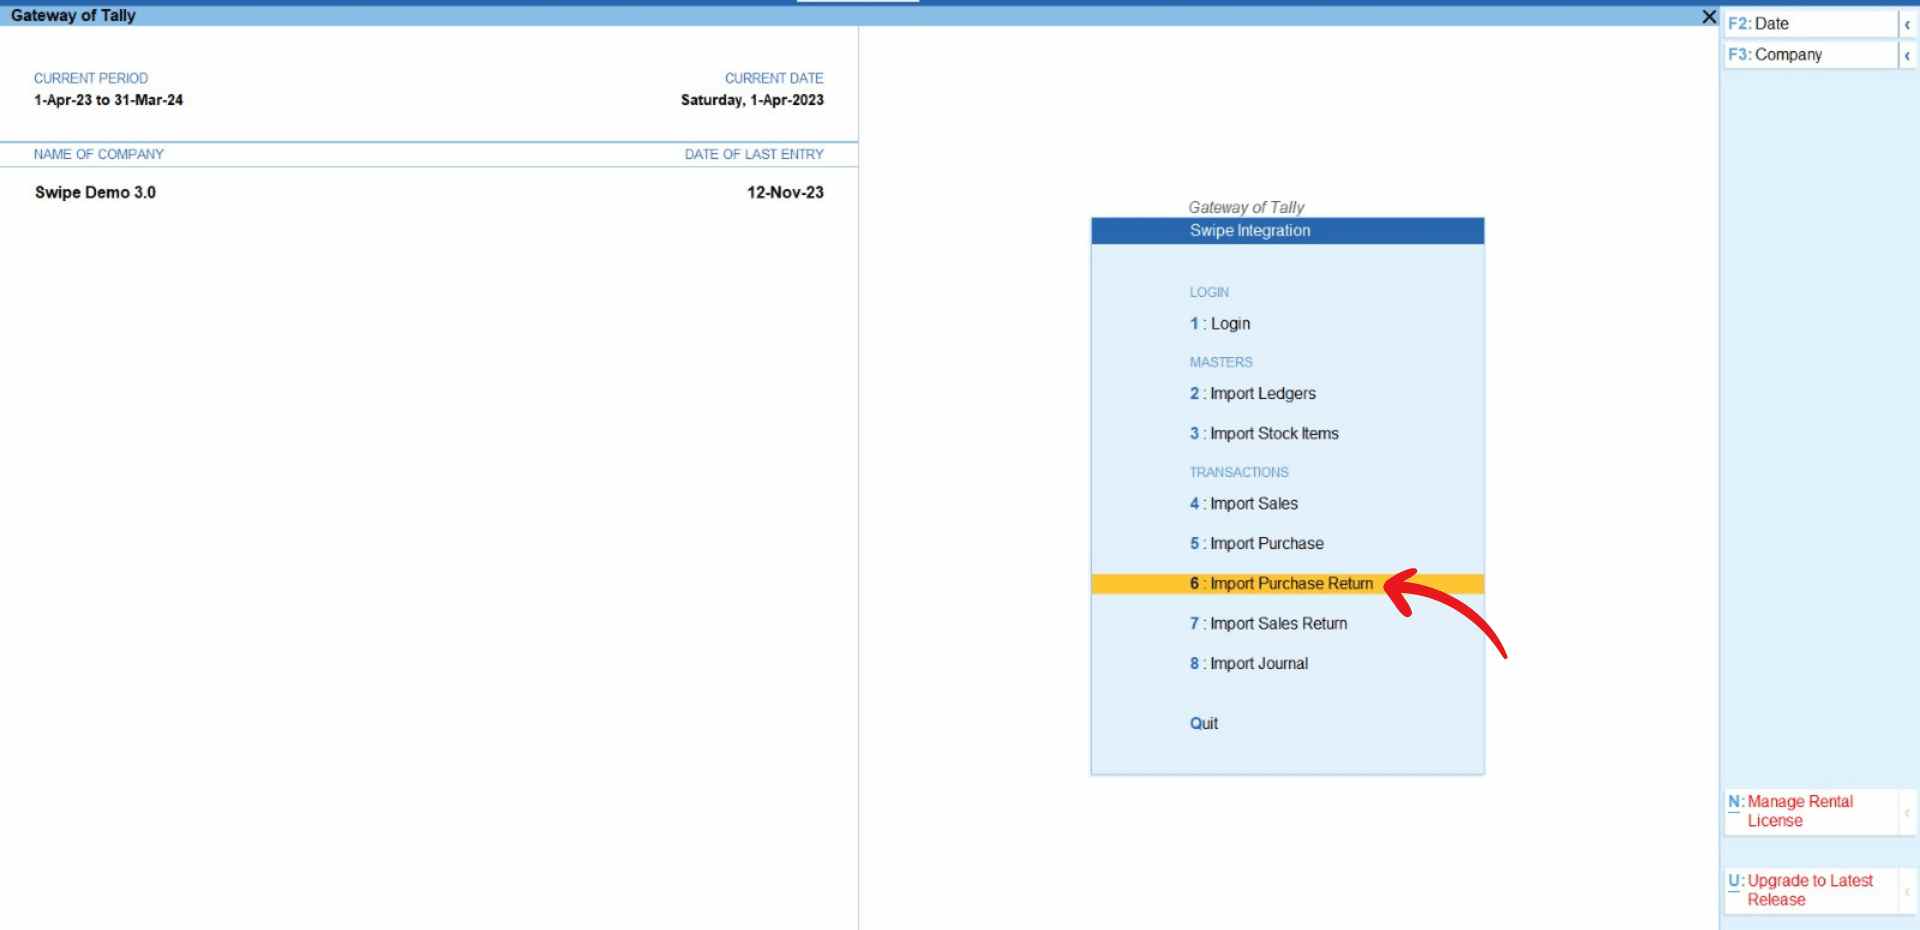
Step 5: Import Purchase return.
Click on the “Import Purchase Return” option under the Masters section.
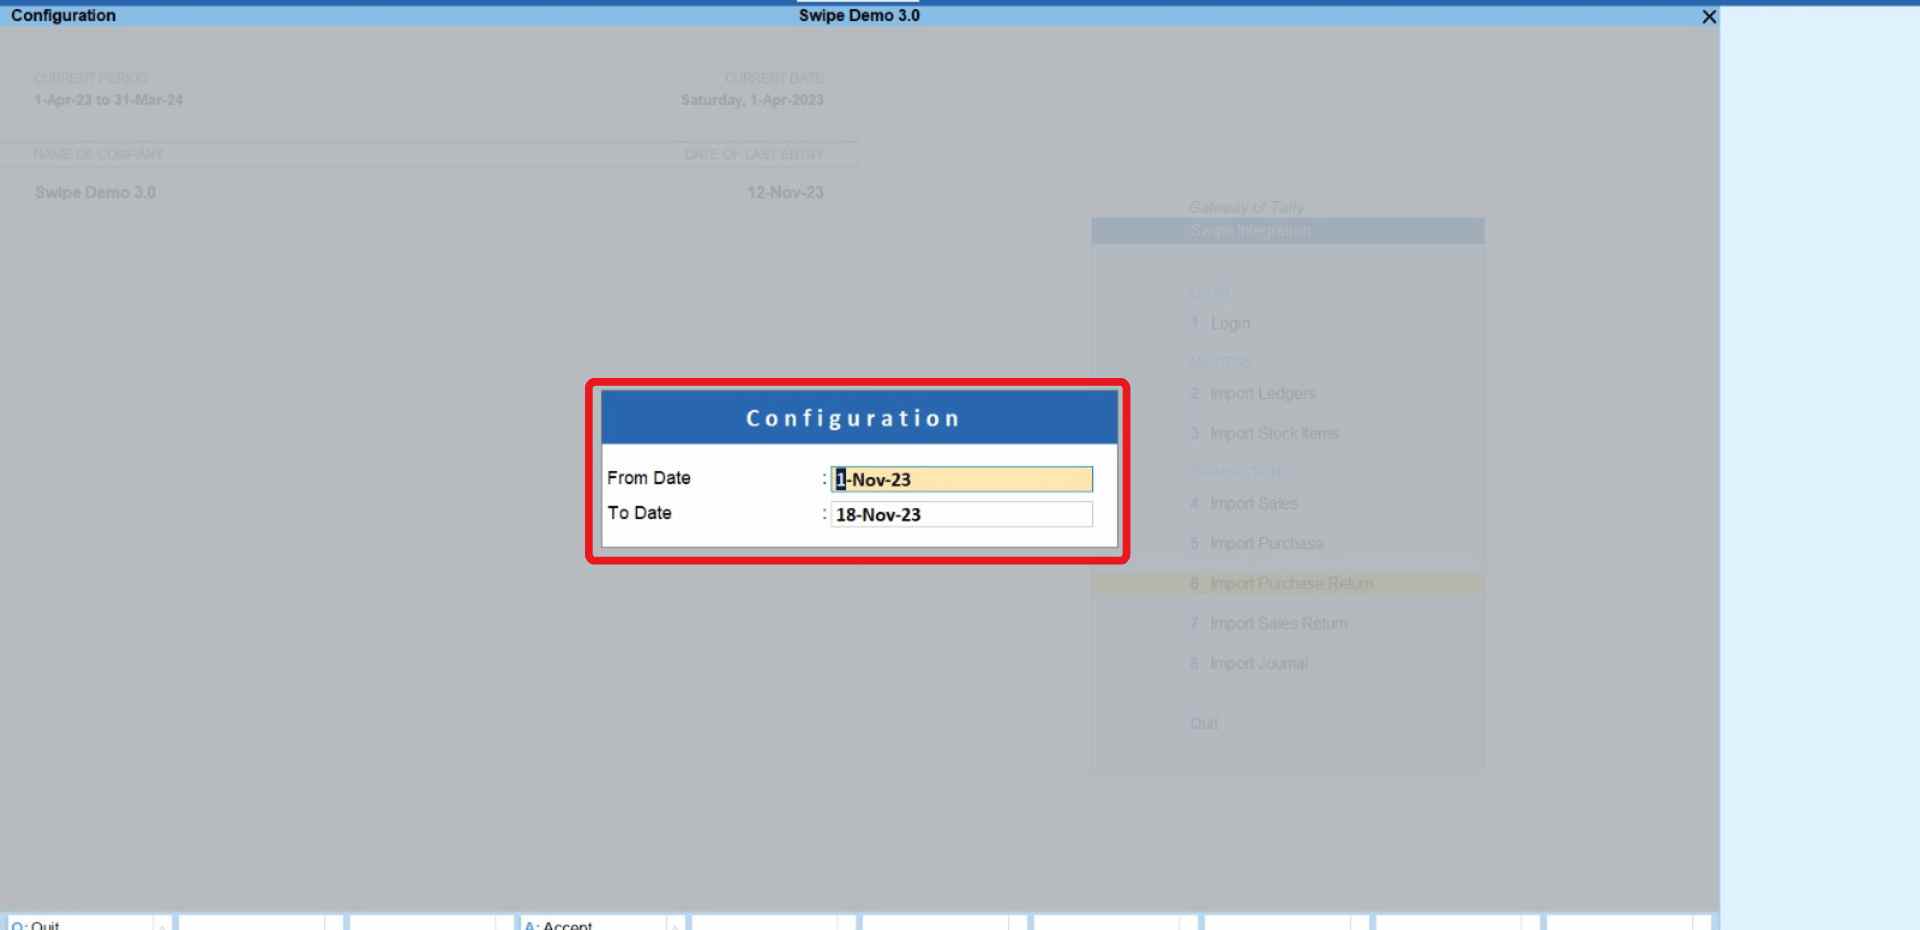
A pop-up appears. Here, enter the timeline of debit notes you want to import and click Yes to confirm your action.
Please wait until the data is fetched from Swipe.
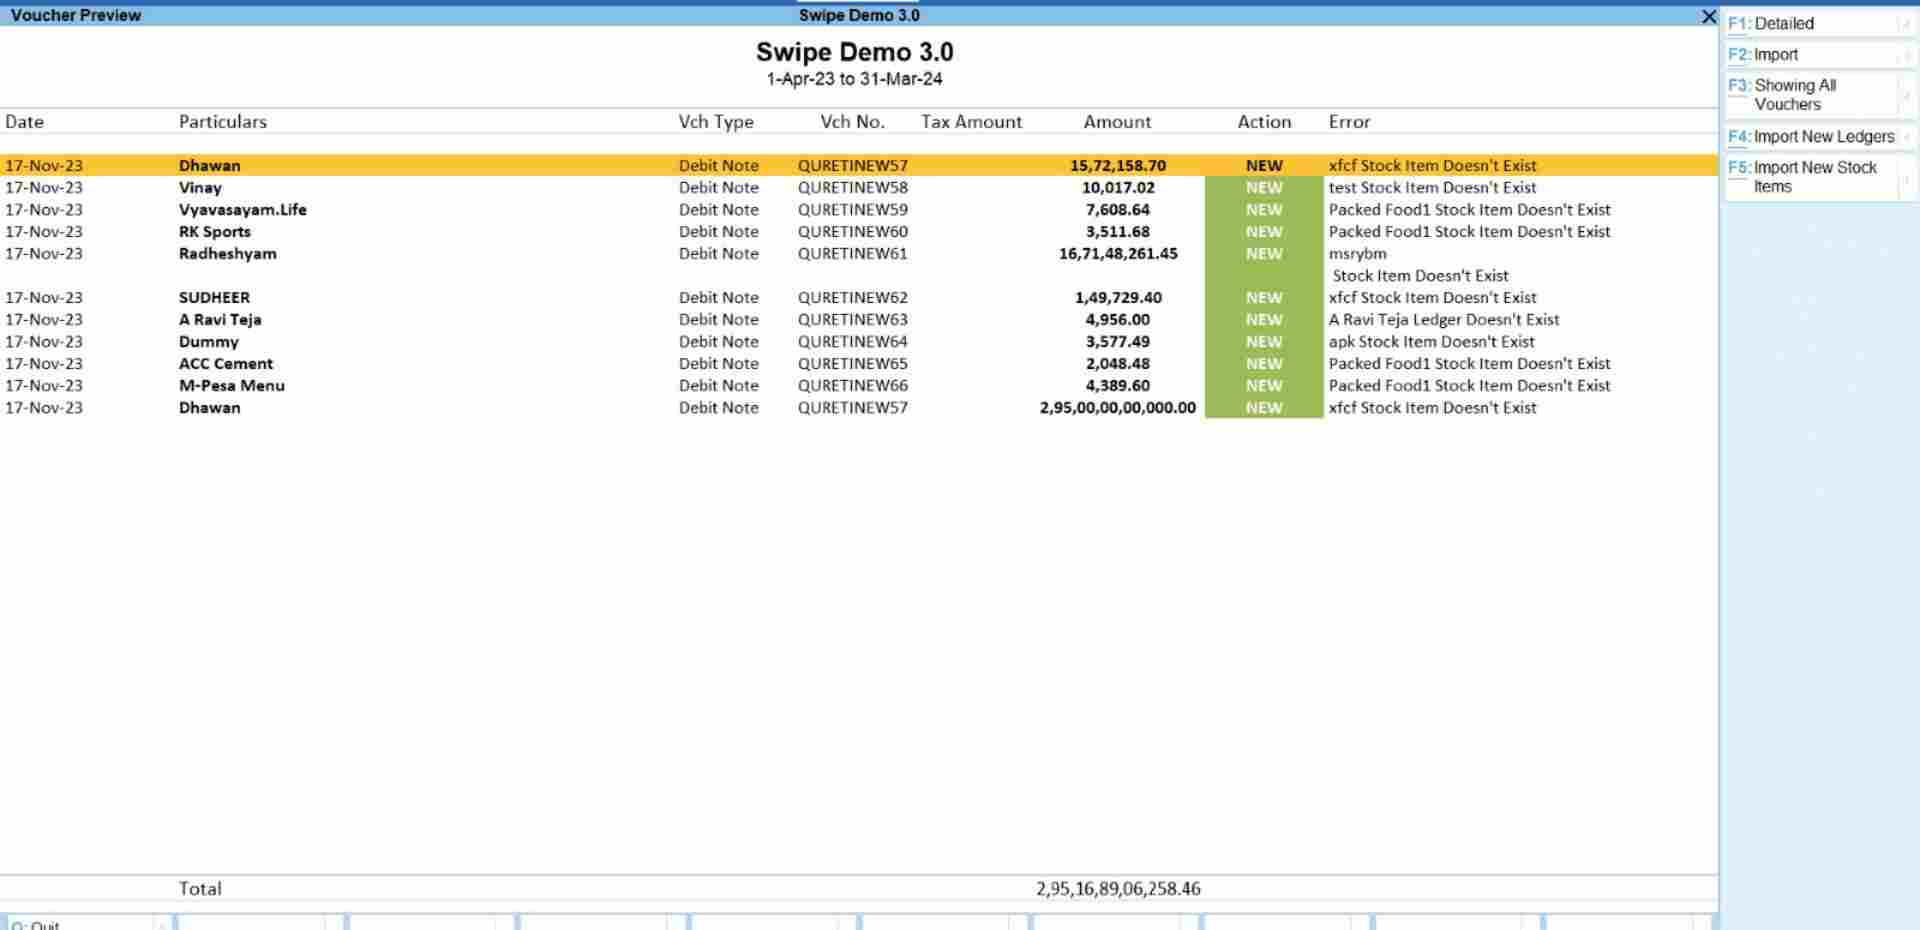
Step 6: Check the Error List.
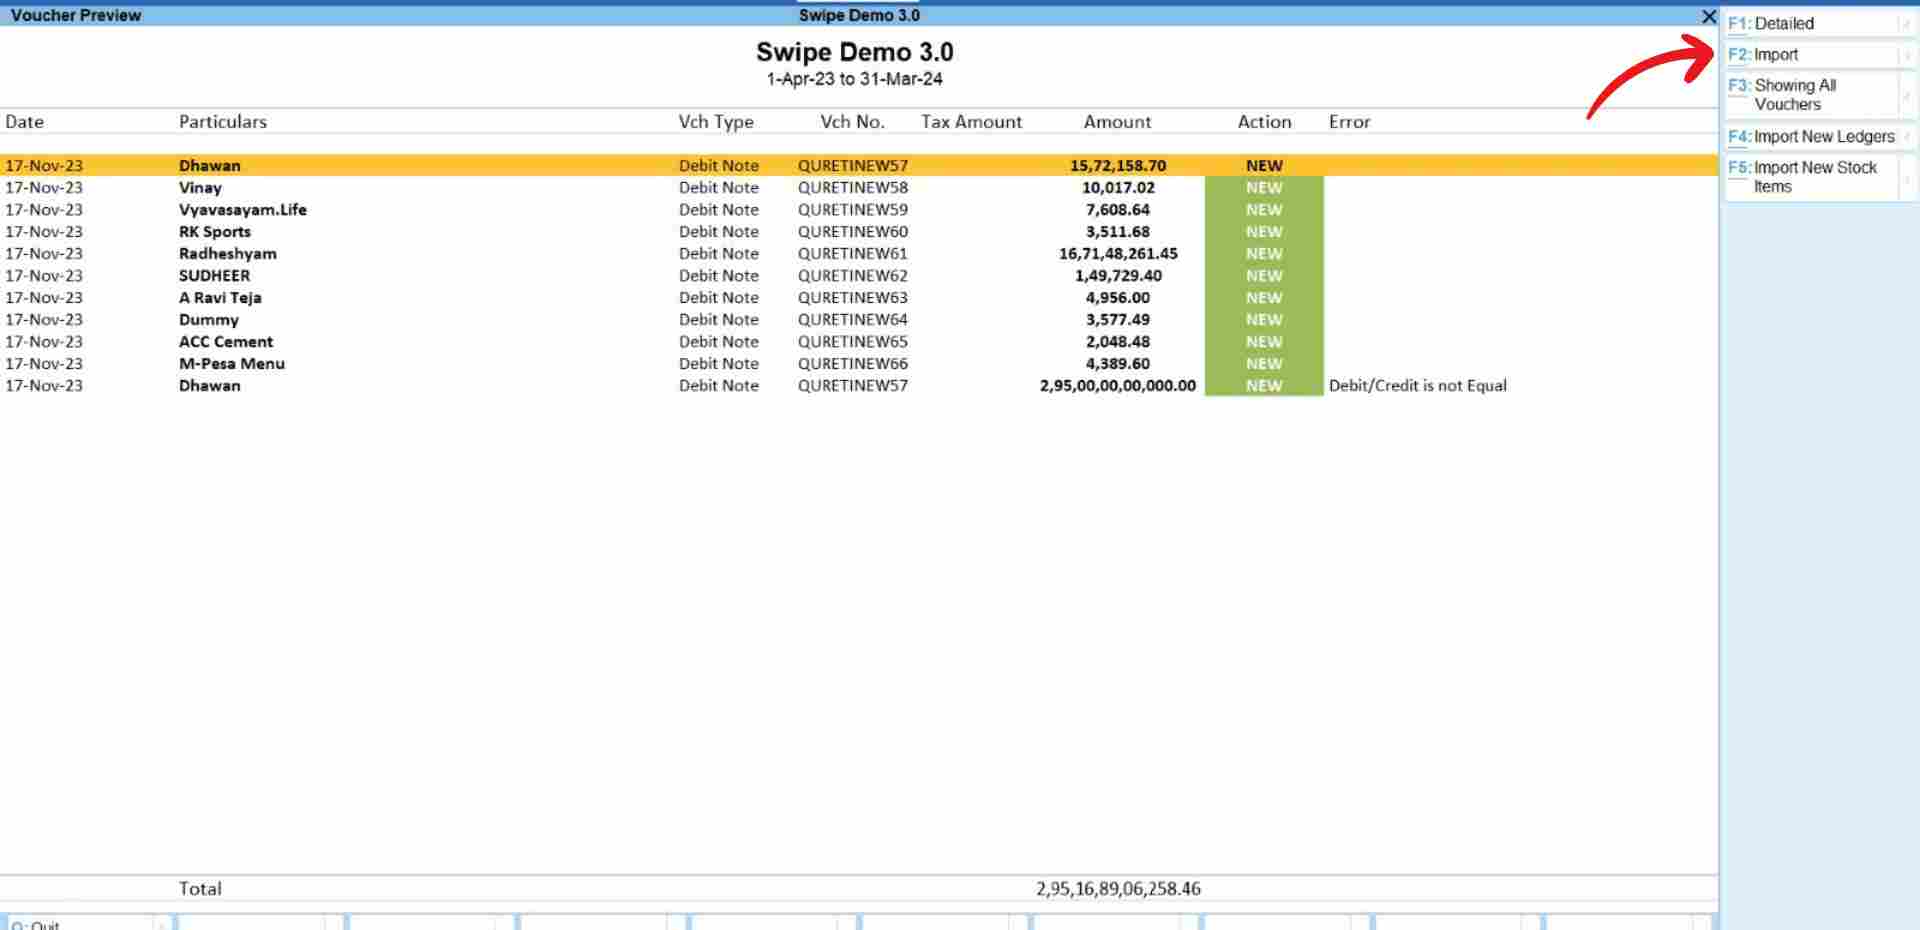
After fetching the data, a preview page appears, displaying the debit notes data.
To review any errors, please follow the steps below to resolve the issue.
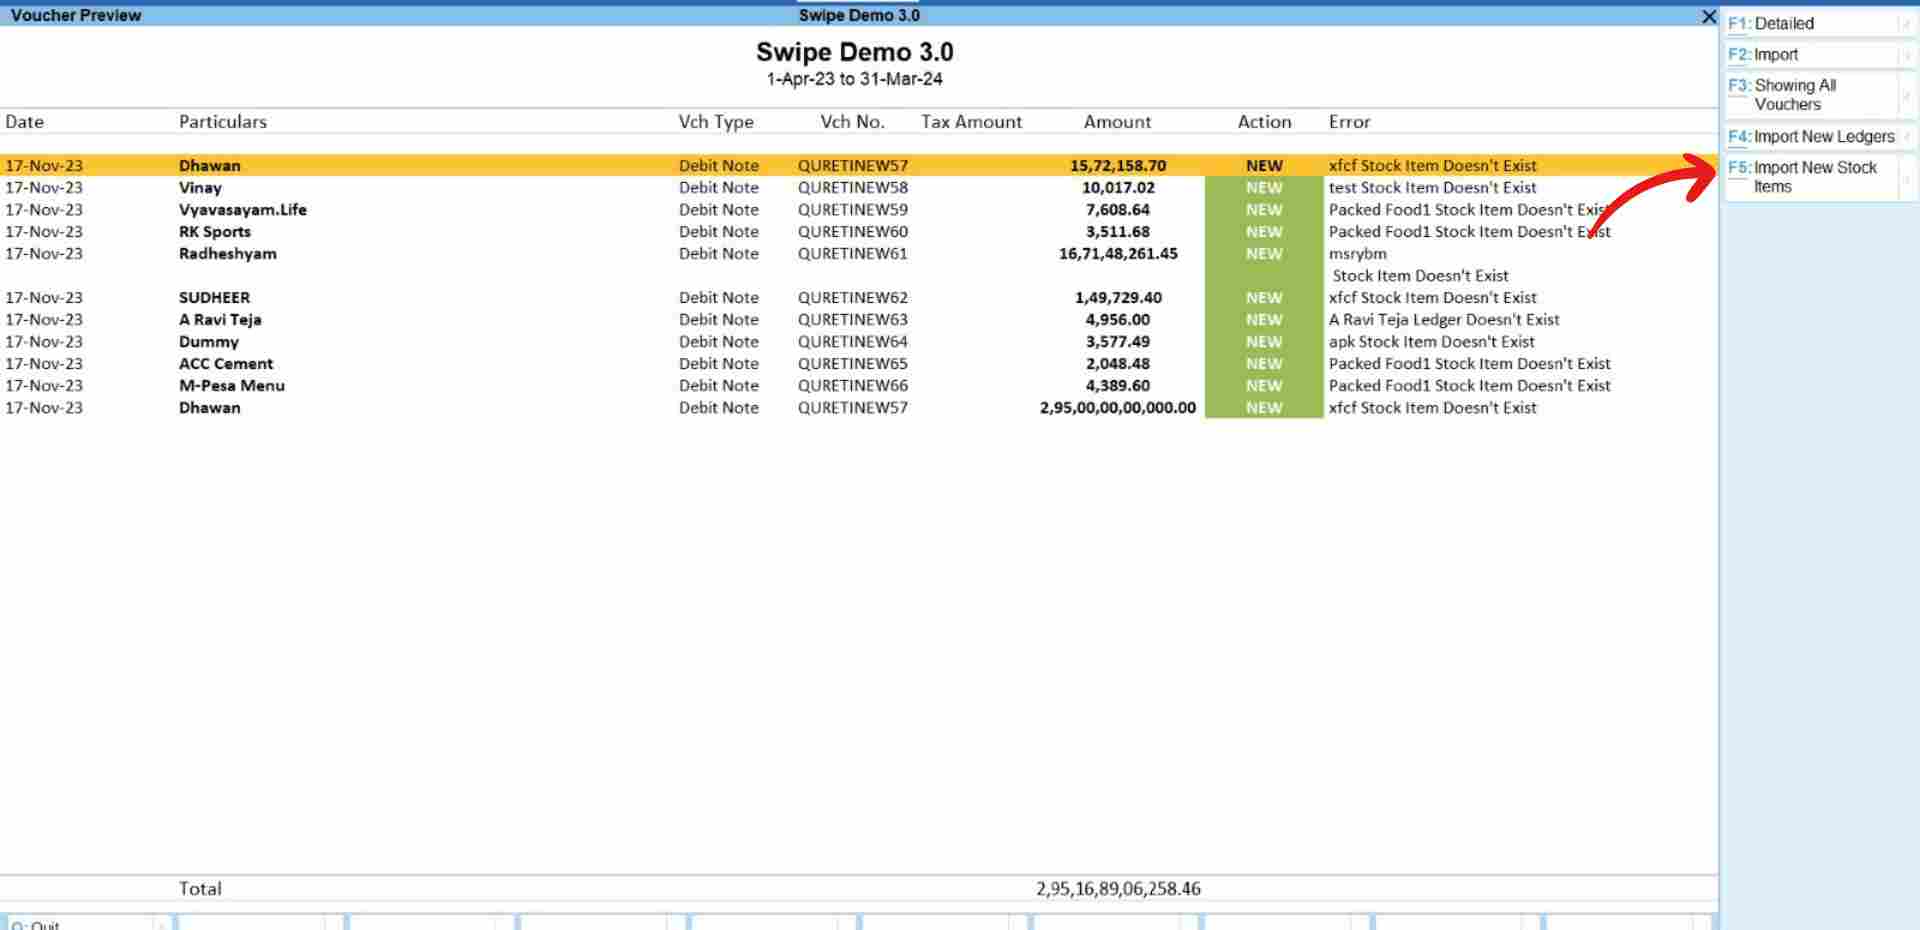
For the error “Stock Items Doesn't Exist": Click on the “Import New Stock Items” option present at the top right corner of the screen or press the F5 key on your keyboard.
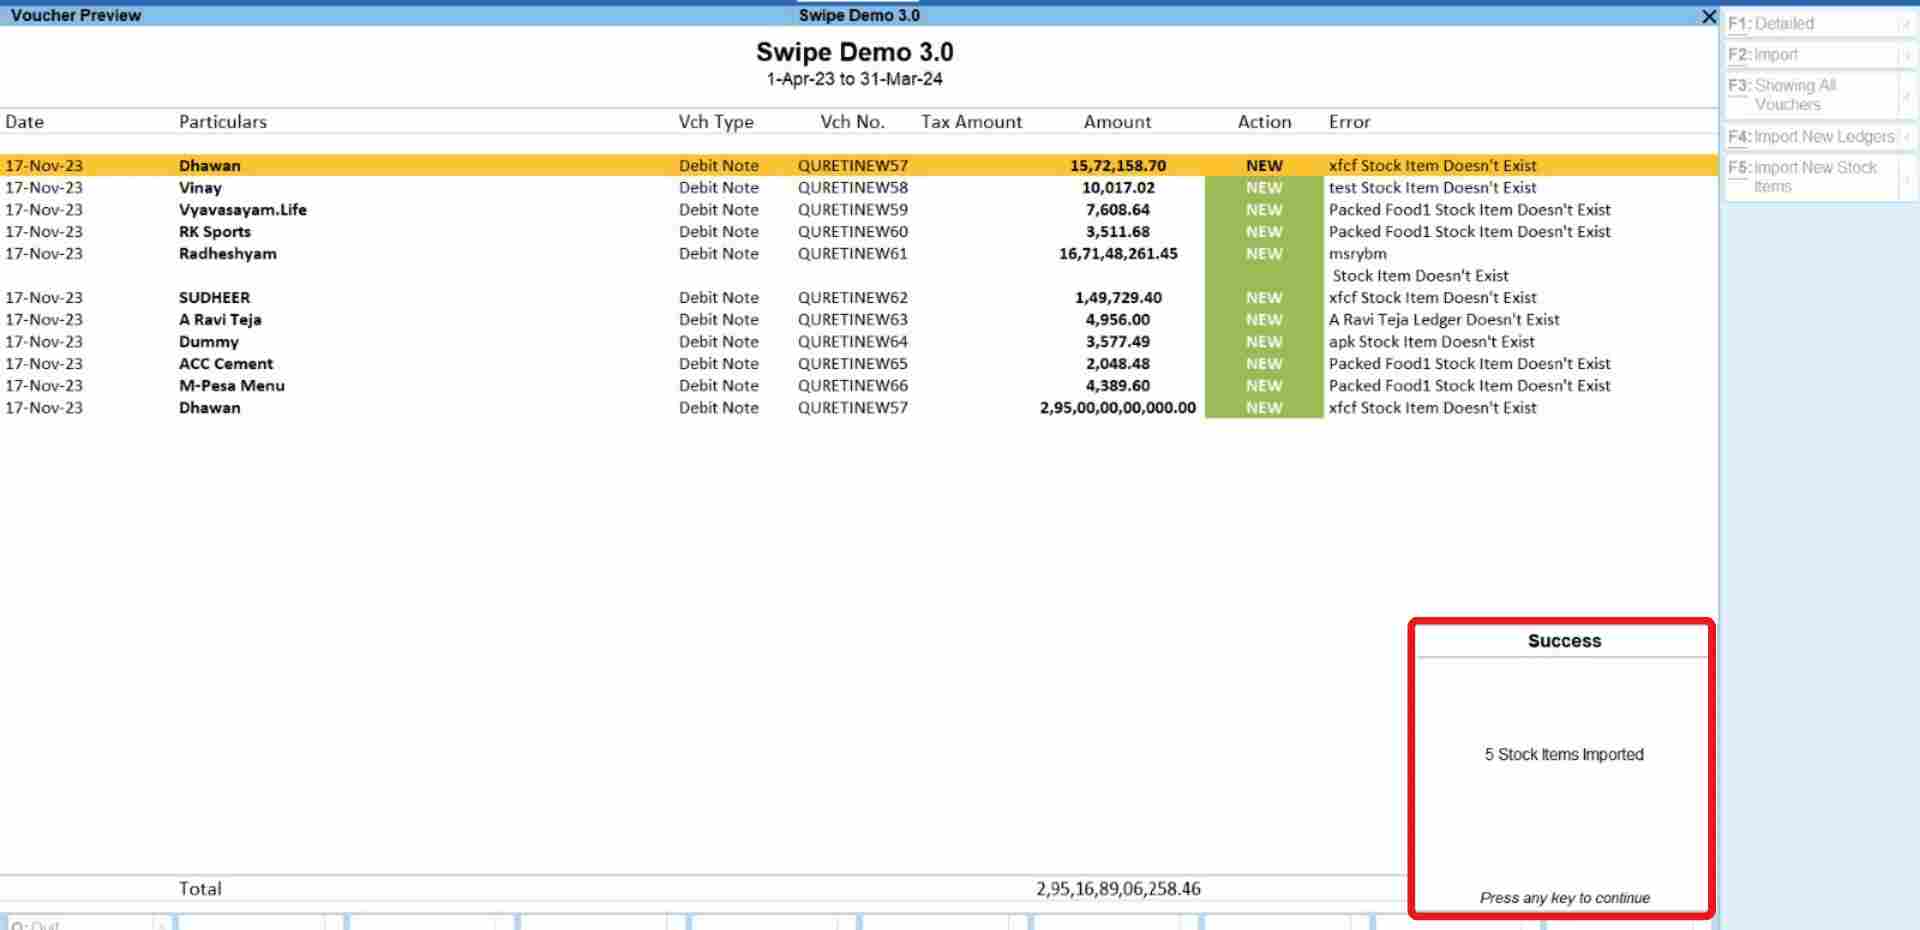
Congratulations! You have successfully imported new stock items and a pop-up appears at the bottom of the screen informing the screen. Press any key to continue.
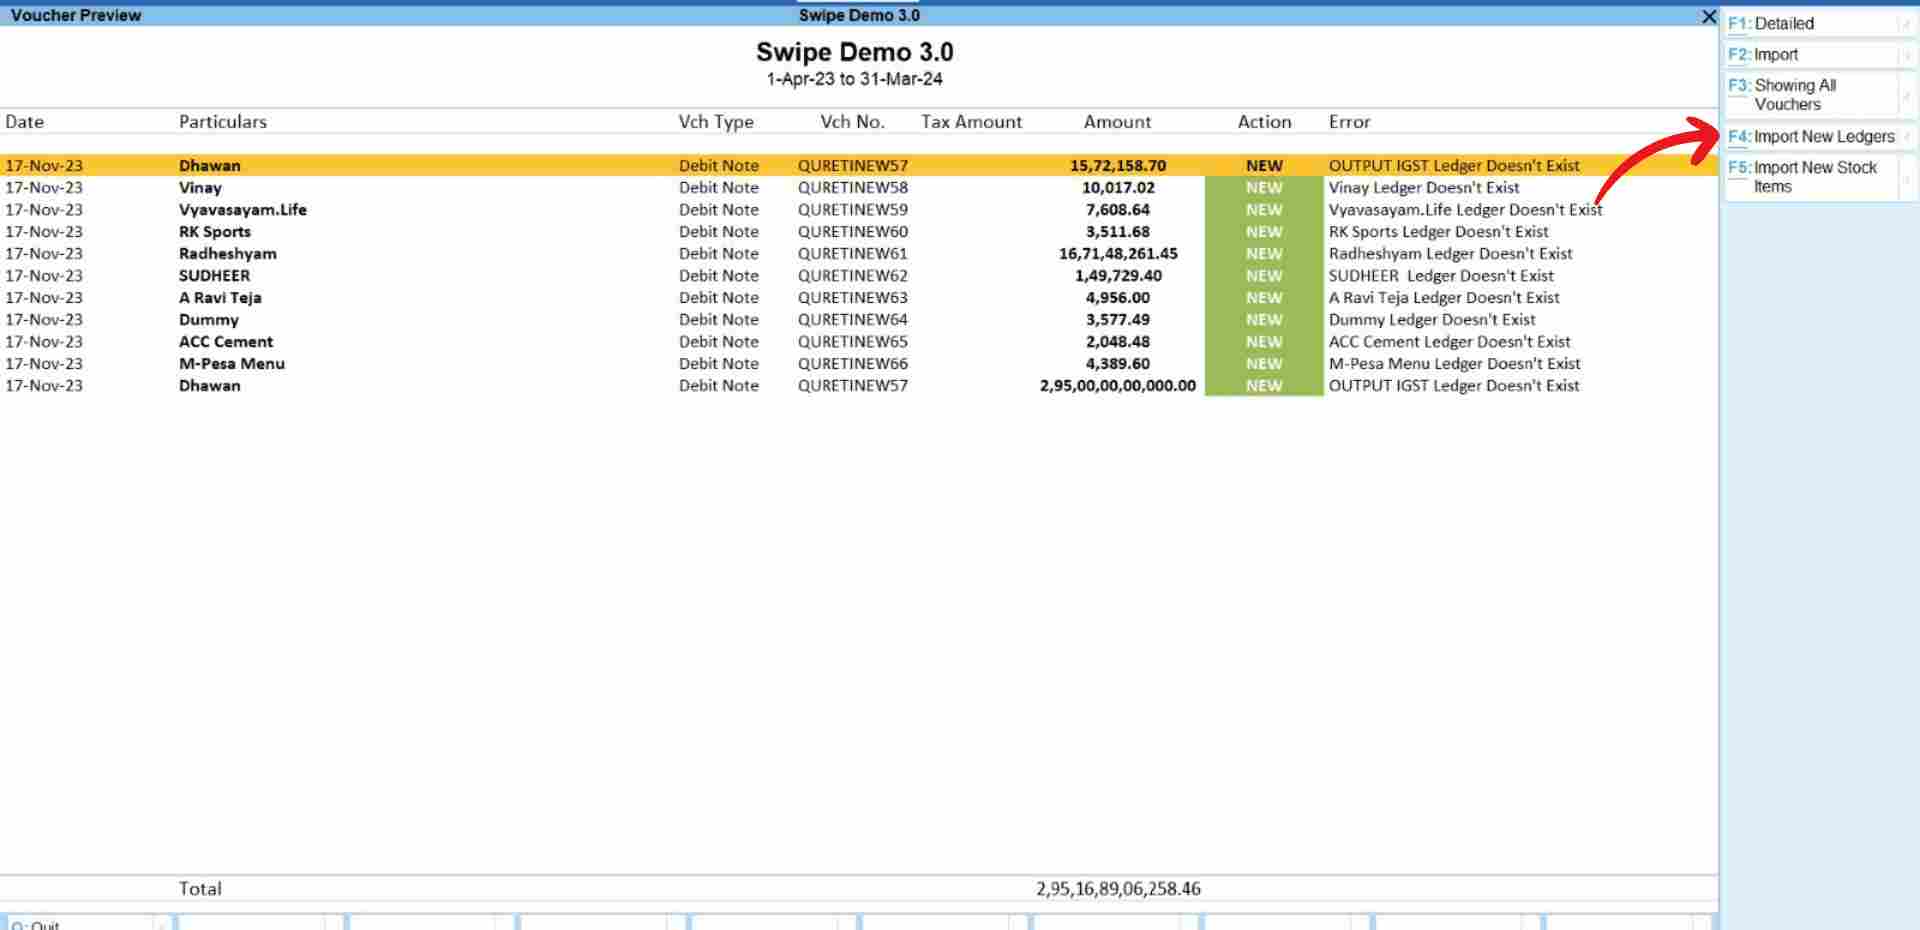
For the error “Ledgers Doesn’t Exist”: Click on the “Import New Ledgers” option present at the top right corner of the screen or press the F4 key on your keyboard.
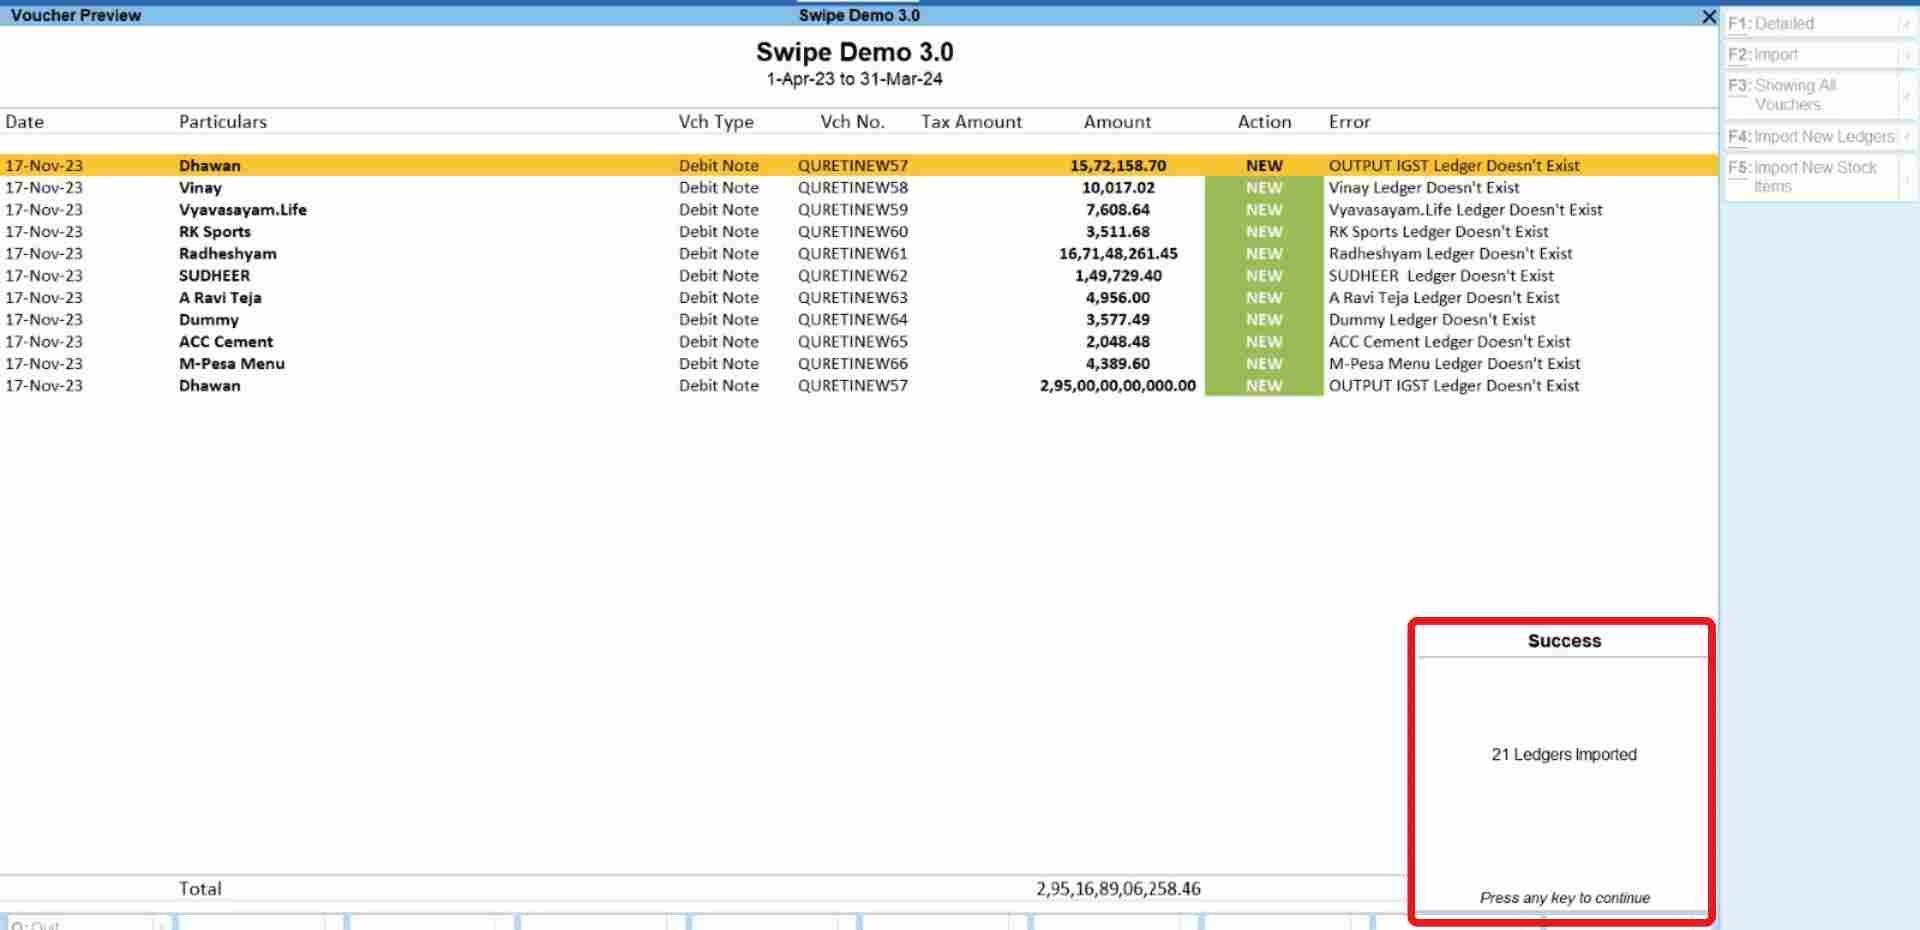
Congratulations! You have successfully imported new ledgers and a pop-up appears at the bottom of the screen informing the screen. Press any key to continue.
Step 7: Import the data.
Click on the “Import” option present at the top right corner of the screen or press the F2 key on your keyboard.
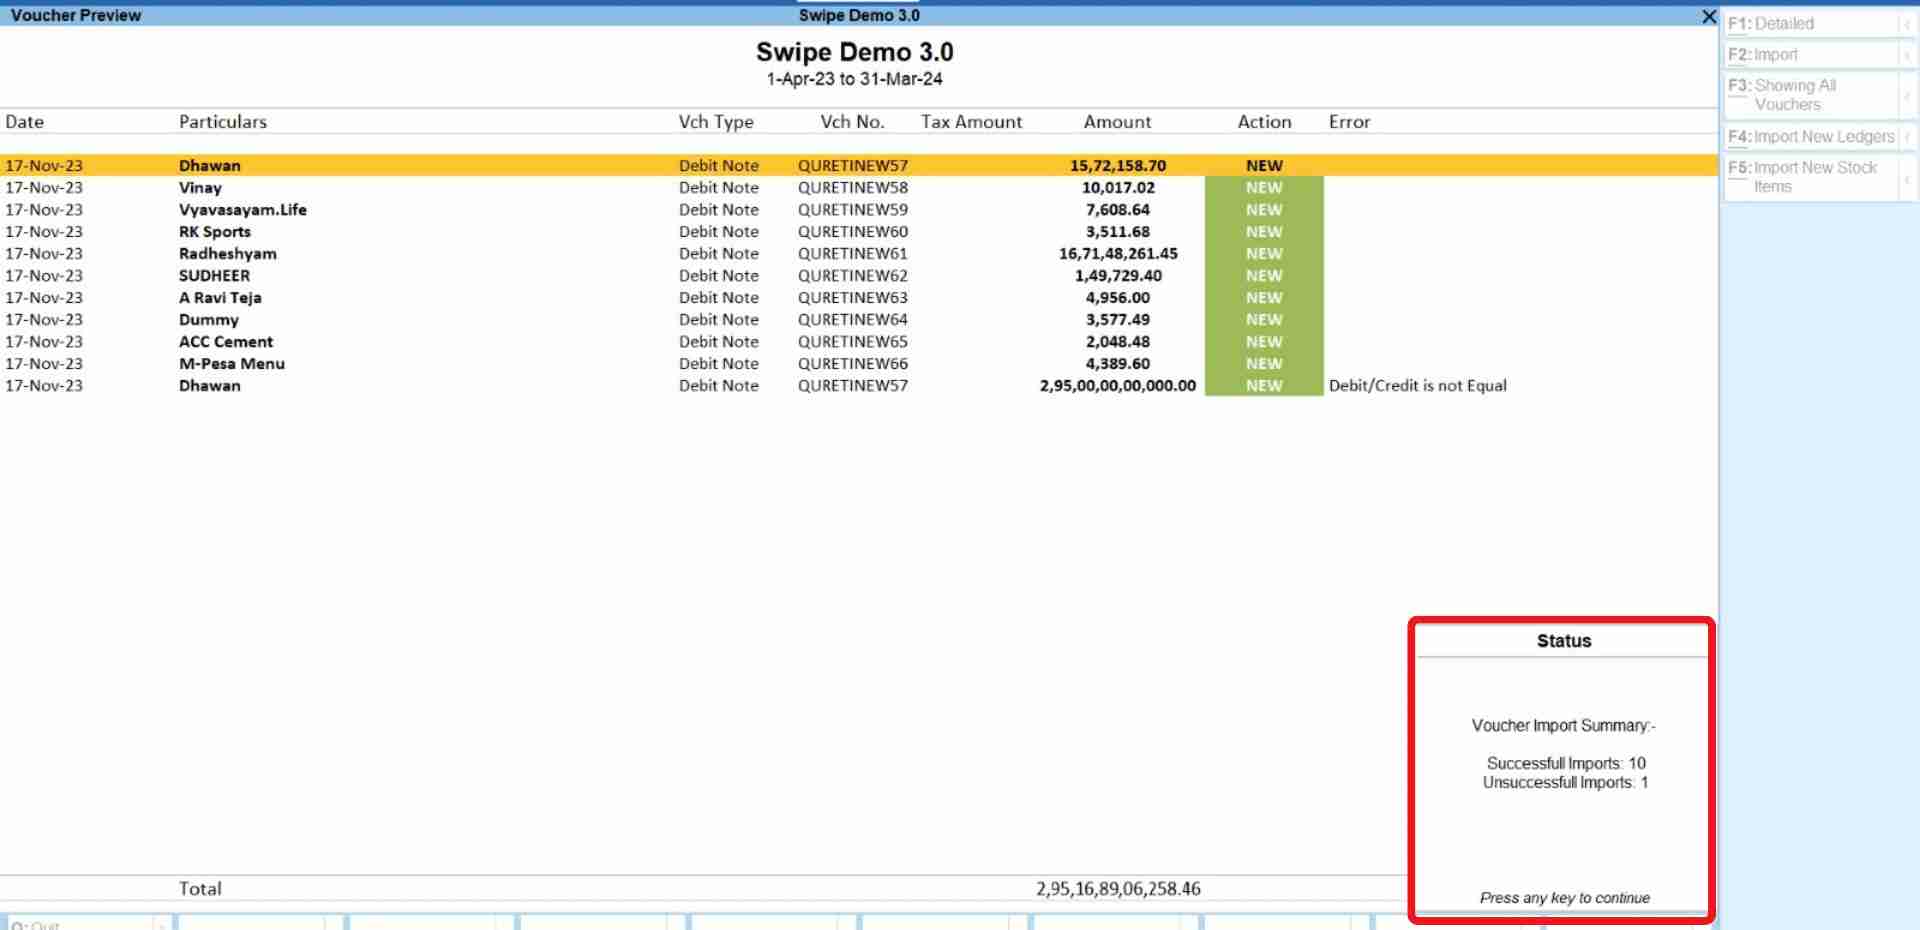
Now, confirm your action by clicking on the “Yes” option from the pop-up.
Congratulations, You have successfully imported debit notes data from your Swipe account to your Tally account, and a pop-up appears at the bottom of the screen informing the same.
Press any key to continue.
How to import expenses from Swipe to Tally
Note: The response time and overall functioning speed of data import are determined by your computer's processor, not by Swipe or Tally software. In Tally software, Direct and indirect expenses are collectively referred to as “Journals”. If you haven't made mandatory changes to your settings to import transactions, please follow the below steps. If you have already made mandatory changes, please skip to step 4.
Step 1: Go to the Alter.
Click on "Atler" which is under the Masters section of “Gateway of Tally”.
Step 2: Click on the voucher type.
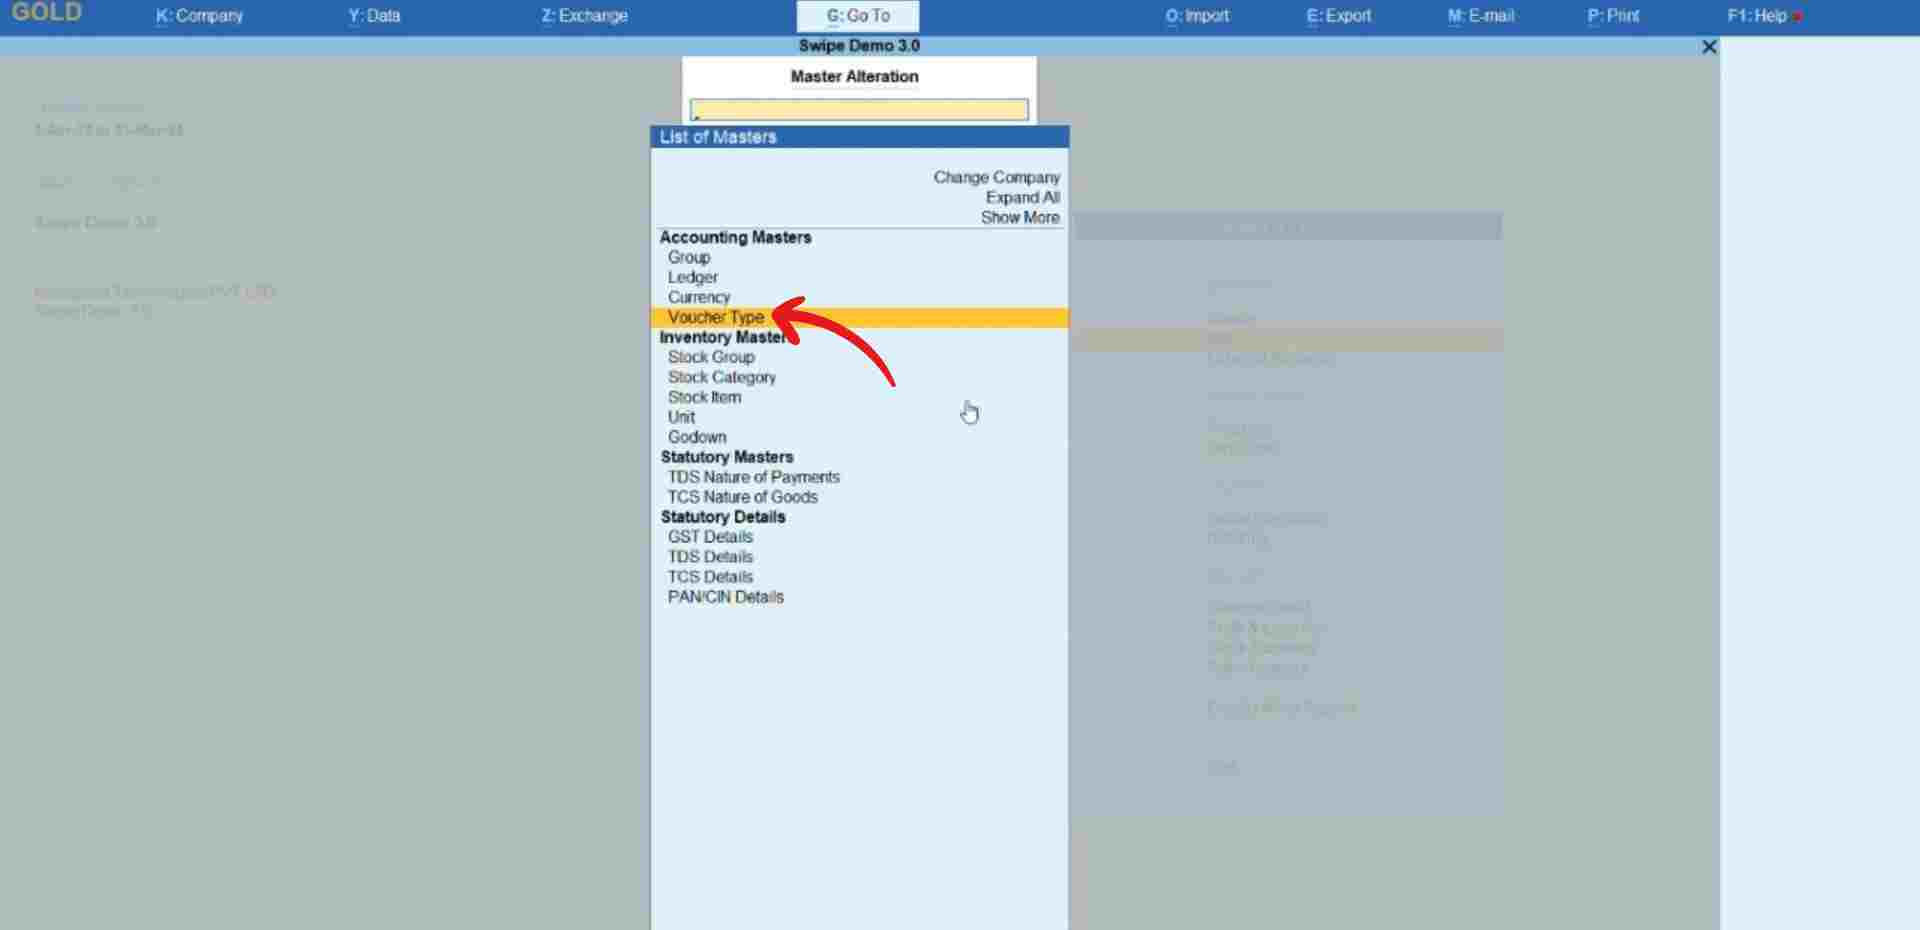
A new page appears. Here, click on “Voucher Type” under the Accounting Masters section.
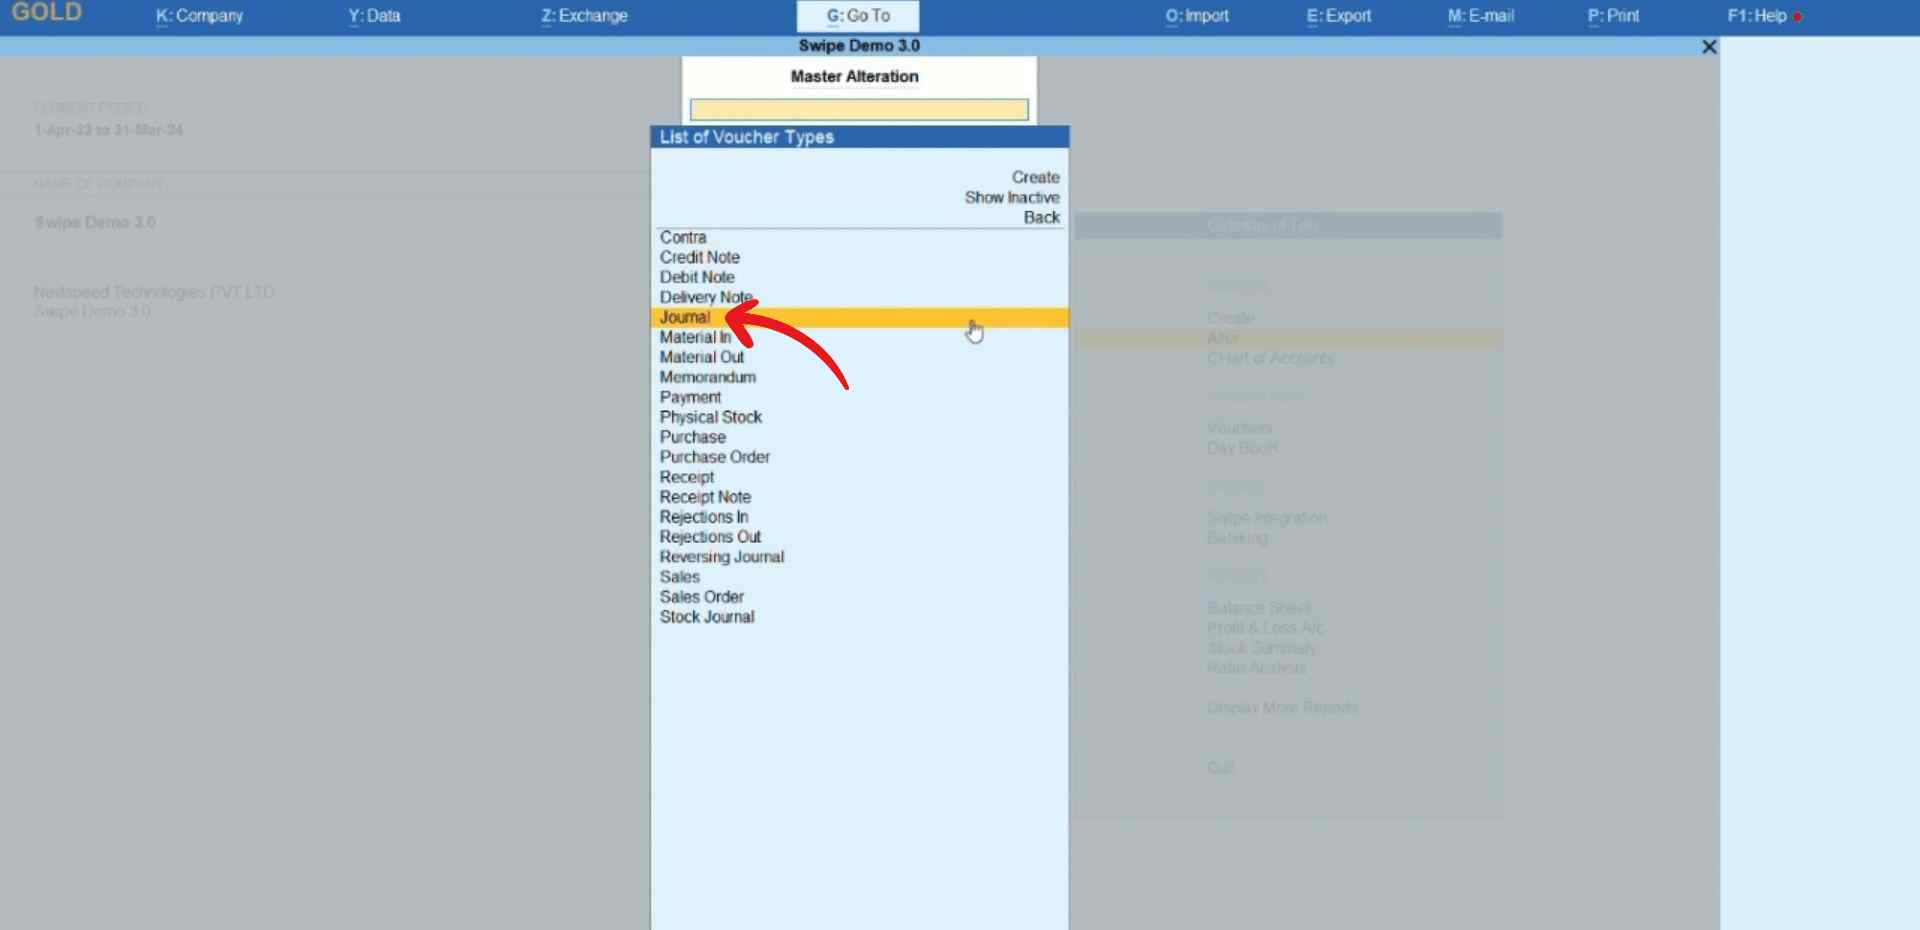
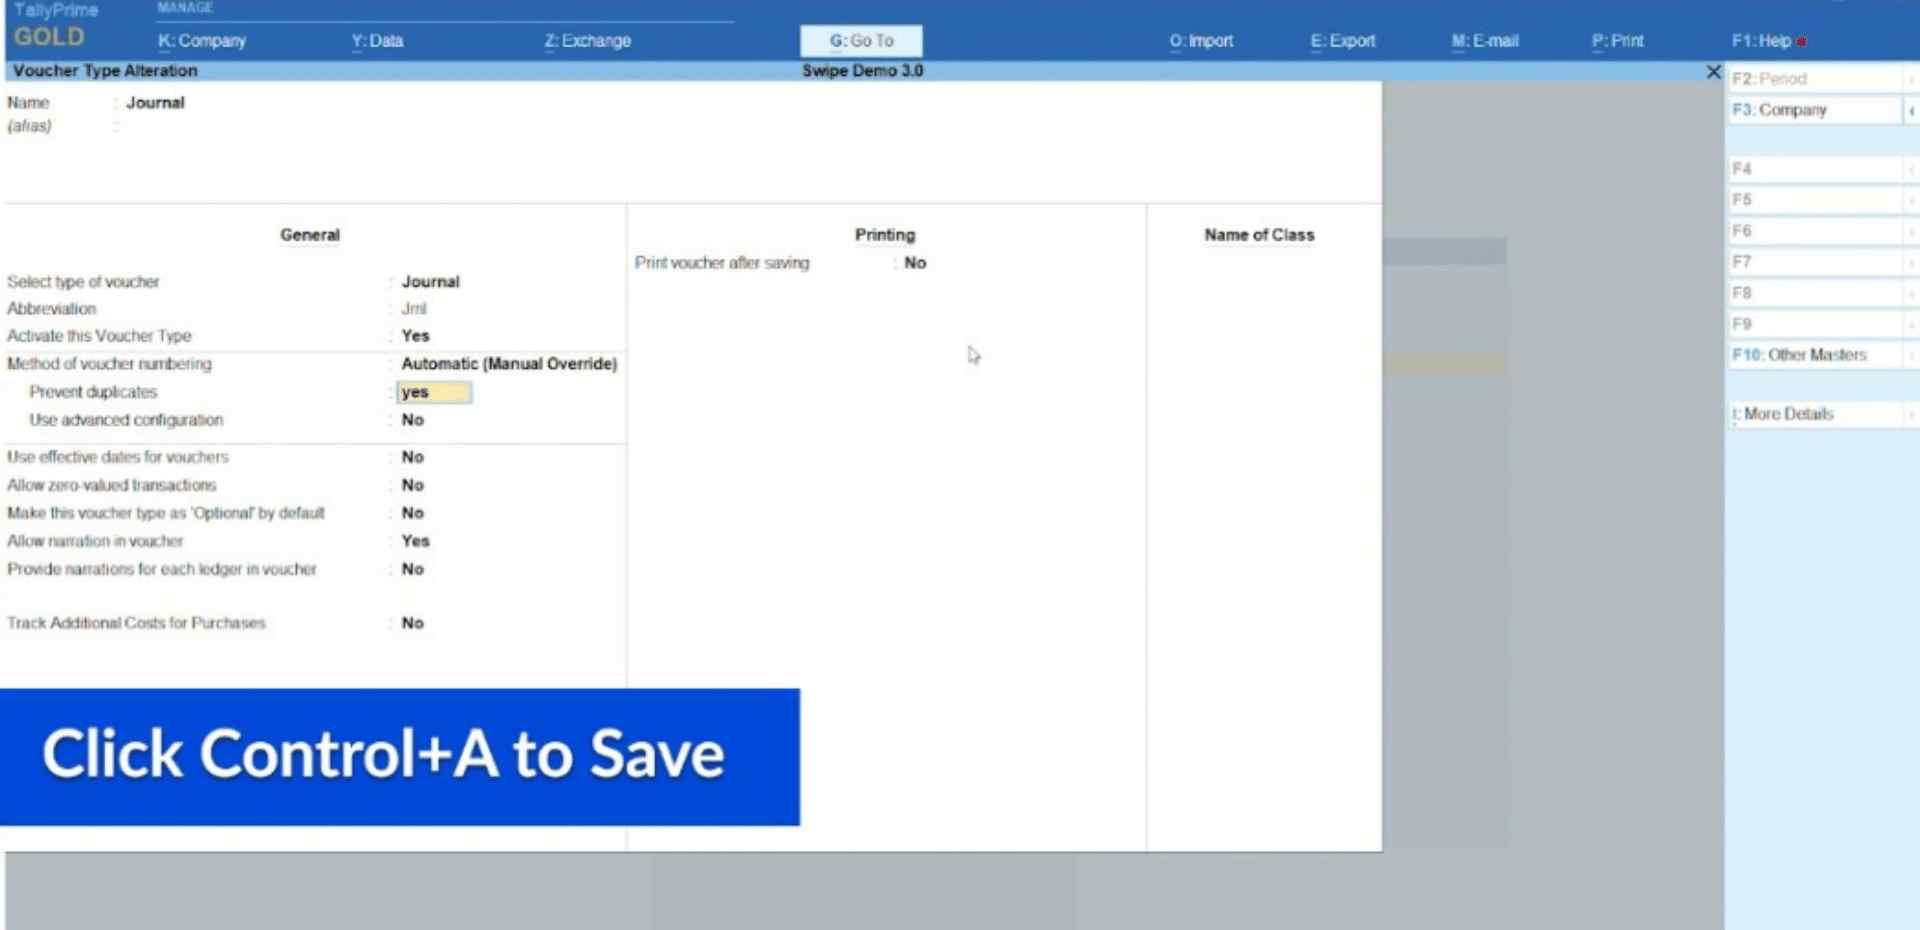
Step 3: Select Journal.
Now, select the “Journal” option from the menu.
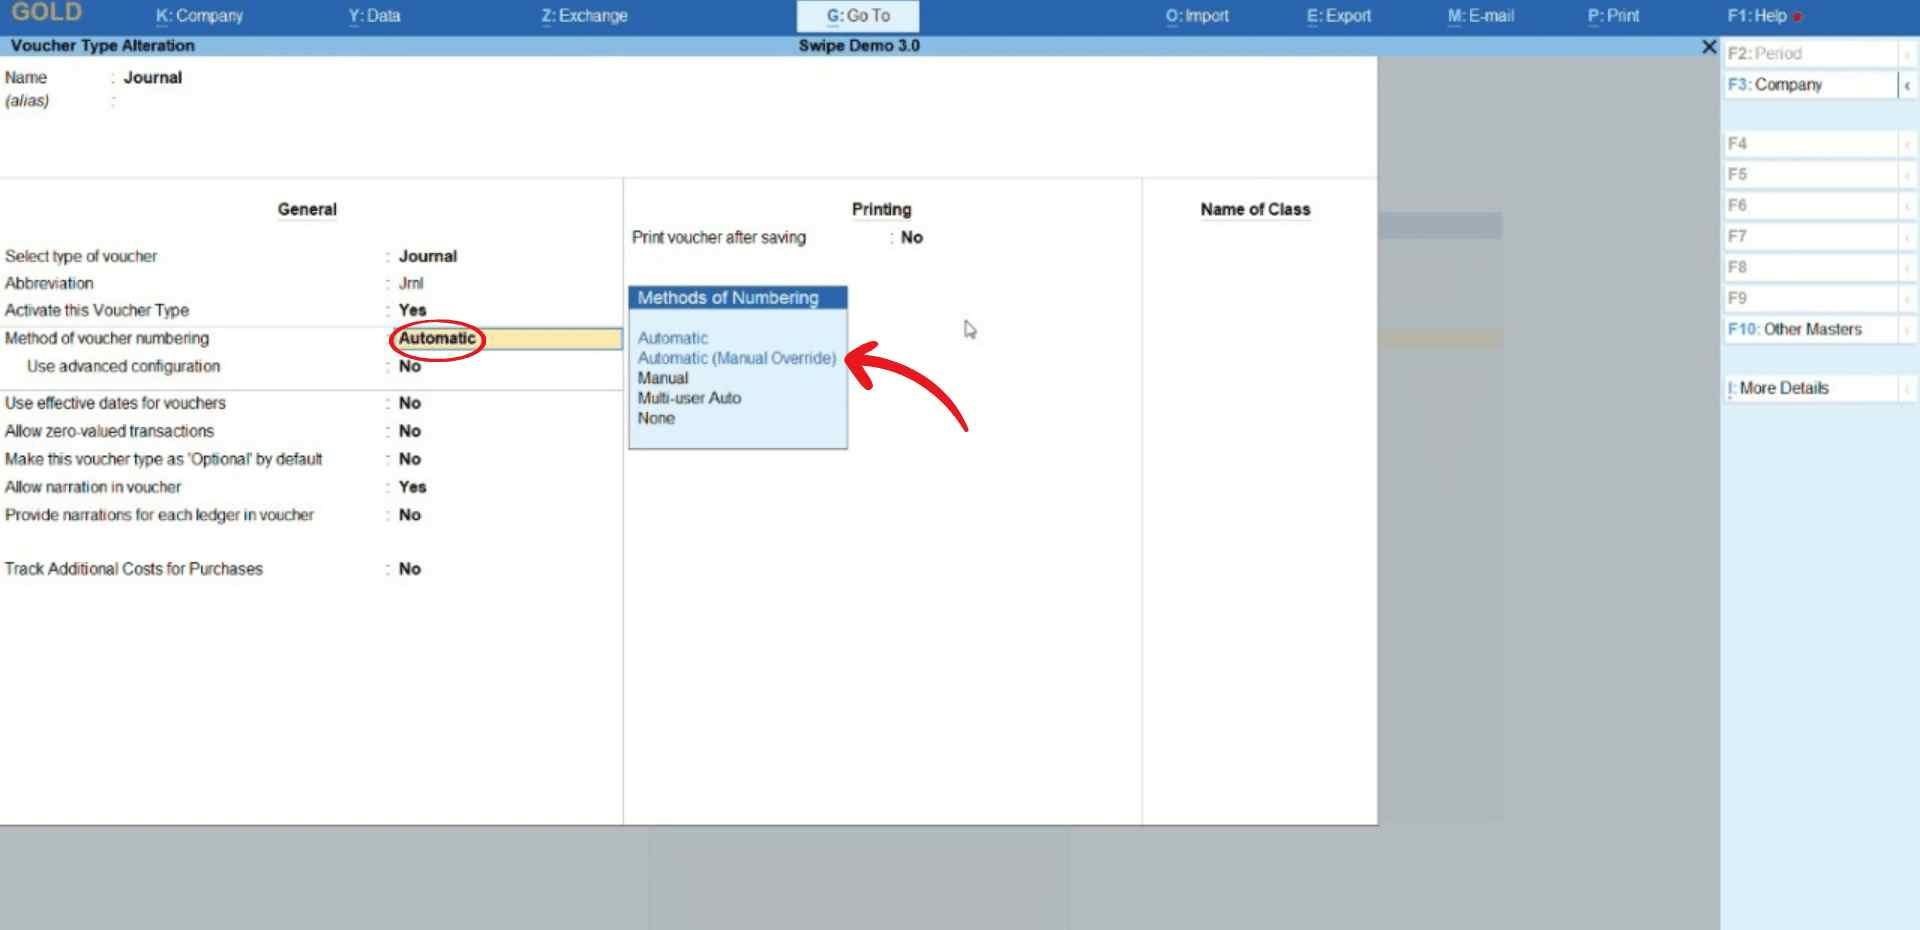
Change “Method of Voucher Numbering” to Automatic (Manual Override)
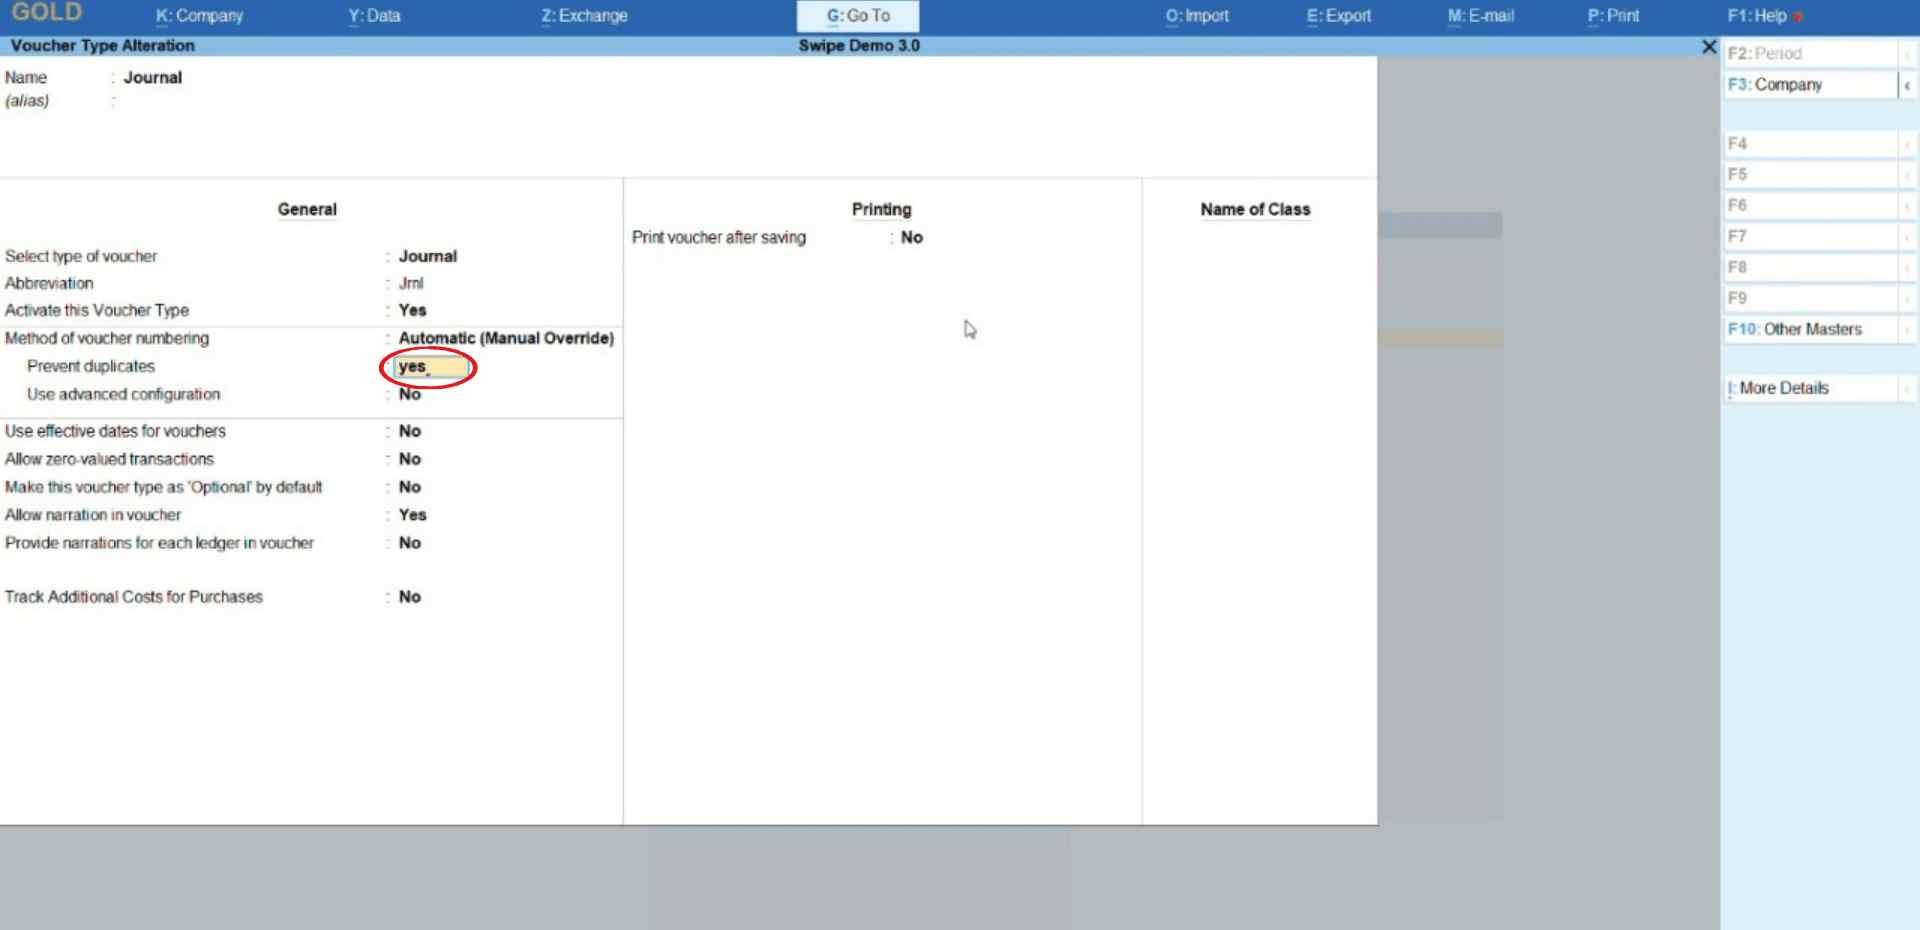
Type yes in the box next to "prevent duplicates”.
Now, press Control+A on your keyboard to save the settings and press “Esc” to go back to “Gateway of Tally”.
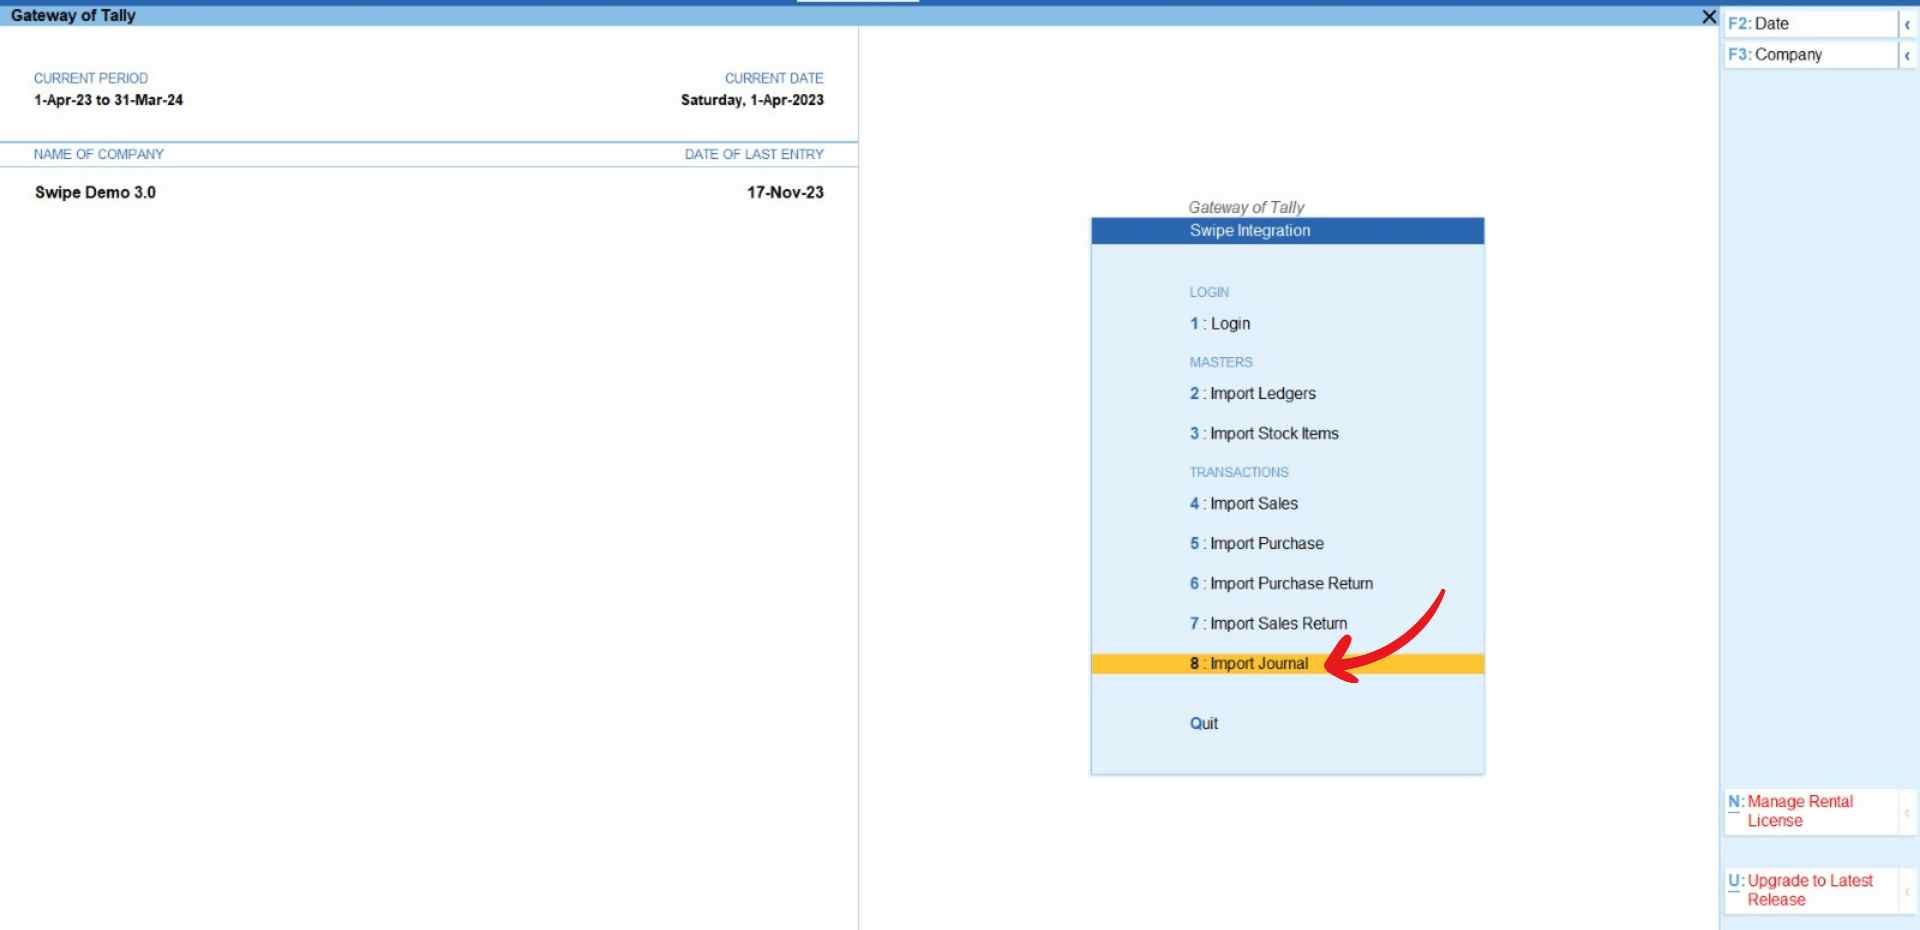
Step 4: Go to Swipe Integration.
Go to "Swipe Integration" which is under the Utilities section of “Gateway of Tally”.
Step 5: Import Journal.
Click on the “Import Journal” option under the Masters section.
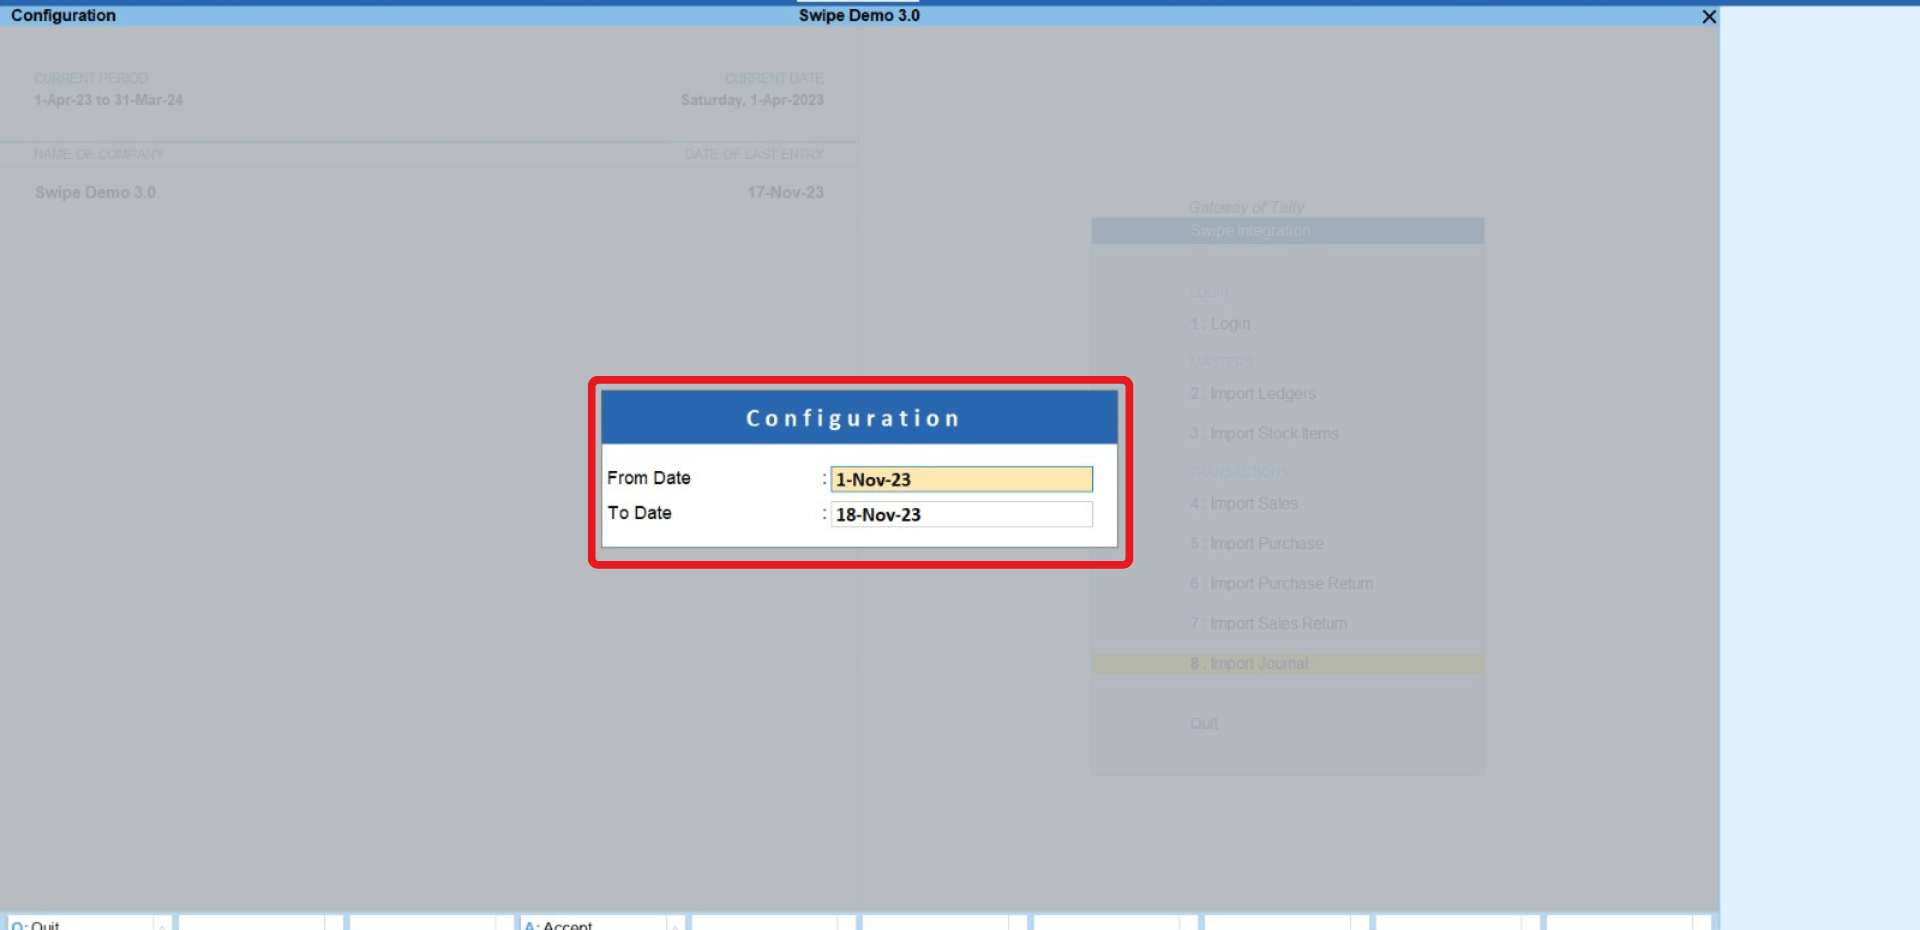
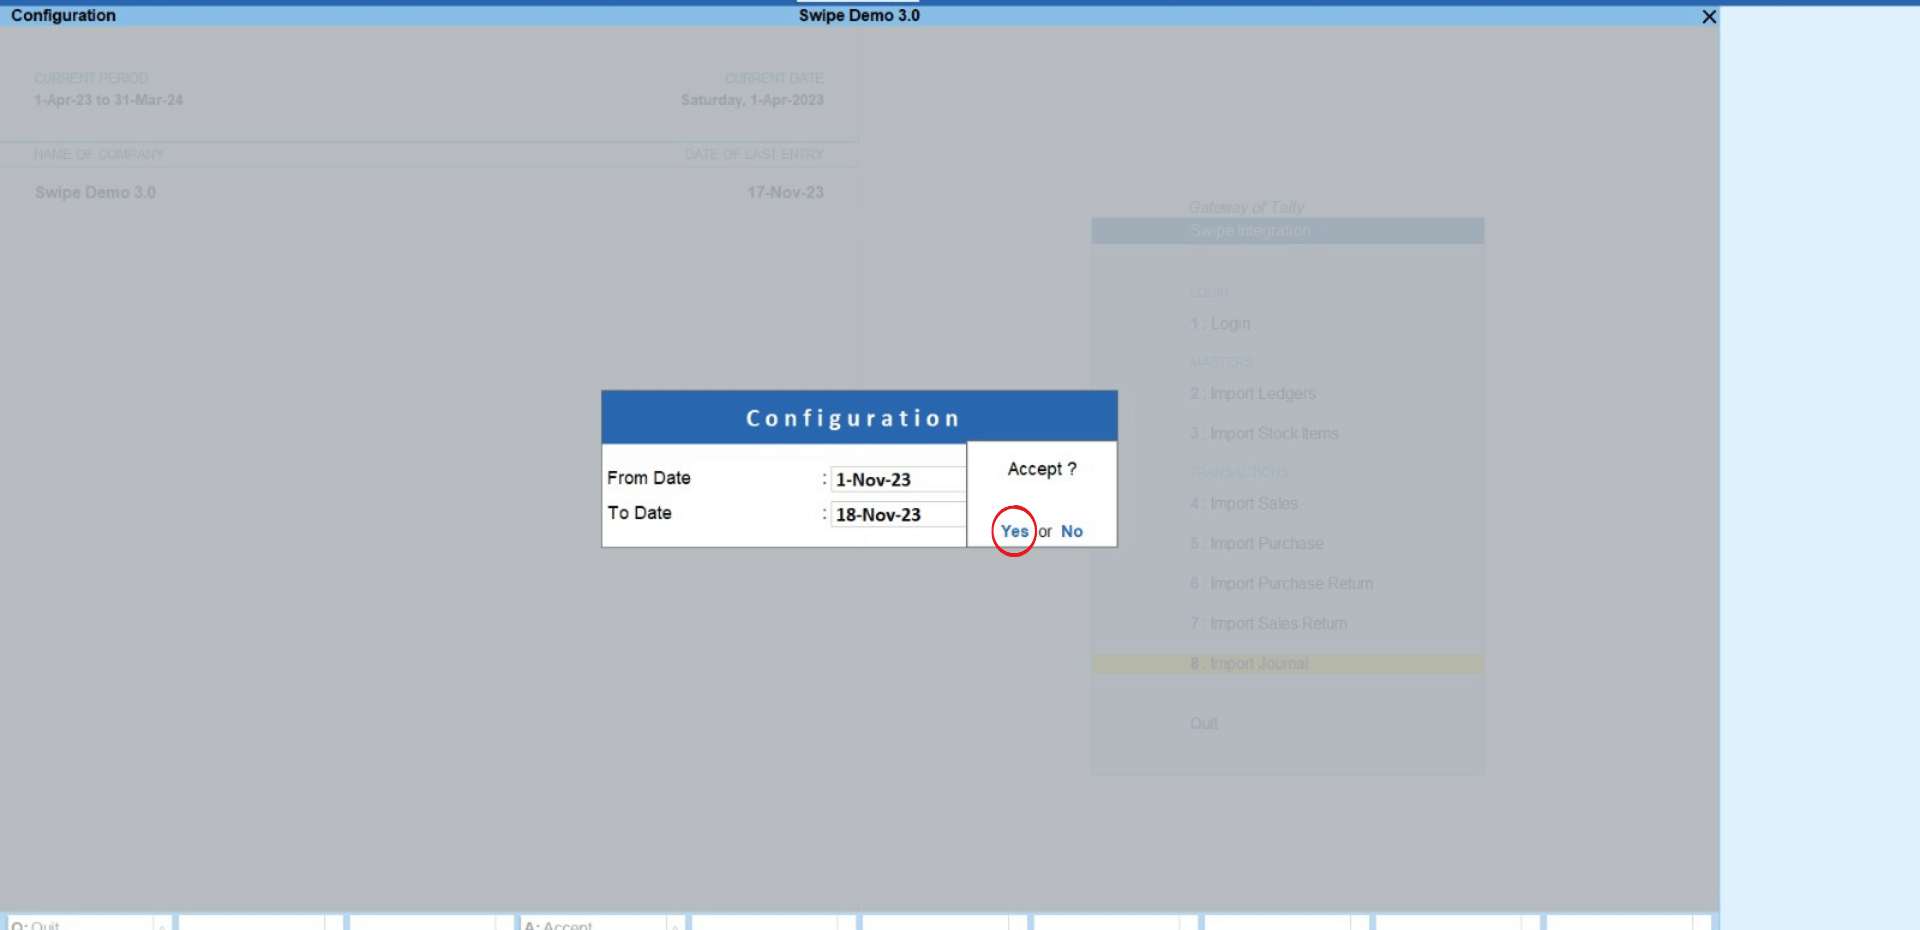
A pop-up appears. Here, enter the timeline of expenses you want to import and click Yes to confirm your action.
Please wait until the data is fetched from Swipe.
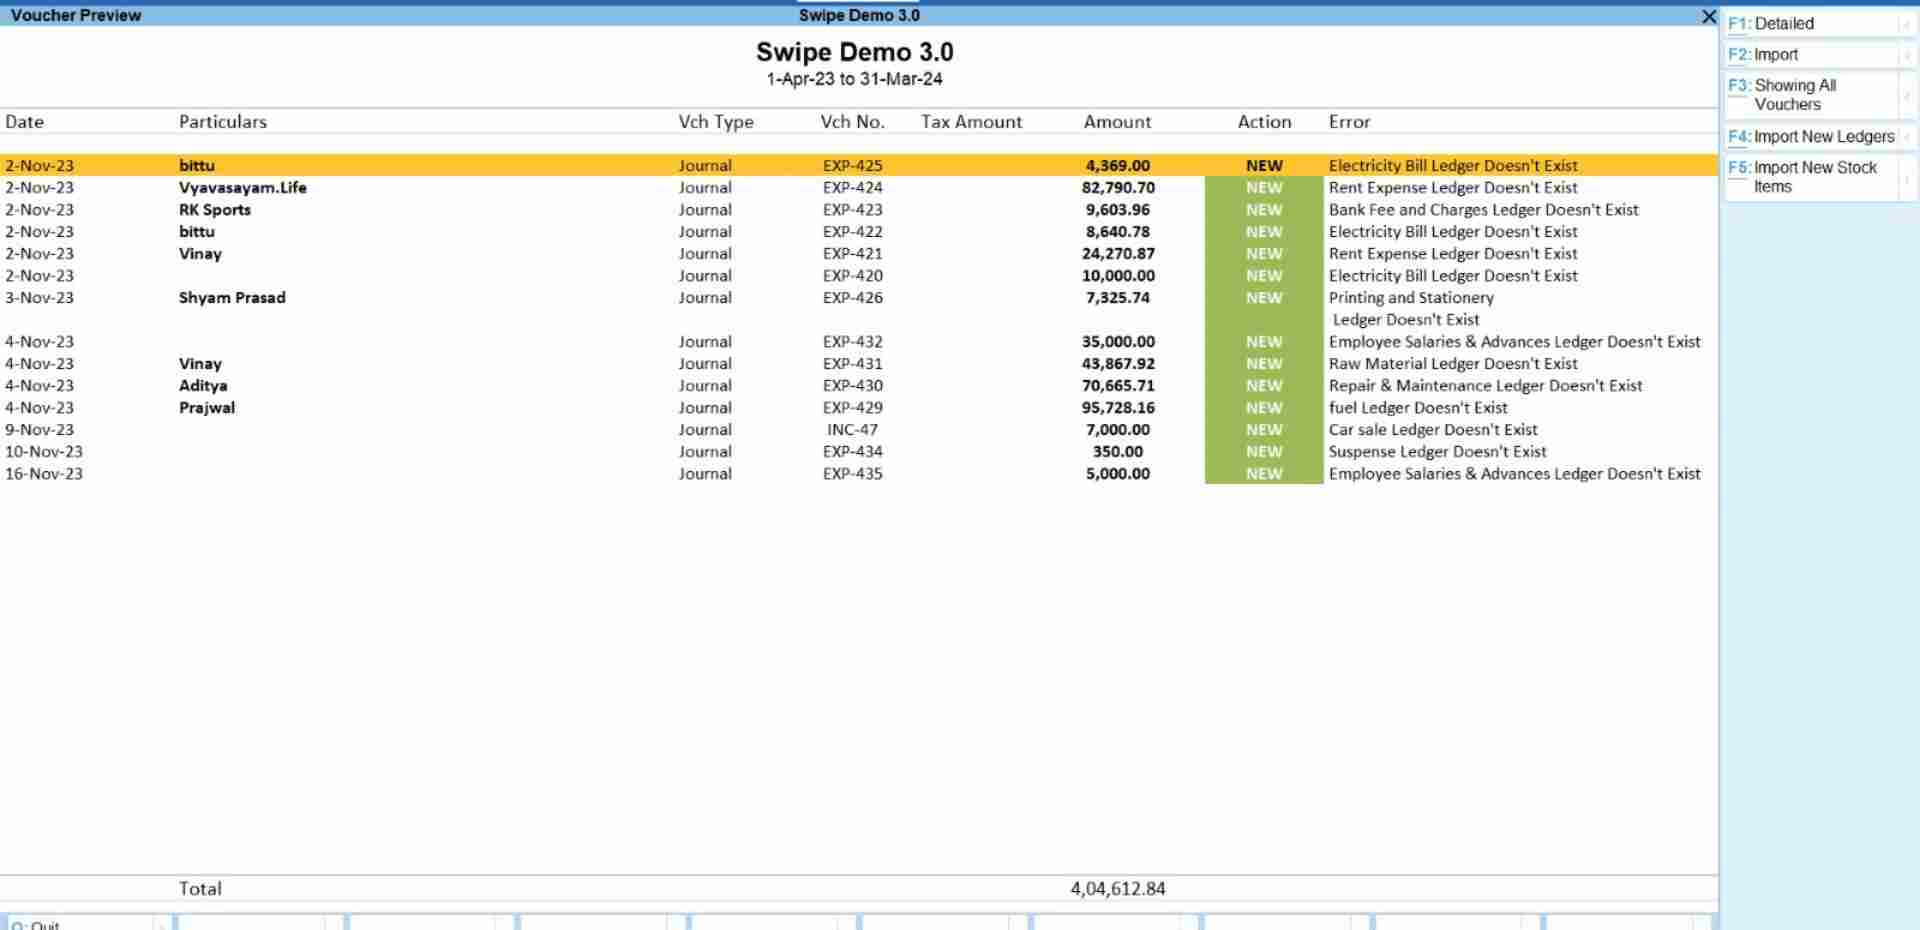
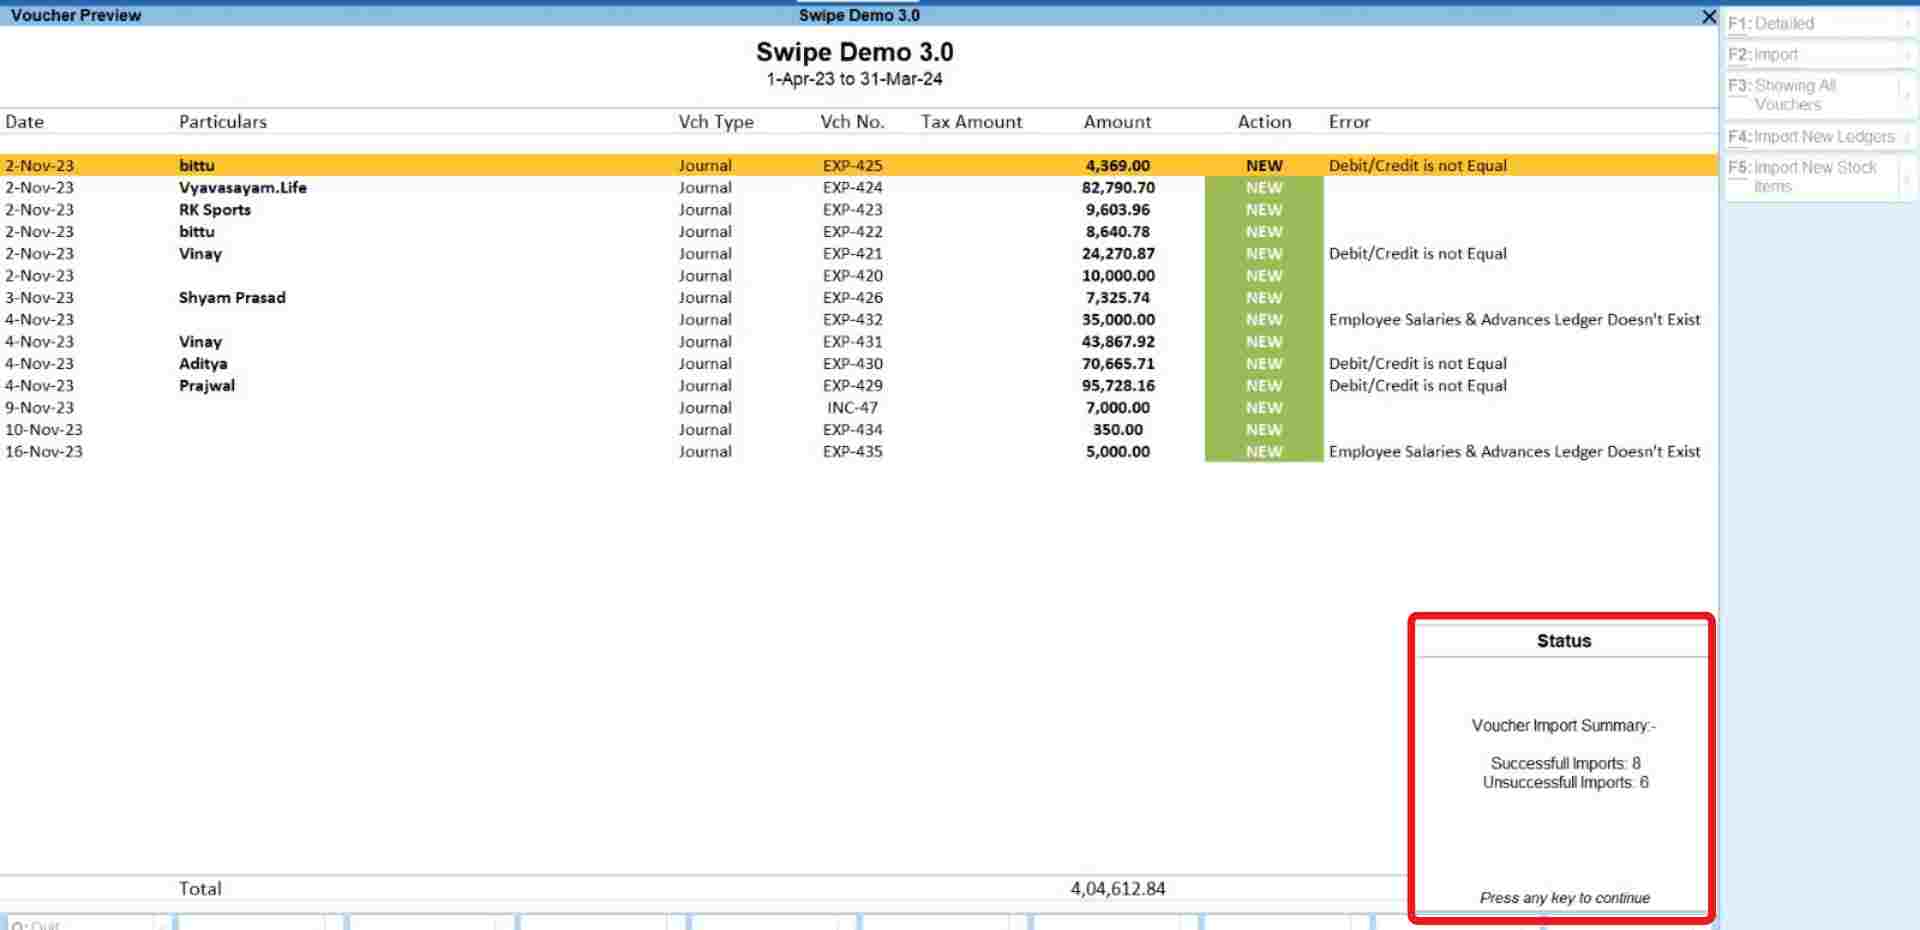
Step 6: Check the Error List.
After fetching the data, a preview page appears, displaying the journal data.
To review any errors, please follow the steps below to resolve the issue.
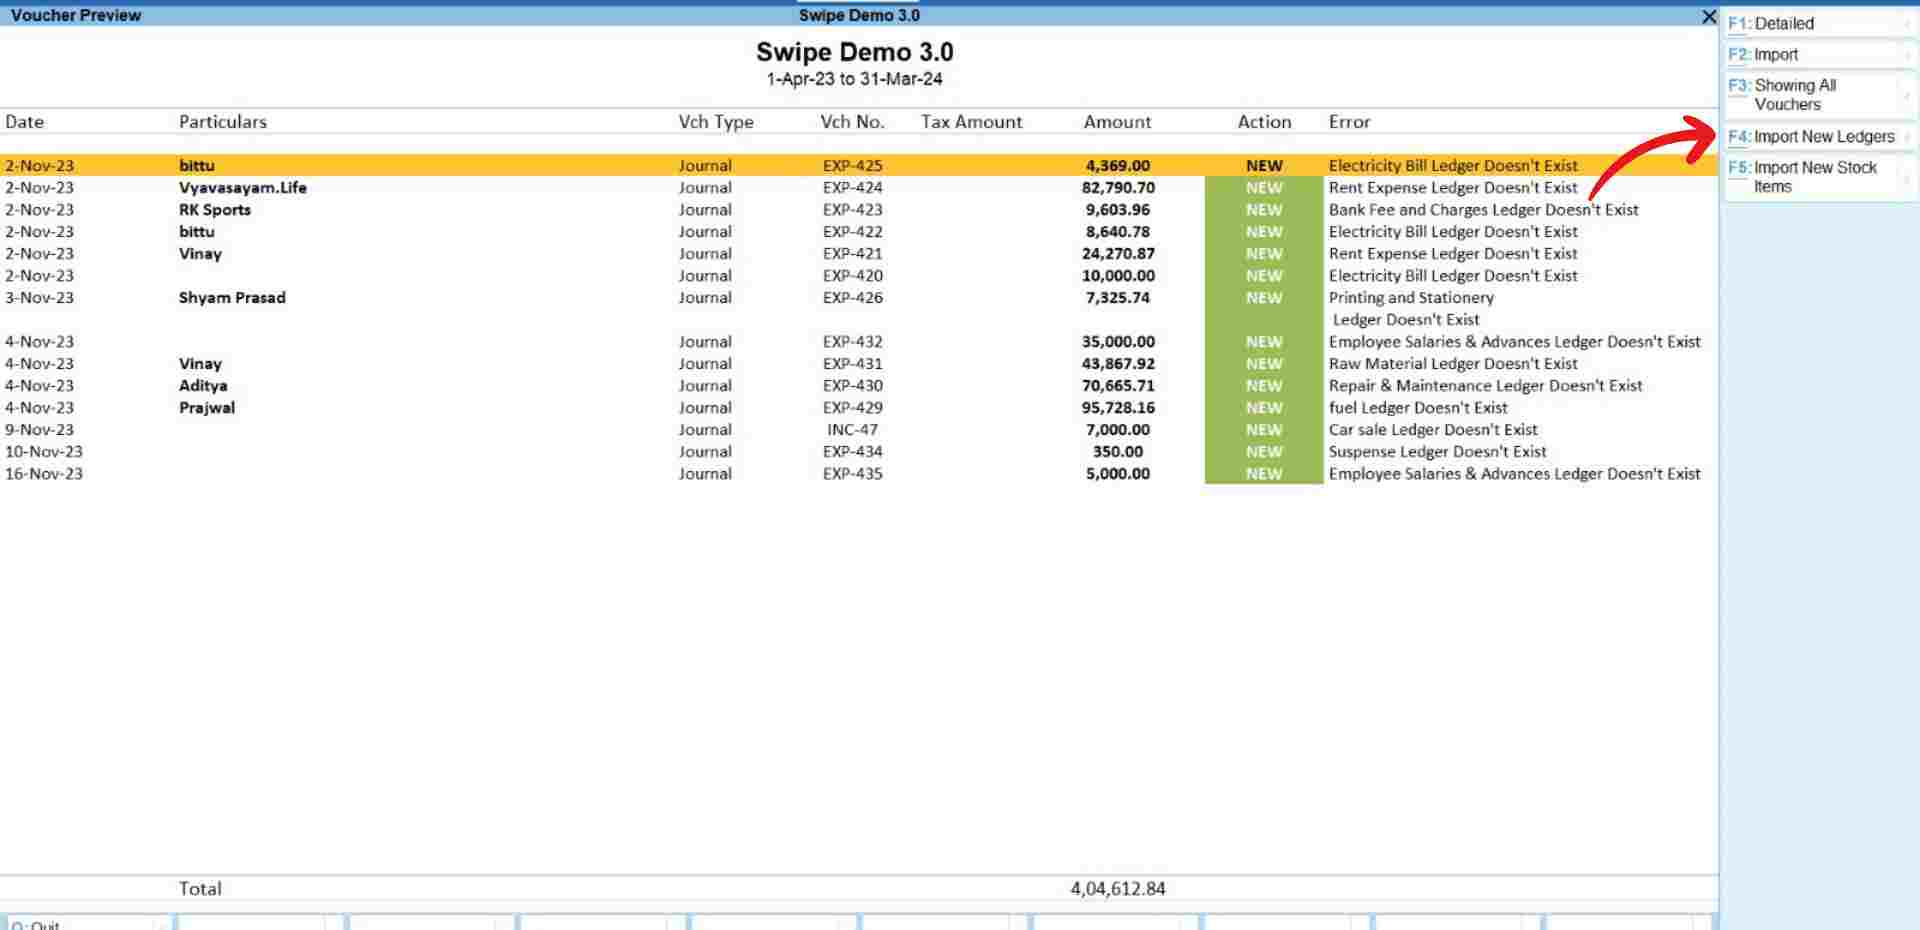
For the error “Ledgers Doesn’t Exist”: Click on the “Import New Ledgers” option present at the top right corner of the screen or press the F4 key on your keyboard.
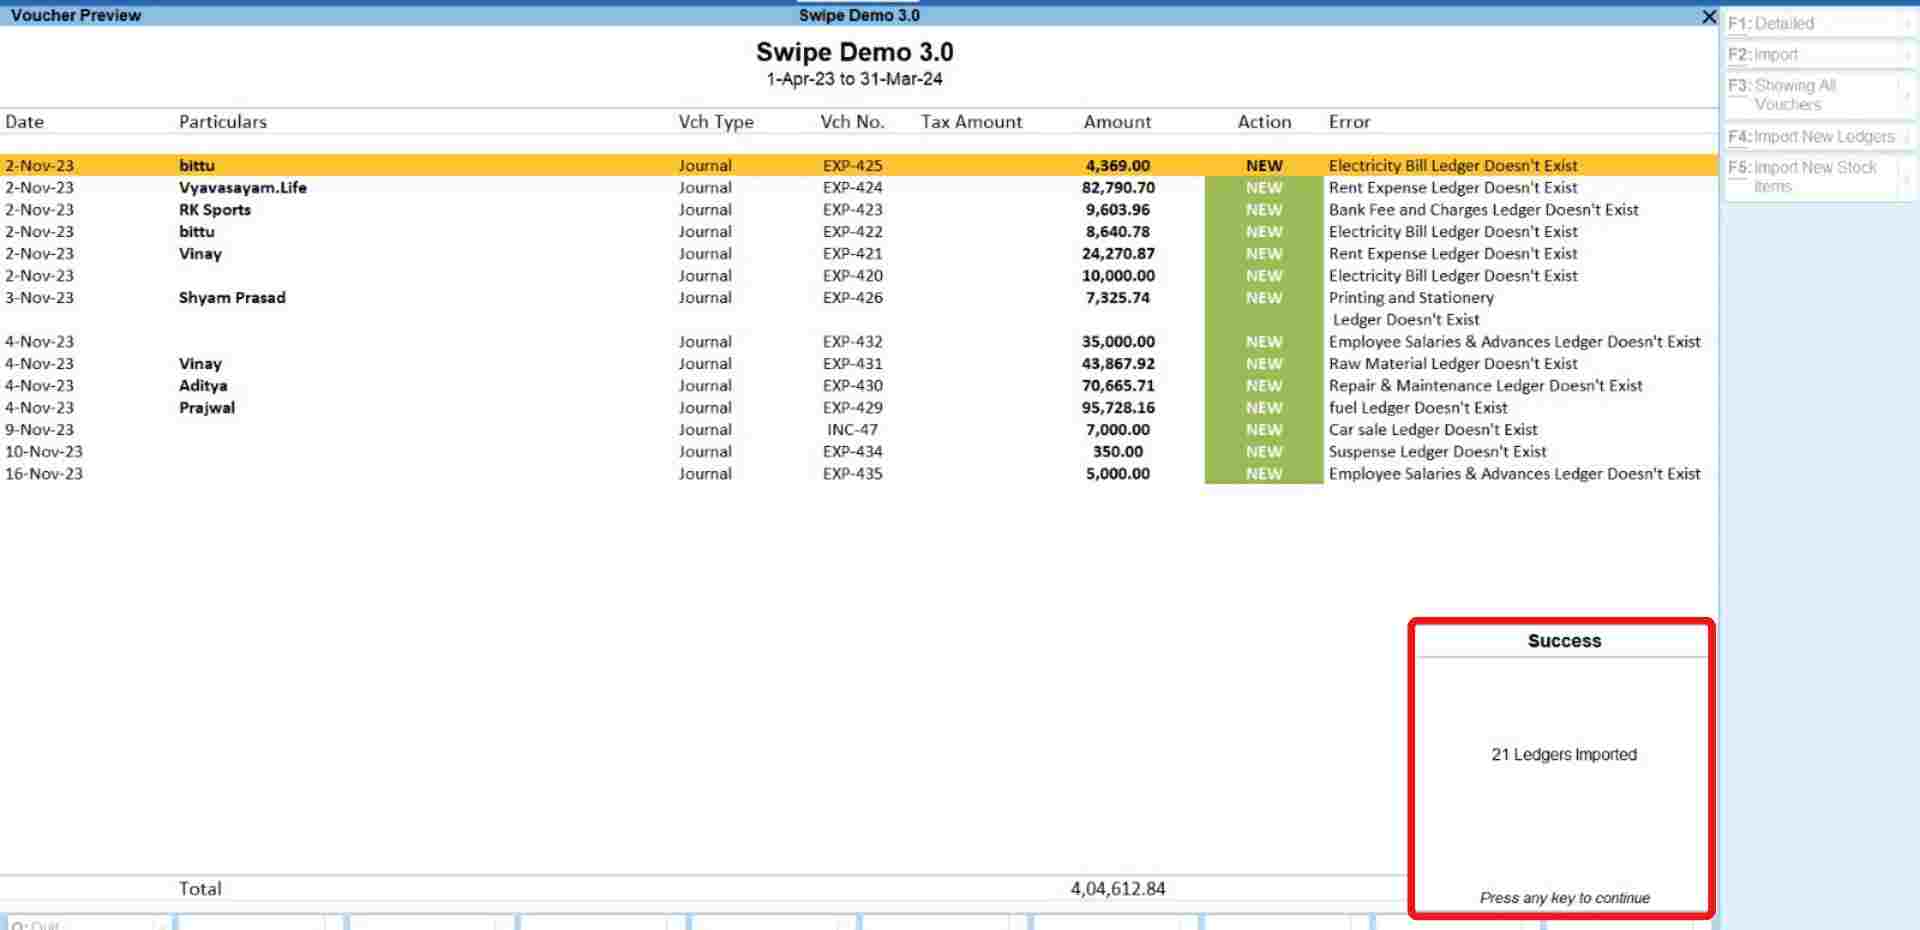
Congratulations! You have successfully imported new ledgers and a pop-up appears at the bottom of the screen informing the screen. Press any key to continue.
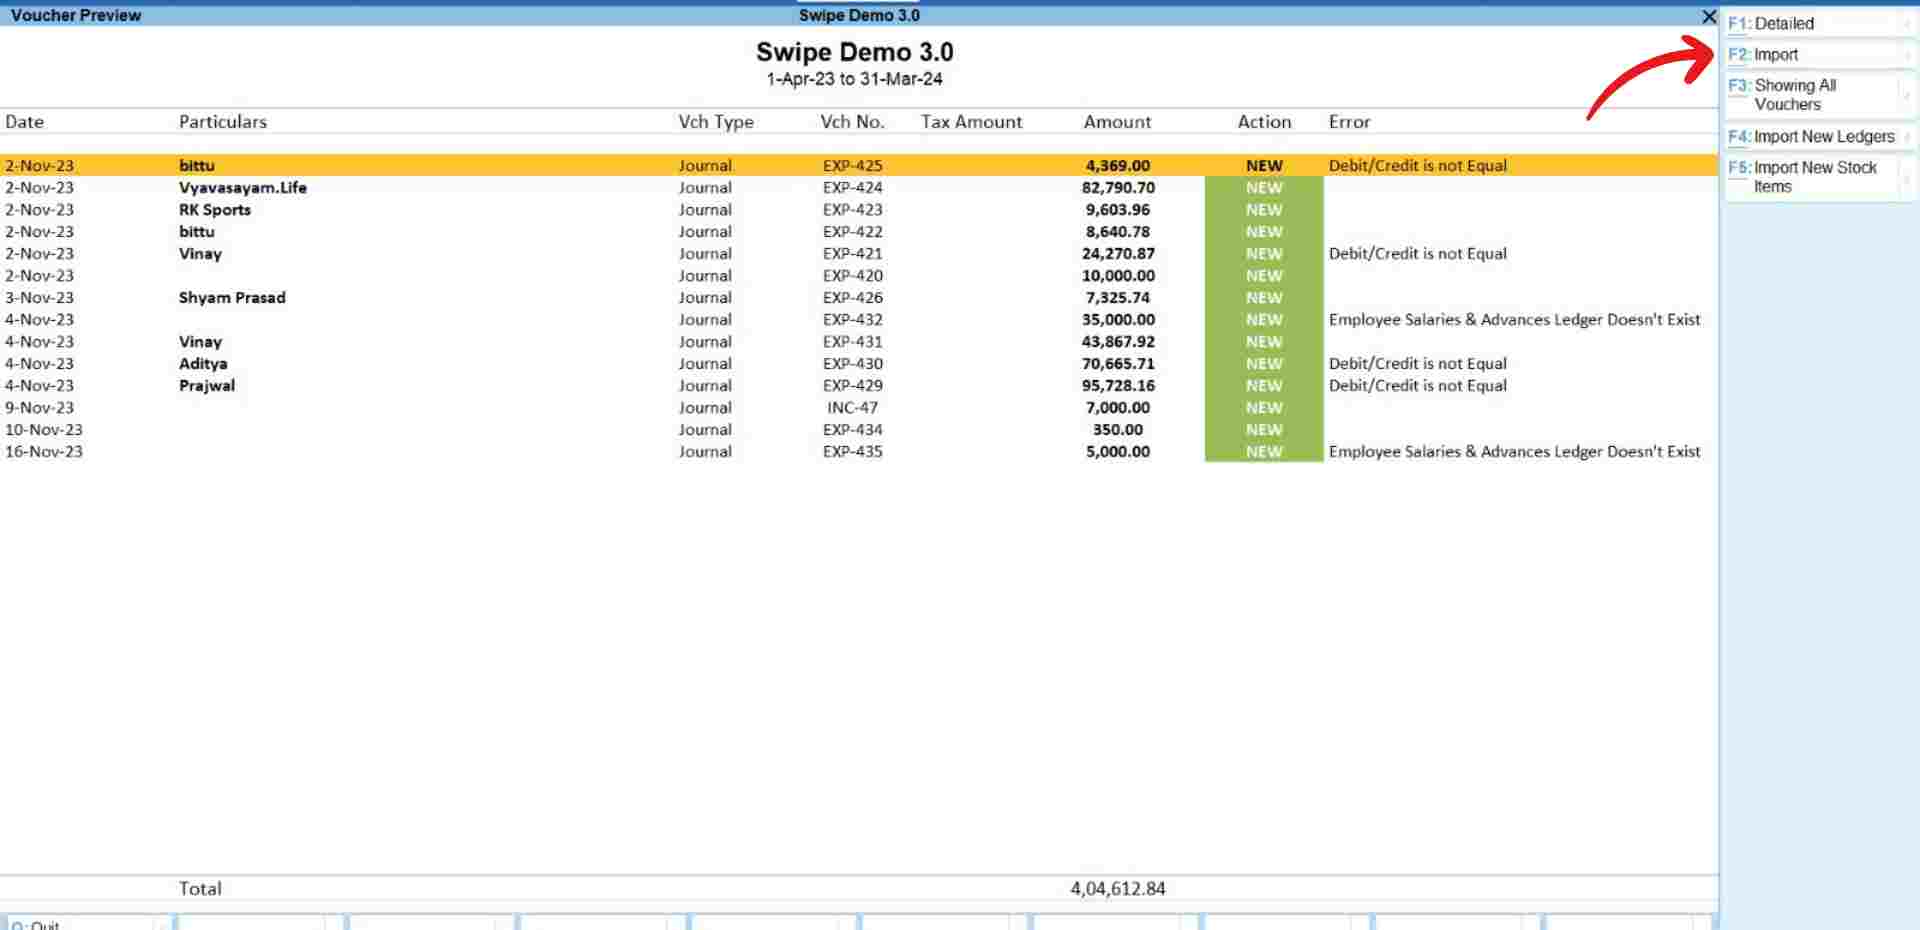
Step 7: Import the data.
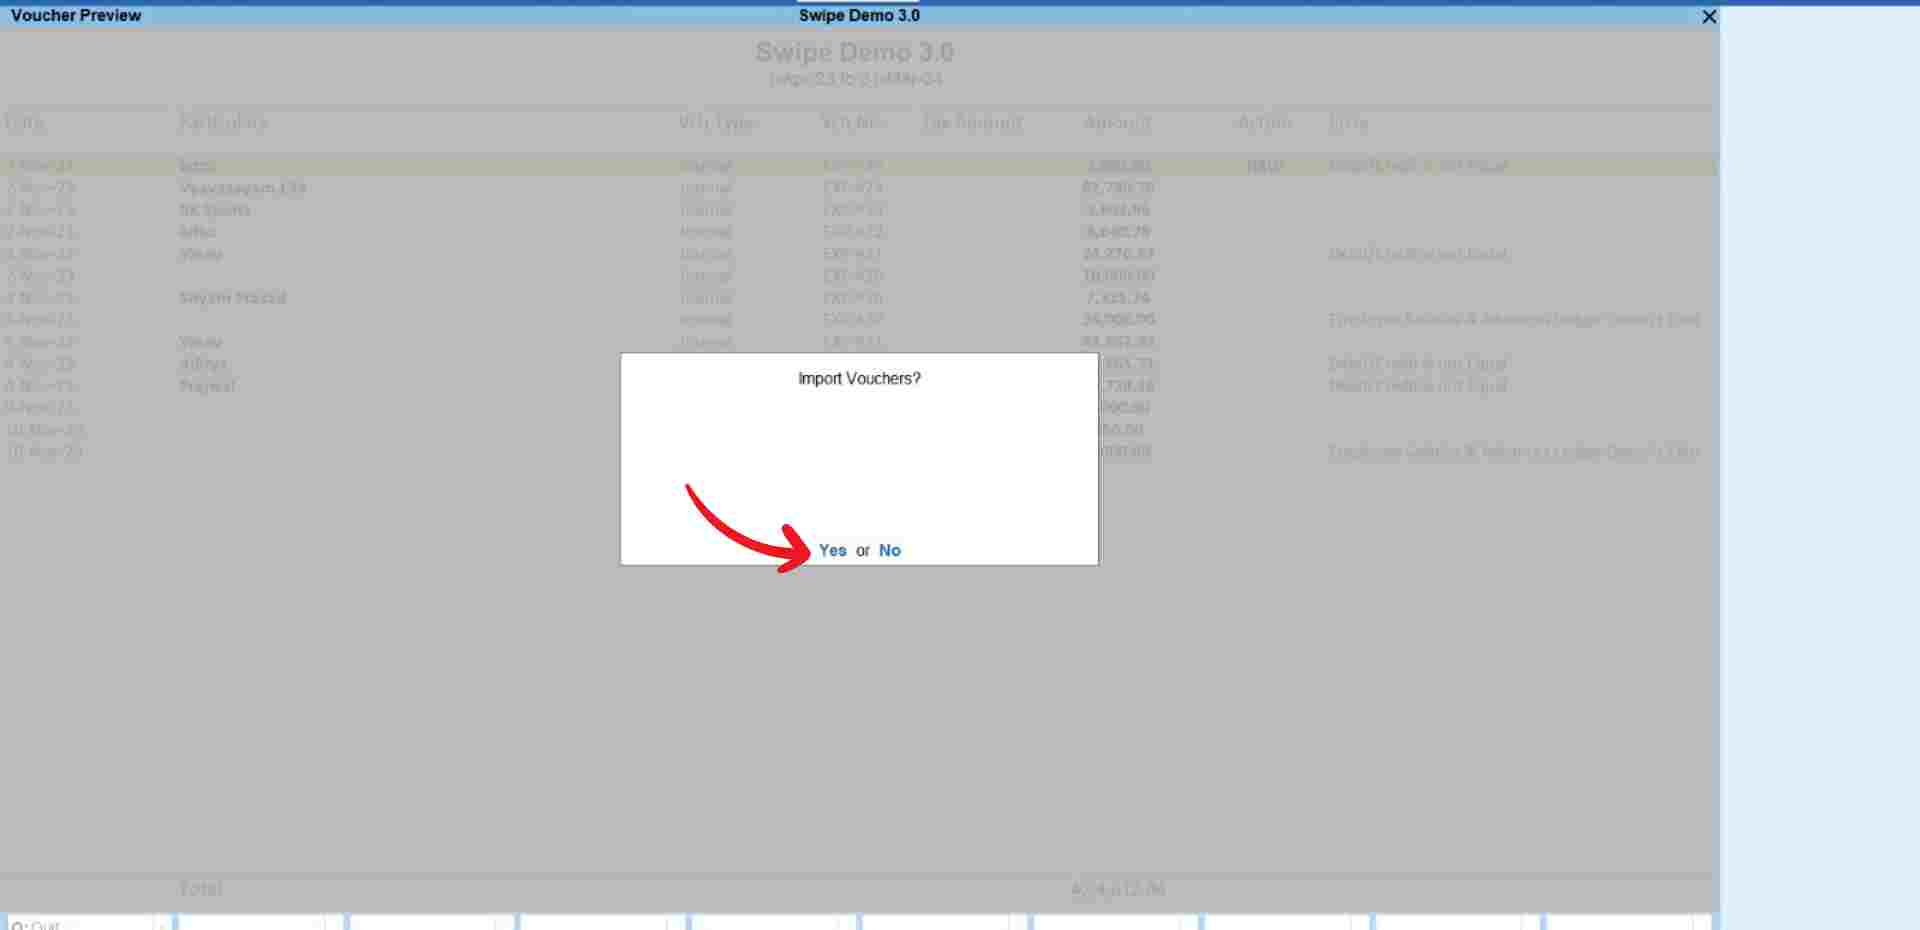
Click on the “Import” option present at the top right corner of the screen or press the F2 key on your keyboard.
Now, confirm your action by clicking on the “Yes” option from the pop-up.
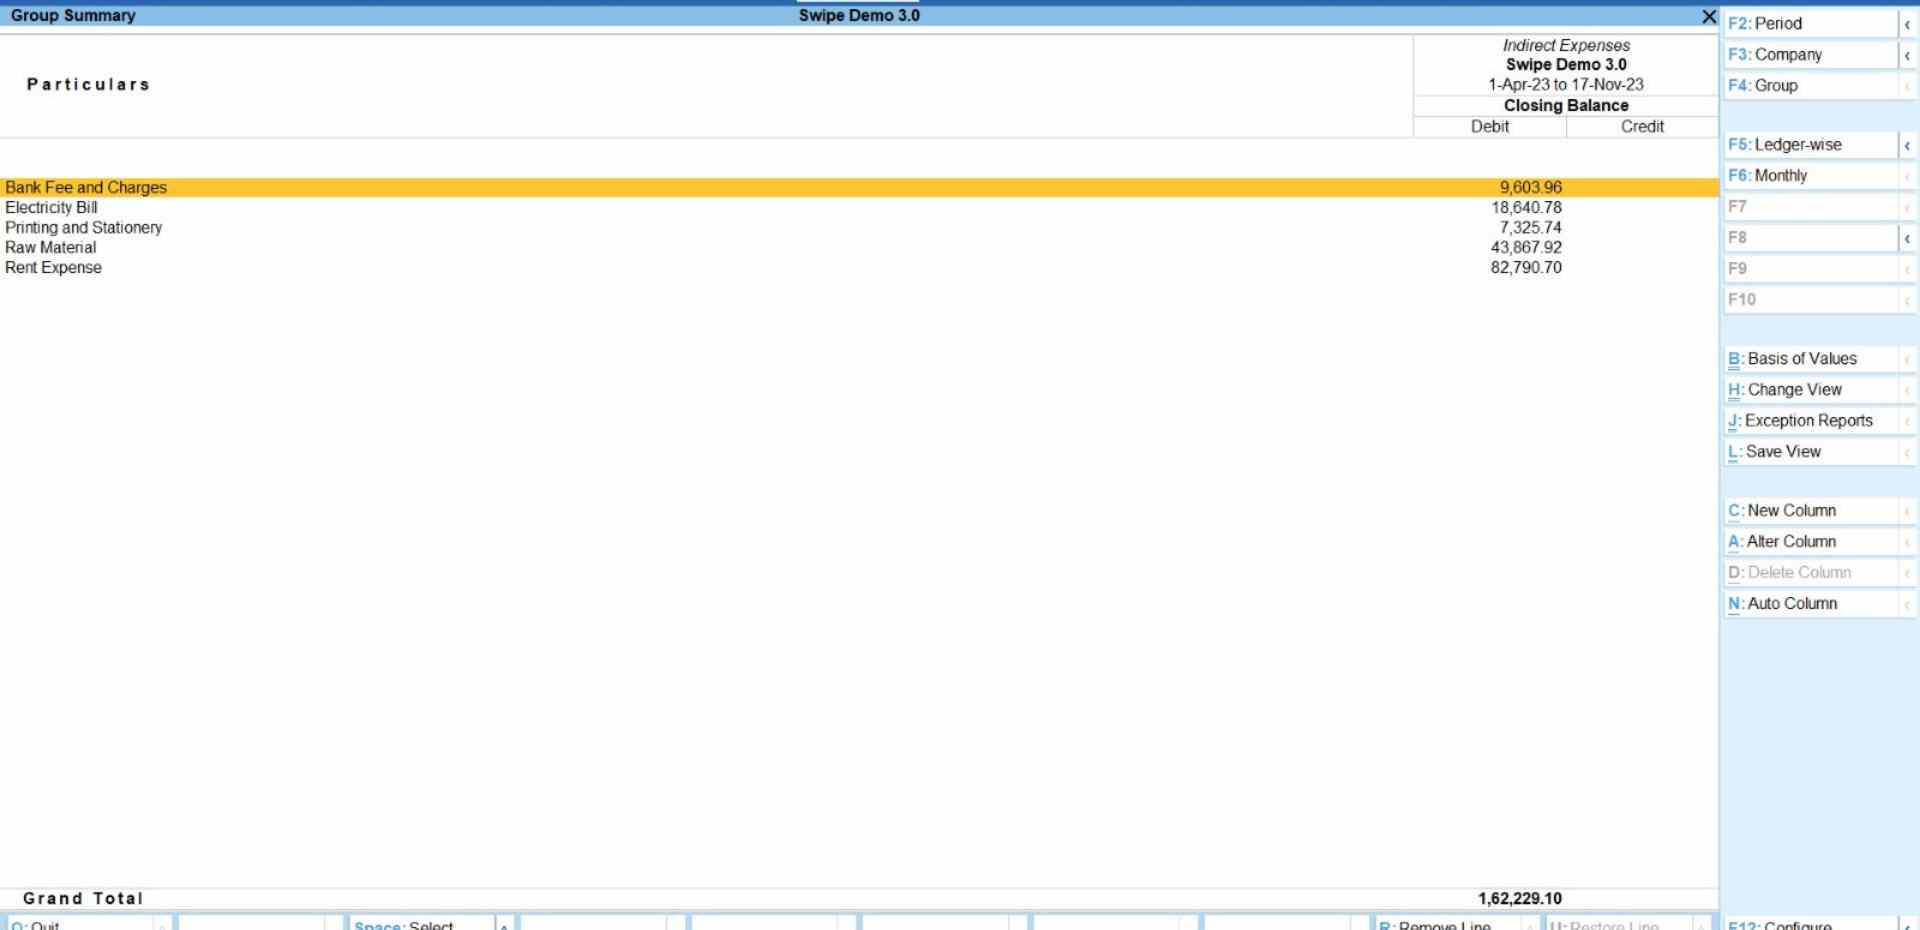
Congratulations, You have successfully imported expense data from your Swipe account to your Tally account, and a pop-up appears at the bottom of the screen informing the same.


%20(1).png)
%20(1).png)