
All the web traffic runs through a DNS (Domain Name Service), usually this traffic is managed by the ISP (Internet Service Provider). These days, it is crucial for both the users and the companies to have a secure and fast connection. Many companies provide a secure and reliable medium for routing web traffic. Similarly, the web infrastructure giant Cloudflare has its own DNS for consumers: 1.1.1.1, which promises to be faster than the competition, also more secure and private.
Cloudflare is a web infrastructure company known for its content delivery network (CDN), DDoS mitigation, and DNS resolver services with a network of 6 million websites. Its 1.1.1.1 DNS service stands out for its exceptional speed, security, and privacy features. By using Cloudflare's DNS resolver, you can experience faster browsing speeds and enjoy enhanced privacy protection compared to traditional DNS services provided by ISPs.
Also, according to Cloudflare, 1.1.1.1's average latency is around 14 ms, making it the fastest DNS resolver everywhere (Google Public DNS latency average is 34 ms). Alongside speed, Cloudflare is also touting greater privacy, promising that users' records will never be stored on drives and that it'll flush out logs every 24 hours.
These are the IP addresses to set up Cloudflare's consumer DNS service on a computer or router.
IP version 4
1.1.1.1
1.0.0.1
IP version 6
2606:4700:4700::1111
2606:4700:4700::1001
Reconfiguring the router is the best way to change the current DNS settings to use Cloudflare 1.1.1.1. Instead of configuring each device individually, this method configures every home device (desktop, laptop, tablet, phone, game console, and smart TV) automatically.
Step 1: Open Web browser
Step 2: Enter the IP address of your router and press Enter
Step 3: Log in using router username and password
Step 4: Open the DNS server settings page. Refer to your router's manufacturer's support website to locate these settings.
Path to DNS settings in some of the most popular home router brands:
1. Linksys: Setup > Basic Setup.
2. ASUS: WAN > Internet Connection.
3. Google Wifi: Settings > Networking & General > Advanced Network > DNS.
4. Netgear: Internet.
5. D-Link: Manual Internet Connection Setup.
Step 5: In the DNS settings section use these IPv4 addresses:
11.1.1.1
1.0.0.1

Step 6: Save the settings
Step 7: Once you complete the steps, restart your computer to start using the new settings.
Alternatively, you can open Command Prompt and run these two commands:
ipconfig /flushdns
ipconfig /renew

These commands will purge the DNS Resolver cache on the device and request a renewal of the IPv4 settings.
One doesn't need to apply the IP version 6 addresses on the router if the network already uses IP version 4. However, if you must use the IPv6 addresses, you must enter them in your router's IPv6 DNS setting page.
2606:4700:4700::1111
2606:4700:4700::1001
Alternatively, if configuring your home router is difficult, or if you want to use the Cloudflare DNS settings on every network you connect to, including public networks (such as coffee shops and airports), with your laptop or tablet, you can configure the DNS settings on Windows 11 (or Windows 10) instead of configuring your router.
Steps to set the Cloudflare DNS settings on Windows 11
Step 1: Open Settings.
Step 2: Click on Network & internet.
Step 3: Click the active network connection – for example, Ethernet.
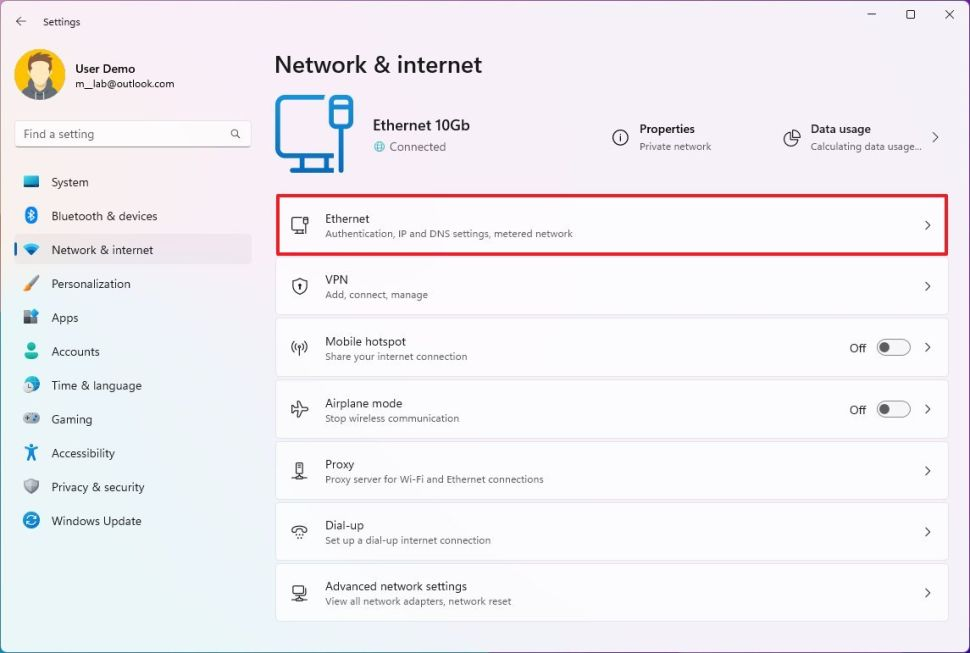
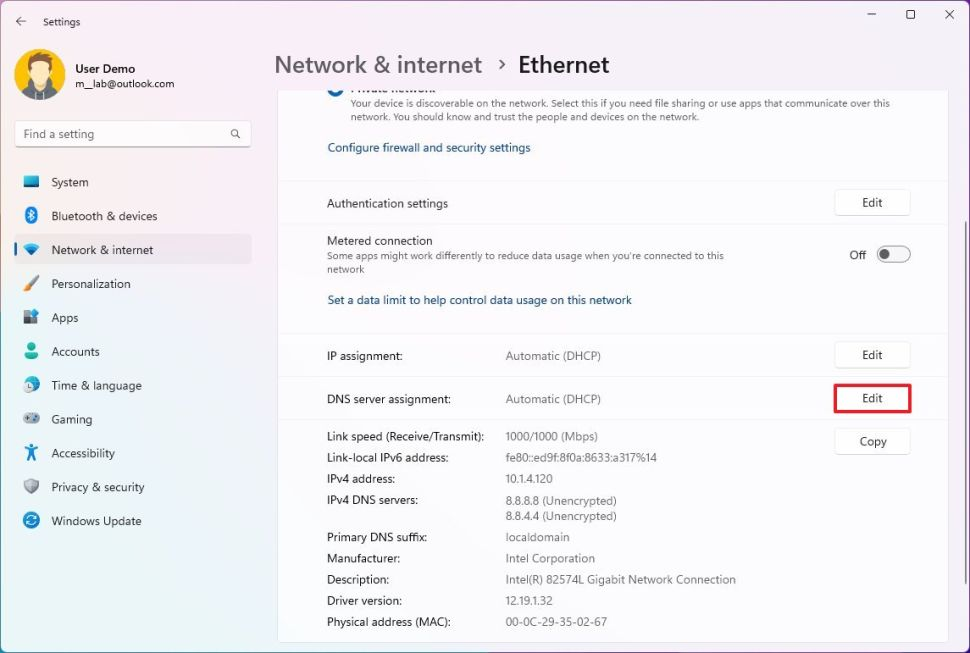
Step 4: Under the "DNS server assignment" section, click the Edit button.
Step 5: Select the Manual option.
Step 6: Turn on the IPv4 toggle switch.
Step 7: Under the “Preferred DNS” section, specify the Cloudflare DNS address: 1.1.1.1

Step 8:(Optional) Select the "On (automatic template)" option from the "DNS over HTTPS" setting.
(Optional) Turn on the "Fallback to plaintext" toggle switch.
Step 9: Under the "Alternate DNS" section, specify the secondary Cloudflare DNS address: 1.0.0.1
Step 10: (Optional) Select the "On (automatic template)" option from the "DNS over HTTPS" setting.
(Optional) Turn on the "Fallback to plaintext" toggle switch.
(Optional) Turn on the IPv6 toggle switch.
Step 11: Under the “Preferred DNS” section, specify the Cloudflare DNS address: 2606:4700:4700::1111

Step 12: Under the "Alternate DNS" section, specify the secondary Cloudflare DNS address: 2606:4700:4700::1001
(Optional) Select the "Encrypted only (DNS over HTTPS)" option from the "DNS over HTTPS" setting.
Step 13: Click the Save button. Congratulations, From now on, the computer will use the Cloudflare servers to resolve domain names.
Step 1: Open Start. and search for the control Panel, and click the top result to open the experience.
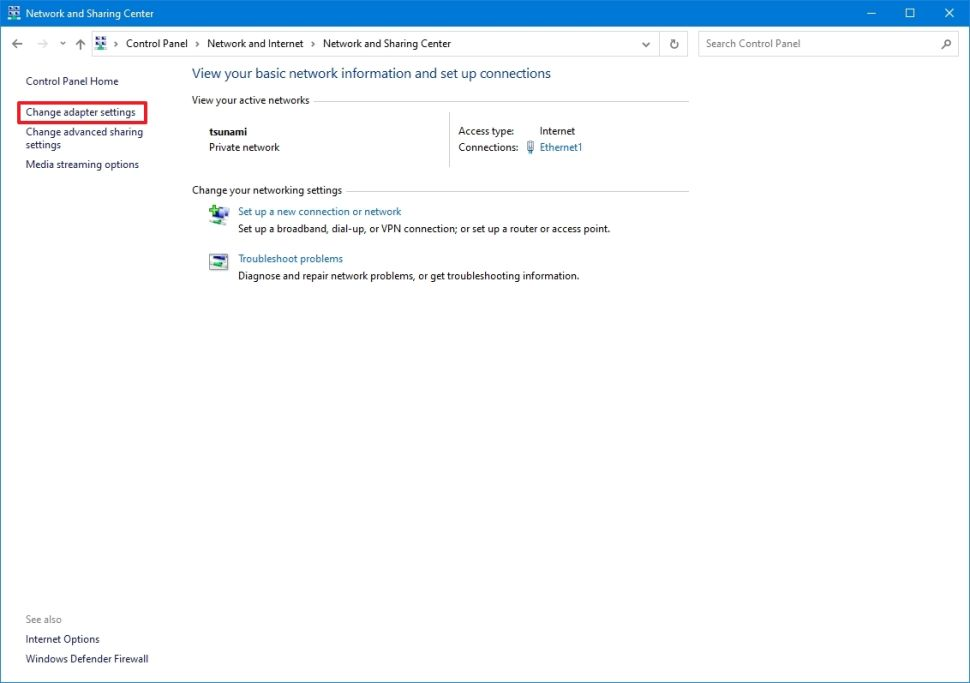
Step 2: Click on Network and Internet, and select Network and Sharing Center.
Step 3: Now, click on Change Adapter Settings.
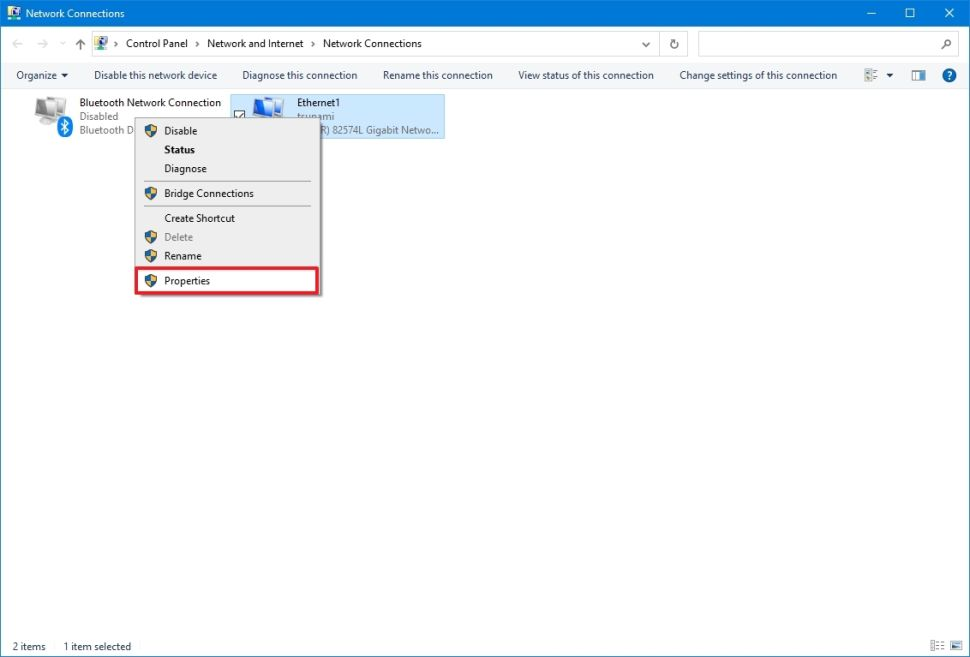
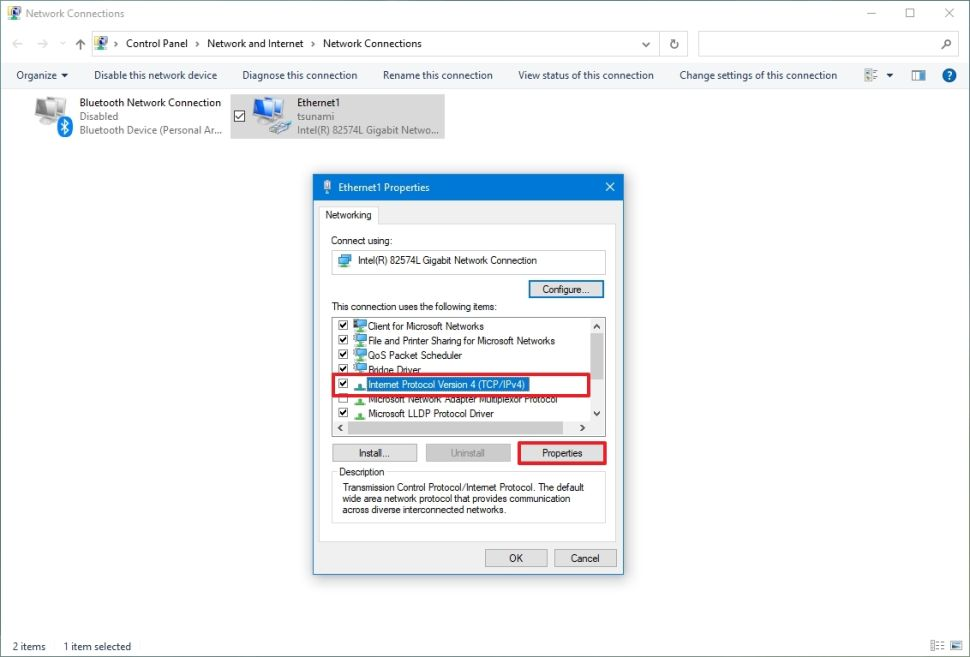
Step 4: Right-click the active Wi-Fi or Ethernet adapter, and select the Properties option.
Step 5: Select the "Internet Protocol Version 4 (TCP/IPv4)" option.
Step 6: Click the Properties button.
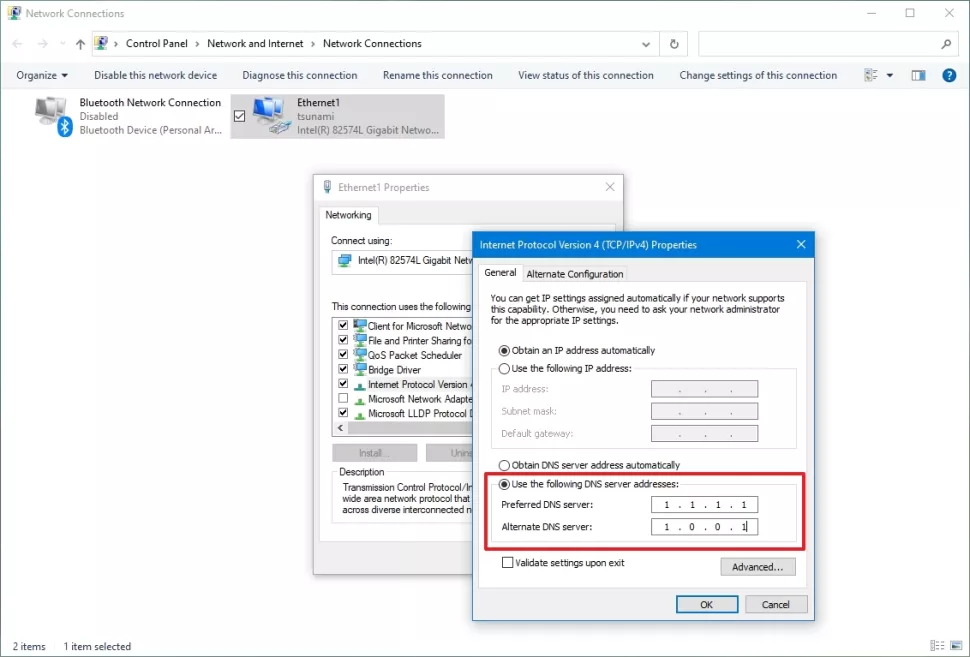
Step 7: Select the "Use the following DNS server addresses" option.
Step 8: In the "Preferred DNS server" field, enter this IPv4 address: 1.1.1.1
In the "Alternative DNS server" field, enter this IPv4 address: 1.0.0.1
Step 9: Now, click the OK button.
Step 10: (Optional) Select the option if the "Internet Protocol Version 6 (TCP/IPv6)" stack is enabled in the network adapter properties and click the Properties button.

Step 11: Select the Use the following DNS server addresses option.
Step 12: In the "Preferred DNS server" field, enter this IPv6 address: 2606:4700:4700::1111
In the "Alternative DNS server" field, enter this IPv6 address: 2606:4700:4700::1001

Step 13: Now, select the OK option and click on the close button.
Step 1: Open Start.
Step 2: Now, search for cmd, and click the top result to open the command prompt.
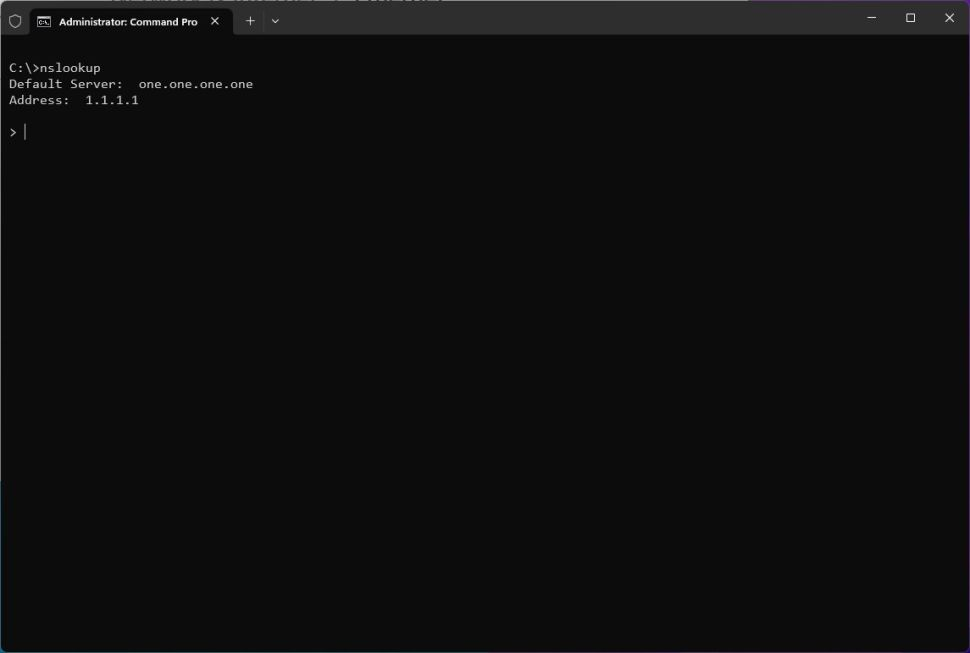
Step 3: Type the following command and press Enter: nslookup
The output of the command should include this result:
Default Server: one.one.one.one
Address: 1.1.1.1
If you're using the IPv6 addresses, then the output should look like this:
Default Server: one.one.one.one
Address: 2606:4700:4700::1111
If you're configuring your router rather than your computer, the nslookup tool will display your router's IP address. This is an expected result because your router is the one making DNS requests on behalf of all networked devices.
If this is the case, you can check that the Cloudflare DNS settings are correct by using your router's network tools (if applicable) and the nslookup method.

Whether one chooses to configure it on the computer or router. By configuring Cloudflare's 1.1.1.1 DNS resolver on your Windows 11, 10, or router, Users can enjoy a faster, more secure, and privacy-focused internet browsing experience.
Memorandum on GST Input Tax Credit Issues: A Detailed Analysis


-compressed.jpg)

